Tag: UK

Shooting Landscapes Handheld. You Are Joking!

Handheld

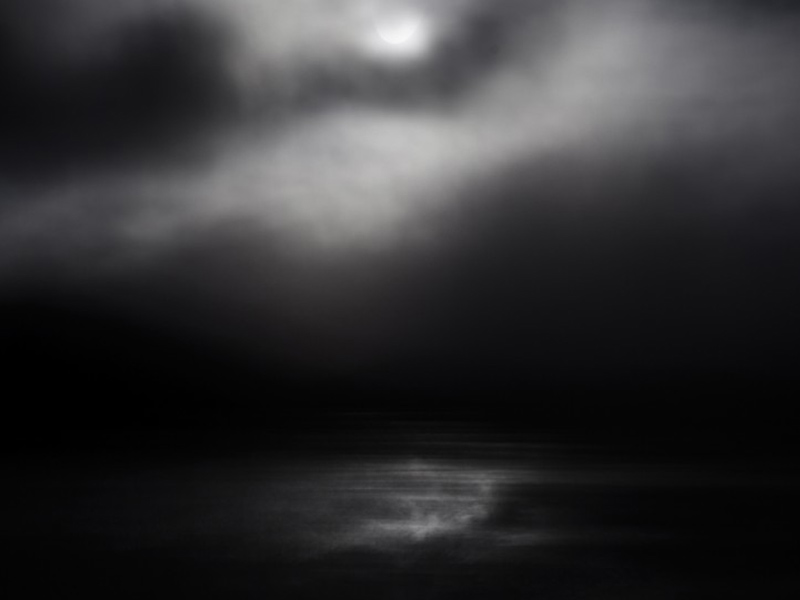
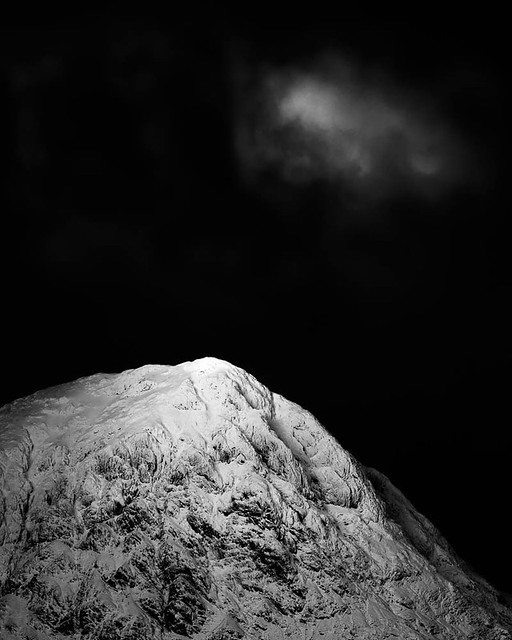
Dark Light III – Taken handheld from Rannoch Moor.

I have written some time ago about my thoughts on working with what you’ve got. Basically, the premise of my mantra is, if all you have is a 50mm lens, then shoot with it. If its raining, rather than giving you he technicolor sunrise you envisioned, shoot the rain. You get the idea.

Recently, on the day I broke my leg in fact, I had to work to my own maxim. 

I was leading a workshop up in the snows on Rannoch Moor and Glencoe, in Scotland. On the first day of the trip, just an hour into shooting my tripod head broke. It broke in a major way (and kudos to Manfrotto for replacing it for me straight away once they saw what had happened).

I tweeted about the failure and many of my followers replied with sympathy (and we all like a bit of sympathy). Several said how angry I must be feeling and how it would ruin my trip. I could understand their point of view but I just didn’t see it that way.

Kit fails. You have to get used to that which is why I have back ups or alternatives with me for virtually everything in my bag, including tripods and heads. Except this time. This time I was car sharing and to save space the one thing I hadn’t bought with me was my spare tripod & head. Ironic, huh?

Getting angry about it would have just spoiled the trip, it wouldn’t have actually changed anything. Here I was in the most stunning of locations with amazing light. I was going to work with what I had.

So this meant shooting landscapes, often in low light, handheld. 

So how did I approach this? I was using the Canon 5d mk2 and was happy taking the ISO up to 800 (and in very low light I went to 1600 at times – whatever it took to get the shot). I also went wide with my aperture. So I abandoned my usual preference for f11 (or f16)  most of the time and went wider, right down to f2.8 at times in low light, but often working at f8, all with a view to keeping the shutter speed high enough to get sharp images.

If this hadn’t been possible I would have gone over to shooting ICM (intentional camera movement) images. Again, working with what I had. 

Another approach I adopted was to shoot in burst mode. Firing three frames at least for each image to give me a better chance one would be sharp. It meant I came away with nearly 900 frames fom the day, but it did increase my success rate.

I also moved to auto focus. On a tripod, I use manual focus in Live View mode which is perfect, but hand holding it just isn’t practical to focus manually all day. There is no benefit in it, in fact, auto focus is perfect for just this situation. I use centre point focusing so I have complete control over what I am focused on. So I turn on just the centre focus point. I then point the centre of the lens very precisely at what I want to be my focus point, press the shutter button half way to lock focus and hold it there, reframe and then complete the shot. You can also use the Focus Lock button on the back of the camera in the same way. 

I found I got the best results using my longer lenses, especially the 70-200 f2.8 IS L zoom. This stayed on most of the day. The image stabilisation helped with sharpness and I followed the basic rule of thumb that you need to keep your shutter speed faster than your focal length so I tried to stay above 1/200 sec all day, using ISO and aperture to do that.

Another advantage of using the 70-200mm (and the 24-70 f2.8 L which I also used on the day) was they both have long full tube shaped lens hoods. On the day, blizzards kept blowing through and these hoods really helped to keep snow off the front element of the lens.

When I came to review the images later (and trust me, I had plenty of time to review them, lying in my hospital bed) I realised that broken tripod head had done me a favor.

I had an extraordinarily high “hit rate” for successful images on the day. I took many more that I was happy with than I normally would. I found I was able to react really quickly to the fast changing light up there. As the blizzards were blowing through we had amazing gaps in the clouds with shafts of light and wonderful cloud shapes. On a tripod I would have been faffing about and couldn’t have got half the  images I did. 

I also would have been shooting much wider lenses, 45mm or 24mm, out of habit and on reflection, images at those focal lengths wouldn’t have had the impact I got from the 70-200 lens. (For my wider shots with the long lens I shot several panorama sequences, all handheld, and Photoshop stitches them perfectly. It’s amazing).

I would also have been more likely to have been trying to use my Lee filters. This would have slowed me down even more and with the falling snow caused frustration and even more lost shots.

Yes, that tripod head did me a big favor. Of course, looking at it another way. If it hadn’t failed I would have had it with me later when crossing the river and would have been using it to steady myself so maybe I wouldn’t have fallen and broken my leg… But let’s not speculate.

So, the lesson. If something fails in the field or you forget something, work with what you have. Think laterally. Work around the problem. Find a solution. It might feel uncomfortable, but just do the best you can. Getting angry with yourself or your kit, or giving up and going home don’t help, and you never know, like this occasion, you might just produce something unexpected by approaching the problem with a positive frame of mind.

If its something really bad like leaving all your batteries or memory cards at home, then use your mobile phone camera. If that’s back in the car, then just sit back and enjoy the sunrise. There will always be another.

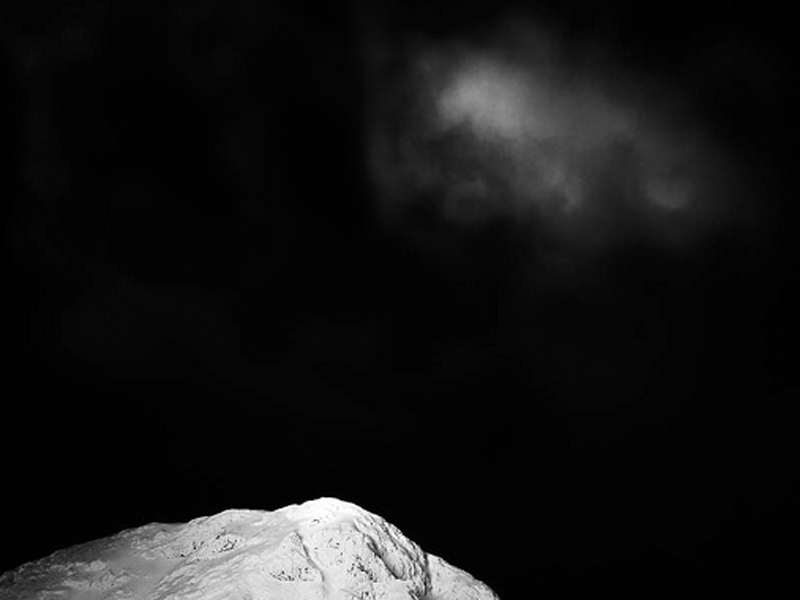
Dark Light II – Taken handheld at the mouth of Glencoe

How do I create light trail images?

light trails

Westminster by Night

Have you ever wondered how to go about capturing light trails? They look dramatic and add a dynamic feel to urban images and are easy to capture.

Before I go into technique there is an important factor about this image which lifts it above many light trail shots. The Sky. Its not just a case of shooting at night. In fact the ideal time is a short 15 minute period shortly after the sun has set. For architectural photographers and those after light trails this is the prime time to shoot. If you look at the image you will see the sky is not black, there is still some residual light (twilight) in the sky. In this brief period of minutes the light in the sky balances perfectly with artificial light which is why it is so perfect for capturing architecture and light trails. You can still shoot the light trails when the sky is black but the images won’t be quite as attractive. Have a browse of the finest architectural night photography and you will see the photographer works in this evening twilight period (or gets up early as a similar is experienced some time before sunrise).

Lets say you are in position at the right time. Get there well in advance so you can sort your composition out and get your exposure right before twilight. It is very frustrating to miss the brief twilight window becuase you weren’t in position and set up in time. Needless to say you need to be on a tripod with a remote shutter release. No graduated neutral density filters are needed as the camera can cope with the dynamic range of the image by this time. You may need a standard non-graduated neutral density filter (perhaps a 2-stop) to slow the exposure down if you are getting too short an exposure for the effect you are after (alternatively, you could use a narrower aperture, say, f16. I would avoid using f22 unless I was forced as the image quality will degrade due to ‘diffraction’, but thats another whole issue!)

For these images the lenght of the exposure is as important, if not a little more important, than depth of field. For my shot of Westminster I worked at f11 (which gave me sufficient DOF and kept me close to the sweet spot of the lens (around f8 would be about perfect). At ISO 100 (for the lowest noise possible), this gave me an exposure time of 4 seconds on my 24mm TSE lens. (As I was using a tilt and shift lens, I could have worked at f8 and used the tilt mechanism to give me the depth of field I needed but I was working quickly and didn’t want to complicate matters).

I test out several shutter speeds before the light gets to its best so that I am ready. The speed of the traffic and the brightness of the lights will dictate the length of exposure. Faster moving vehicles need a shorter shutter speed than slower vehicles. In my case, timing was vital. I could have shot when just cars were passing but I found it was worth waiting for a bus to appear as this gave a wider stripe of lights because of the upstairs windows. I fired the shutter, using a handheld remote release, a fraction of a second before the bus entered the frame. A few buses later, I had my image, the light dropped and it was time to head off for more night shots around London.

If you would like to master low light and night photography, why not join me on one of my London Night Workshops. We even have a London Black Cab to drive us around all of the best locations all night. Drop me an email if you are interested as these are selling out before I can list them on my website.

New Exhibition of My Work

Dark Light

New Exhibition - "Dark Light"


I have been to Gainsborough today to hang my new solo exhibition entitled, “Dark Light”

It is being hosted at the Trinity Arts Centre in Gainsborough and is an exhibition of monochrome photographs. The Arts Centre is a council run location dedicated to the promotion of the arts in North Lincolnshire. The gallery space doubles as a mingling and bar area outside the main theatre and so is ideally placed for people visiting for performances to browse the images. If you happen to live in or near Gainsborough I would love you to pop in and take a look, but please don’t make a special journey.

The exhibition consists of 16 images (it was planned for 22, but the gallery didn’t have enough hanging clips to put all of the images up, requiring an on the spot rejigging of my hanging plan – the joys of exhibiting!). Here are a few iPhone images from the venue to give you a feel for what it is like.

Trinity Arts Centre Gallery

Main Wall

Side Wall

The Curved Wall

Here is a quick montage of some of the images on display

Montage 1

Montage 2


If you would like to go and see the exhibition, the gallery is free of charge. Opening times are;

Monday – Closed

Tuesday – Closed

Wednesday – 10.30 – 3.30

Thursday – 10.30 – 3.30

Friday 10.30 – 3.30

Saturday – 9.30 – 2.30

Sunday – Closed

The gallery is also open for performances – see the Trinity Arts Centre web site or Facebook page for details.

The address is

Trinity Arts Centre

Trinity Street

Gainsborough

DN21 2AL

(There is a car park (free) at the back of the centre but its a bit tricky to find. Drive past the centre on your right and go a few more yards to the roundabout where the big Tescos is and turn right. The road bends around to the right as you go around the corner you will see a row of terraced houses ahead on your right. Immediately after them is the entrance to the car park).

If you ever get the chance to hold your own exhibition, what do you need to know?

The first thing is, don’t expect to make a lot of money from sales. Its a sad fact in the UK that most people don’t value photography as art and as a result are very reluctant to put their hands in their pockets to buy images. If you have tried selling prints from your website you have perhaps realised this. True, some do make a good amount of money from print sales but this is usually because they are a big name and their images are of the very finest available or their name alone makes the images collectable. In fact, expect to make a loss if you hold an exhibition. The costs to hold one are high. For a start, many galleries charge you a fee to exhibit, whether you sell or not. They also take a commission on any sales and this can be from 25% to 60% of the sale price. Now factor in your printing costs (whether home printed or outsourced), framing costs and your time getting it all printed and framed. You also have to make labels for each image (mounted on foamex board) as well as writing an artists statement, designing a poster and producing a price list. You have to drive to the venue and spend a few hours hanging the exhibition on your own, the gallery rarely help in this. Then drive home, perhaps drive back for an open evening (for which you provide drinks and nibbles) and drive home again. Then at the end of the exhibition drive back and take it all down and drive home again! You can see why it is difficult to make a true profit if you factor in all of the costs.

Before you exhibit you need to be clear about what the gallery provides and what they expect you to provide. Some of the better ones will provide the drinks and nibbles, for example. Most won’t. Many expect you to provide all of the packaging for any items sold. if people buy prints or framed prints you will probably be responsible for posting them to the buyers unless the buyer is willing to return to collect them.

You need to be clear on insurance. Some galleries provide a certain amount of insurance cover if works are stolen or damaged. Will this cover your work. If they don’t provide cover, you lose if anything happens to a picture or pictures.

Be clear with the gallery too, on what advertising they do for you. Do they have a website and will they use it to promote your exhibition? Do they use Twitter, Facebook etc. Do they have an emailing list and will they use it to mail their clientele? In reality, many galleries are poor at advertising on your behalf. They leave it all to you, so what is your ‘reach’ as regards advertising? Are you on social networking sites and if so are you suing them to promote the exhibition? Do you blog, use Twitter and have a mailing list? If not, who is going to know about the exhibition apart from your close friends? Do you have the gumption to ring the local newspaper and see if they will run a piece for you? Are you up for contacting the photography magazines to see if they will list your exhibition? This is all additional time you need to spend to make the exhibition a success while remembering you are still unlikely to sell any or many prints!

In smaller local exhibitions you are more likely to make sales if your images are of local scenes. Also seasonal scenes sell better, so if the bluebells are out bluebell images sell better, for example. More ‘arty’ and creative work has a lower chance of selling because it will appeal to a smaller audience, however will, perhaps, command a higher price.

This leads us to the age old question of what to charge. You can approach this one of two ways. Most people add up the cost of the paper, ink, frame and so on and then add a bit on top. This is called ‘cost plus’ pricing. If your frame, print etc costs you £25 and you charge £50 it sounds like a good 100% profit. But remember, the gallery will take a huge slice and you are unlikely to have factored in the true costs I have listed above. In reality, if you are charging any less than £100 or more you are making a crushing loss IN REALITY, whatever you are fooling yourself into thinking. The second method of pricing, is to view your work as art. This takes courage and also lessens your chances of selling anything! Here, you think less of the costs involved and place a figure on your work based on the fact you feel it has, and will increase in, value. You are thinking more like a painter or sculptor. So you may value prints at £250 or whatever. This is a brave photographer who takes this approach as sales become even further apart. Ask yourself, would you spend £100, £200 or more on a framed print from a photographer you have never heard of who is relatively low profile? No? Neither will they. Why? Because they think they can go to Ikea and get a very nice framed print for £20 and then when they redecorate they take it to a charity shop or car boot sale and buy another that fits with the new decor. The English do not value photographs as art in the way the Americans do.

So this all sounds very pessimistic. Why on earth exhibit? Good question. If you are in it just to make money, don’t. However, if you want to invest in your profile or want the world to see what you create and are prepared to take criticism as well as plaudits, it is a lovely thing to do. It does bring kudos and respect from fellow photographers. It is also a starting point. I am sure Charlie Waite, Joe Cornish & Michael Kenna went through these early loss making exhibitions. But because they were prepared to put themselves out there and make the investment in time and money gradually, and because they have real talent, they became more successful. Now Joe has his own, amazing, gallery (one of the few UK photographers who make a success of this) and images by photographers such as Charlie and Joe command good prices and have become collectable in their own right – they have broken the glass ceiling so it can be done. One day someone who runs a ‘better’ gallery may walk in and be impressed with your work and offer to represent you long term (this is the route Michael Kenna has taken – working with galleries for years who display and sell his images all year around as well as holding solo exhibitions on top of these). A publisher may see your work and ask you to do a book. A print manufacturer might be scouting for talent. If we don’t promote ourselves, even at a loss, we will never know. If we really want to make something of our images then we should view an exhibition as an investment in ourselves and go in with our eyes open. This saves us from disappointment.

I hope this helps you if you are considering exhibiting. I am not trying to dissuade you at all. I just want you to know what it is really like. If you accept this it can be a very fulfilling and positive experience and if we make some money too, so much the better.

And to finish, heres another image you can see at the exhibition.

Thinking of Winter


Adventures in Polaroid

Polaroid

Avast, Me Hearties!


As many of you will know, I do like quirky photographs! Among the styles I love is the Polaroid. My dad had one when I was young. Being keen on holding on to his cash, he resented having to pay Boots or Bonusprint to develop his films and so thought Polaroid was the answer. He soon realised the costs were similar, you, in effect, paid up front for the instant development of Polaroids in higher film costs and so once the novelty had worn off the camera rarely came out to play.

Ever since, I have loved the washed out images the Polaroid film produces. There are digital tweaks you can make to imitate the look, but nothing really compares to true Polaroid for that sixties/seventies feel. Like many, I was so disappointed when, in 2008, Polaroid announced they would no longer be making the film – again economics took priority over art. However, a small group of dedicated European Polaroid lovers put their faith in the medium and with great foresight bought the old Polaroid film making machinery that was being sold off. They had no idea how to make the film. No idea of the chemicals involved. Oh, and they had no money.

Kippers by Post

Thus started the ‘Impossible Project”. The name came from the fact that whet they were trying to achieve was deemed ‘impossible’ by everyone they asked but this just seemed to make them all the more determined to succeed. To raise money they started a website along the crowd-funding principle. They asked Polaroid lovers world-wide to commit to buy a certain amount of film if they could make it. Once they had enough pledges they called the money in, bought a load of chemicals and put on the rubber gloves. I am sure it would make a great movie, because, against all the odds they succeeded in making  batch of film. (you can read the full story here). From there, the team have gone from strength to strength and employ 25 people, many of whom originally worked for Polaroid.

Fishing Boat - Whitby Harbour

A few words about the film itself. They make a colour and a mono film. Both are, shall we say, very unpredictable. VERY unpredictable. But it is this unpredictability which makes them so good in my eyes. The film has to be shielded from light in the first few seconds after shooting and can take half an hour to develop (best done in one of the film boxes). In fact, it can continue to develop for the next 24 hours. Sometimes the chemicals don’t mix correctly. The exposure can be all over the place. Flare and other aberrations abound. I am currently using some of the early close to prototype film which they sell at a reduced price and so am experiencing extreme quirkiness. The new generation films they have released this year apparently show greater consistency.

I bought an old Polaroid camera from eBay and adore it. The film packs are expensive (think, about £1.50 an image once postage is factored in) but the packs are well made, quite complex and contain a battery to power the camera and flash, so there is a lot going on. You get eight shots per pack and it is best kept in the fridge (DO NOT freeze the film). The camera is totally retro and I feel like a seventies Dad walking about with it. I used it in Whitby earlier this week sand people were stopping and staring 🙂 It got a great reaction. The Impossible Project have plans on the drawing board to make a new Polaroid camera, so exciting times lie ahead. The project has been such a success that they are opening Polaroid shops in capitals around the world to service customers. I got my film, from Germany, via UPS in a couple of days.

Camera meets Camera

Today I put a pack of the Silver Shade mono film in the camera and am blown away by the results. The tones are beautiful. I can’t wait to use the new generation of mono film they have released. I have one pack but am going to use up the old batch film first. new products in the pipeline will please large format film users as they are working on 10 x 8 and 4 x 5 versions of the film which was used by many large format camera users to test exposures and for quick client approval shots. The possibilities are endless.

On My Desk


I am keen to get out with the camera as soon as possible to continue experimenting. Ideas I have in mind are a trip on a train with just the Polaroid to see what it brings. Also, I would like to try some urban decay as well as ‘seaside’ photography. If you decide to give it a go, be warned, it is addictive and could be expensive but the results can be wonderful. Even the ‘spoiled’ frames can become happy accidents that in their own way are works of art. I enjoy the lack of precision and unpredictability of the Polaroid. I love the retro feel of the images and the tactile nature of holding a Polaroid in your hand to admire it. I already have some which I will frame for my walls. No doubt you will be seeing more of them from me in the near future.

If you fancy dabbling in film photography to see if it is for you, why not consider joining Jonathan Stead and myself on a film based workshop in September. We provide the camera (if you need one), a roll of film and show you how to develop the film cheaply and easily at home (without any need for a darkroom). You can get full details here — Go on, come and try some ‘real’ photography and enjoy the pleasures of analogue.

Me, myself and I

How do I create Panoramas?

Panoramas

Before getting in to answering this question I just wanted to mention I am running a “Capture-to-Computer” workshop in Skegness, Lincolnshire on Saturday 21st January 2012. One place is taken but there is one free place left. The basis of the workshop is creative and artistic photography – blur, ICM (Intentional Camera Movement) and textures. The morning will be spent with me showing you the techniques for shooting this style of image and then after a meal (included) I will spend the second half of the workshop showing you how to process these images in Lightroom and Photoshop. If you would like to book the second place the price is £149. Please drop me a message and I will organise it for you. Right, now on with the business of making panoramas!

I love panoramic images and with modern digital cameras and software they are easy to make. I find myself rejecting the use of super wide lenses in favour of making panoramas more and more in my photography. I am not keen on the heavy distortion that comes with the super wides and the converging verticals they create. With a panorama I can get in even more width and maintain a natural looking image with far less distortion.

You can by purpose made panoramic tripod heads, such as the Panosaurus, which are designed to rotate the camera on the ‘nodal point’. If the camera is rotated while held on this point and kept absolutely level will allow it to create almost perfect panoramas with little distortion and a very natural look. However the heads are expensive and you either have to have them fitted to a dedicated tripod or be prepared to switch heads in the field, and few of us are that dedicated or have the backpack space to carry two tripod heads.

There are two very acceptable alternatives which are ideal for most of us and I use both in my image making. I will cover both methods here. You can use a tilt and shift lens (the expensive but easier option) or you can use a standard prime or zoom lens. Both require stitching images together in software and both produce great images if done carefully.

So, if you want to make high quality panoramas, how should you go about it? The first step is to get your tripod as level as possible and make sure the camera is as level as possible on the head. This is far better than angling the camera slightly upwards or downwards. The more our of level the tripod and camera are, the more distorted the final image and the area you will need to crop away from the edges of the pano will be larger. I use the small round level bubble on the top of my tripod below the head to level the tripod itself. This can be fiddly as you need to tweak the leg lengths to get it right but it is worth doing. I then level the camera on the head using my hotshot spirit level.

Next is getting the settings in the camera right before you start shooting. It is critical that nothing changes between shots or you will not be able to seamlessly stitch the image. Turn off auto focusing on your lens so the focus point does not change between shots. Switch the white balance to daylight so it doesn’t alter between shots. Zoom out further than you want to to allow for cropping the stitched image which you will have to do to a greater or lesser extent. Don’t frame the image as you want it to finally appear as some of the edges will be lost. Start the panorama further to the left or right than you want to for the same reason. I use the camera in portrait orientation for panoramas to give a larger file size and more depth for cropping (unless I am using a tilt and shift lens, but I will come to that later).

Working in aperture priority or manual, choose one area of the pano to set your exposure and focus. The exposure is often the tricky part, especially around dawn and dusk or when the scene has high contrast. I tend to aim to set my exposure based on the area of the pano which is almost the brightest. I take a test shot to get the histogram across to the right. You have to accept then, that as the camera moves to wares the darker area of the pano it will begin to under expose but we can tweak this later in the software to balance the image. I set my neutral density graduated filters for the same frame as the one I use to set the exposure. You have to accept that as you take the other frames the positioning of the grad may not be quite perfect, especially if the land rises or falls across the width of the range of shots but it will look worse if you try and move the grad up and down for each image. (I prefer to use soft grads for panos to make the transition line less obvious).Do not use a polarising filter when doing panos as this will cause havoc with the look of each frame and you won’t be able to stitch the images acceptably. Focus hyper focally or on a point very close to the base of the frame. I usually use f16 for panoramas to give a bit more latitude on depth of field, whereas in my other landscape work I am usually trying to get the aperture to f13 or f11.

Once you are all set up rotate the camera to the left or right hand end of the pano sequence. Remember go further left, or right, than you want to include in the final image you have in mind. I then take a single shot with my hand in front of the lens with my thumb up. This tells me the next image is the start of a pano sequence. Once I have taken the final shot in the sequence I take another with my thumb down. This indicates the end of a sequence. Believe me, you will be pleased you did when you get home as it can be hard to tell which images are for panos.

Take the first shot and then rotate the camera for the next as quickly as possible. The absolutely critical thing to remember is to overlap each frame by at least 30%. It is better to overlap by 50% than to go lower than 30%. The more data and overlap Photoshop has to work with the better the quality of the panorama you will get. The reason for working quickly during the sequence shooting is to minimise movement of objects in the pano. Anything moving makes it harder for the software to do the stitch, so scudding clouds, branches of trees blowing in the wind and so on can cause issues.

Don’t forget, panoramas don’t have to be horizontal. For a really different type of image use the same system but shoot vertically. Vertical panoramas look great on the wall.

Back at home on the computer there is some very specific things you can do to make the panorama stitching go well. I use Lightroom to work on my raw files so the screenshots below will show that, along with Photoshop for the stitching but Elements works in just the same way although the menu items might be in slightly different places. You can also get specific panorama stitching software but I have never used this so can’t comment on it.

Import the raw files into Lightroom. Do not allow the import dialog box to apply any changes to the images on import such as adjusting white balance or applying some preset as this will make stitching difficult or impossible to do seamlessly. It is vital you don’t do any work on them whatsoever before they are stitched. Find the sequence of images and shift click to elect them (this is when the thumbs up and thumbs down shots are a big help, but obviously don’t include them in the stitch!). Right click the selected images and select Edit in >> Merge to panorama in Photoshop. (see screenshot below)


This will open Photoshop (or Elements) with the following dialog box open


On the left hand side select the Auto  radio button and in the centre area of the window you will see the list of raw files you are using. Click OK. Now just leave Photoshop to do its thing. It will take a while depending on how many raw files you are stitching and how fast your computer is. On slower machines you will have tome to go and make coffee :).

Once stitched the image will look something like this;

Now you can see why cropping is required. In the layers panel you can see how Photoshop has stacked the three images and then masked them to achieve the stitch. The next step is to flatten the layers and then crop the image to the panoramic shape, losing all of the irregular edges. I then save this image as a tiff (or psd, if you prefer) and take it back into Lightroom. Now you can start making adjustments to the exposure, contrast, clarity and so on because now it will be across the whole image and will look right.

Once you have made the adjustments you want in Lightroom, move the image back to Photoshop for any final tweaks and adjustments there, and you are done.

The process is identical with Tilt and Shift lenses, with a few differences. Firstly, when doing horizontal panos you keep the camera in Landscape orientation. You make the sequence of images by using the shift mechanism and make three images, one shifted all the way to the left, one in the centre position and the final one shifted all the way to the right. All the information above about levelling and camera settings still apply and the stitching process is identical, you just need the three shots. The advantage of this method is the overlap the TSE lens produces is way beyond 30% so the stitch works well and the amount that needs to be cropped away is usually less as the lens tends to give a clean stitch if the tripod and camera have been set level.


So, why not have a go next time you are out with your camera. They are great fun to make and can be quite addictive. Enjoy!


New Digital Photography Workshops for Winter/Spring 2012

digital workshop

Here is the new winter/spring 2012 workshop schedule for my digital photography workshops.

I am introducing a range of new workshops and locations for 2012. You will also see I have teamed up with two more very talented photographers as co-leaders on some special locations. I will be posting full details of these workshops on my website in a few days time and soon you will be able to book and pay online via PayPal. Direct booking via email will still be available.

As a special offer for the new season I am offering the first ten who book and pay their deposits a 10% discount off of the cost of a workshop in the schedule. This does not apply to Capture-to-Computer workshops but will apply to one-to-ones. (just four reduced places now remaining)

If your family or friends are struggling to buy the perfect gift for you, why not suggest they buy you one of my gift vouchers. They can select any value they wish from £10 upwards and it can be redeemed against any workshop, one-to-one or Capture-to-Computer workshop of your choice. If the value of the vooucher exceeds your chosen workshop I will refund the difference or it can be credited towards another workshop. If the workshop exceeds the value of the voucher you can use it in part payment. I even send you a blank greetings card with the voucher with one of my images on for you to present the gift to a loved one.

JANUARY

6th & 7th – ‘Coast & Castles’ Northumberland, with Antony Spencer (now a Light & Land tour leader). Two days photographing the spectacular coast of Northumberland so beloved of photographers like Joe Cornish, including three castle locations. £149 per day or £125 per day if booking both days. Includes breakfast. Does not include accomodation.

13th – Capture-to-Computer’, Yorkshire Coast, Yorkshire Limited to two people & includes breakfast. £149 per person

16th – Black & White Landscapes, Peak District. Includes processing in Silver EfEx Pro & Photoshop. Includes breakfast. £70 per person

22nd – Beginners introduction to your camera, Clumber Park, Nottinghamshire. Three hours approx. Any camera no matter how basic. £35 per person

23rd – Complex Compositions – Bole HIll Quarry, Peak District. Includes breakfast. £70 per person

30th – Peak District (New Locations) includes breakfast. £70 per person

FEBRUARY

11th – Lakeland Landscapes. A day spent photographing classic lakeland locations. Includes breakfast. £70 per person.

18th – Northumberland. A day photographing the finest coastal locations in Northumberland. Includes breakfast. £70 per person.

24th – Capture-to-Computer, Somerset coast. Limited to two people and includes breakfast. £149 per person

25th – Black & White Photography, including long exposures, with co-leader & mono specialist, Paul Wheeler. Weston-Super-Mare. Inlcudes breakfast & ‘how-to’ pdf’s. £99 per person.

29th – Peak District Landscapes, Half day, including refreshments. £45 per person.

MARCH

3rd – North East Coast – Nature & Industry – Saltburn & Paddys Hole. £70 per person including breakfast

5th – Peak Woodlands, Bole Hill Quarry. Includes breakfast. £70 per person

9th – Capture-to-Computer – Yorkshire Coast for Seascapes & Long Exposures. Includes breakfast. Limited to two people. £149 per person

10th – Long Exposures, Yorkshire Coast with long exposure specialist, Noel Clegg. Includes breakfast. £99 per person.

17th – Capture-to-Computer, Spurn Point, Yorkshire. Limited to two people, includes breakfast. £149 per person.

18th – Beginners introduction to your camera, Clumber Park, Nottinghamshire. Three hours approx. Any camera no matter how basic. £35 per person

APRIL

2nd – Peak District Landscapes, with Antony Spencer. £125 per person, includes breakfast.

3rd – Peak District Landscapes, with Antony Spencer. £125 per person, includes breakfast.

10th – Private macro workshop for members of the Nottingham Photographic Society.

13th – Bole Hill Quarry, Peak District woodland landscapes, half day, including refreshments. £45 per person

22nd – Peak Landscapes, half day to sunset, including refreshments. £45 per person

28th – Bluebells in Ashridge Forest, Buckinghamshire with co-leader Tim Smalley. Includes breakfast. £99 per person.

I look forward to seeing you on a workshop soon

Best wishes

Doug

Some recent testimonials from customers;

“Just wanted to say a huge thank you for a fantastic weekend!”

“I thought all the venues were spot on and enjoyed the fact that both of you brought so many different skills and knowledge to the event.”

“Since I started doing “serious” photography about 7 or 8 years ago I’ve been on at least half-a-dozen workshops or courses. I gained more from this one day than I have from all the others put together.”

Landscape Photographer of the Year 2011

LPOTY 2011

I am pleased to announce that this image of mine entitled ‘Scintilla IX’ which forms part of my ‘Lone Cloud’ project has been commended by the judging panel in this years Landscape Photographer of the Year competition. As such it will be featured in the AA Publications book of the winning entries which is to be published in November. It will also form part of the exhibition of the winning images in an exhibition at Londons National Theatre on the South Bank.

Top ten tips for photographing seascapes

Landscape photographers love the chance to photograph the sea. We love the wide horizons, big skies and the magnification of the glorious light at dawn and dusk reflected in the water. To make the most of your trips to the coast here are some tips for making great seascape images.

1. Go prepared. Welly boots, while not glamorous, are the best footwear on the shore. They allow you to work in soft mud, lapping waves and rock pools without worrying about getting wet, cold feet. Neoprene lined wellies are more expensive but much more comfortable and warmer than cheaper brands. I have also found seawater rots the adhesives and stitching in modern walking boots. I had a pair of new boots fall apart after a trip to Skye due to me wading about in seawater for two weeks.

2. Check the tides in advance. Often the best time to make seascapes is with a falling tide at sunrise or sunset. The exposed rocks and sand will be wet from the receding tide which reflects the light in the sky and adds much more interest than a drier foreshore with an advancing high tide. To find the tide time for your location enter the name of the nearest harbour or port into Google along with the words ‘tide table BBC’. this will bring up a link for the generally reliable tide tables on the BBC website. If you don’t live in the UK just enter the nearest harbour name and the words’ tide table’ and you should get a link for your country. Being aware of the tide times also helps you be aware of not being cut off from the mainland by a fast rising high tide. Very easy, believe me, when you are engrossed in making images.

3. Check where and when in relation to the location the sun will rise and set to find the best time to visit that location. The best way to do this is to download ‘The Photographers Ephemeris’. This free software uses Google Earth and shows on the map exactly where the sun and moon rise and set in any location on the planet on any day. One of the best bits of software a landscape photographer can have on the computer. You will find it here. There is even a version for the iPhone.

4. Take a towel, lens cloth and lens cleaning fluid. You will find, even in quite calm conditions that your lens and filters start to get coated in salt while making images at the sea. This soon ruins images. Keep an eye on this and clean your glass regularly. I also have a golf towel clipped to my tripod for quickly drying off salt spray from the camera and for draping over the camera if the waves start to get high.

5. Wash you tripod legs in fresh water after a seascapes session. Tripods often get stood in seawater to get the perfect shot, and get coated in abrasive sand from beaches. To preserve your kit, wash it off well with fresh water after the shoot.

6. Get there early. I usually get my best seascapes 30, 45 minutes or more before the sun is due to rise. Trust me, that extra 20 minutes in bed is not worth missing the best light for.

7. Stay late. As with the preceding point, at the end of the day i often get my best images up to an hour after the sun has set. Don’t pack up and go home when the sun dips below the horizon – keep shooting.

8. Get the tripod down low. So often photographers fully extend the tripod legs so the camera is at head height for comfort or out of habit. Get down low for more interesting images with a different perspective.

9. Use ND filters. ND filters from 2 to 10 stops help lengthen exposures and create wonderful effects on moving water and clouds. The 10 stop filters, such as the Lee Filters ‘Big Stopper’ enable me to shoot great seascapes long after the best light has gone thus lengthening the shooting time on location. they also enable great images to be had in poor light and cloudy conditions.

10. Shoot details. it is easy to just shoot the wide seascape before you and to miss some of the beautiful ‘intimate landscapes’ of the shore. Rock patterns, seaweeds, shells and pebbles, patterns in the sand, beach furniture and buildings and so on.

I hope you have found these tips helpful. I would be interested in hearing from you if you have tips to add.

If you would like more help with improving your seascape photography, please use the form on the right to add your email address to my mailing list. You will get advanced notice of all of my future seascape and other workshops before they are announced elsewhere.

New website launched

As you will have noticed my website has had a complete makeover.

I was quite happy with the look and feel of the old design, in fact, I feel the look of this one is not as good but there is a reason for the change.

While the design was fine to my eyes, in Googles eyes it was repulsive. The old site was created in Apples iWeb program which is great if you need a very simple web design program. Everything is drag and drop, click and re-size, WYSIWYG etc. However to make it so slick and simple the program is creating horrendous code in the background which Google takes one look at and walks away from in disgust. Sadly in this age, if we are running a business and need traffic to our site then we need to feed Google what it wants. hence I have taken the plunge and created this site from scratch using WordPress.

WordPress is free, open source software originally created for blogging but it soon became apparent that it was ideal for creating websites too. If you just want a blog you can sign up on the WordPress website http://wordpress.org/ and they will host a lovely free blog for you but if you want a website using the software it becomes a whole lot more complicated. You need to download WordPress from them (which they are fine about) and then sign up with an Internet hosting company that supports WordPress websites. They need to be able to run MySQL databases (which runs under the WordPress bonnet (hood, for my American readers!)  and organises all the data and be able to run php (whatever that is?). I opted for a UK based company, www.1and1.co.uk, which many people complain about and yet I have had no issues with at all.

You use an ftp program (I used the free and excellent Filezilla) to transfer the WordPress files to your bit of webspace hosted by 1and1 in my case. Then you start the installation and configuration of your website which is all done through your web browser. This is where for the first two weeks I had a nightmarish time. Every help file I looked at for hand-holding and guidance seemed to make assumptions that I knew stuff. This is stuff I now know, but at the time with no experience whatsoever it was very frustrating. You will get detailled instructions on a stage in the process which is ideal and then they will drop in a sweeping statement with no explanation of how to perform that step. Stage 5, reconfigure the widget module for multi-spronged upwiggliing. WHAT! Then followed endless trawling of help forums reading the posts of exasperated newbie WordPress users like myself who had come up against the same wall and after much searching I would find a kindly soul who had taken the trouble when they had discovered the answer to go back and write a short detailled description. With this, it became simple again until the next sweeping statement was reached.

But, by sticking to my task like Frodo and Sam on their quest, I eventually came out of Mordor and to the point where I could start actually building web pages. Here things got simpler ad I was soon steaming through the laborious process of moving the old website to the new.

What I do like about WordPress is all the widgets which you can integrate into the site to do things I could never do with iWeb. Things like have a subscription form that works for people to sign up to my free newsletter (its over on the right of this page, by the way – fill it in for me to test it, thanks!). I am also able to have the ‘Contact Me’ form instead of having to put my email address on the website. I love the Twitter, Flickr and RSS buttons which are so easy to add so people can follow me trough other channels easily. But most of all, I love the way Google loves WordPress sites. I am hoping I begin to turn up higher in searches for photography workshops in the UK, for instance.

I am not happy with the look of the site. It is okay but I now need to get my head down and learn how to modify the code you can’t see to get the look and feel I am after. There are some glorious websites made in WordPress out there and I want mine to be as good looking and as easy to use as those.

Plans I do have which will be implemented in the next week or so include a downloads page where I have some ideas for free downloadable pdf’s that you can grab and print out for use in the field – sign up for my free newsletter for an announcement of when they are up and available.

I am also going to go back through my old blog posts and upload all the most popular ones, the ‘to-do’s’ and ‘how-to’ articles so that there is a base resource here to start the new site off. This is useful to my readers and also gives more food for Goggle because that hungry content monster needs feeding. If the food is good, it keeps coming back for more.

I would welcome your comments on the site, good, bad and indifferent as well as any thoughts you have on how I can improve it.