Tag: photo

Seaworks 1998-2013 by Paul Kenny

Seaworks by Paul Kenny

I first became aware of a man, Paul Kenny, several years ago through an article in, I think, Outdoor Photography magazine. I read about a photographer who was visiting, annually, a small stone sheep pen by a beach on the west coast of Scotland. Here he camped for a week or two each year and photographed this sheep pen. The rocks, the lichen, the patterns, shapes and forms. The enclosure had been built no one really knows how many centuries or millennia previously, the rocks used were beautifully round, smooth and encrusted in lichen which grew painfully slowly over generations of mans existence, populating their own spherical worlds, forming continents and islands of life. I had never come across such devotion and application in a photographer before and he really made a deep impression on me.

Aurora Hunting in Norway, Trip Report, Day Two

aurora hunting day 2

Last night Tony and I took it in shifts to keep a watch on the skies and the aurora reports but sadly the auroral activity was extremely low and there was nothing to be seen here despite broken cloud. At least the group had a long nights unbroken sleep to get over jet lag.

We headed out after breakfast into great soft pink light (the image above was one I managed to grab from one of the mornings locations). The temperatures here were below freezing all day and are currently around minus 10 a few miles inland. Here on the coast they are a little higher at around minus 2 to 4 but the wind is rising so it feels much colder. No snow has fallen after yesterdays blizzards.

The group were getting used to working in such cold conditions. You soon learn not to let snow get onto your gear. For example, I dropped a body cap into the snow. It would have been crazy to put this on to the body of my camera. The snow melts in the bag then when the camera gets cold the snow then re-freezes causing damage or sticking the cap into place. One member of the group had her tripod head accidentally dropped in the snow. This quickly froze the ball head, which we had to defrost on location.

Keeping yourself warm is key too. As hands get cold it quickly becomes impossible to operate the camera, so, even though it slows down picture making, it is important to wear gloves (only removing them when necessary and putting them back on again as quickly as possible). Hats, gloves and warm coats are all very necessary. Decent boots here are very important. Not only do they need good grip for walking on compacted snow and ice but they also need to have good thermal barriers in the soles to help keep the feet warm when standing by the tripod for long periods. I am wearing North Face Chilkats and they are performing perfectly.

Fuji X-Pro 1, Handheld, 35mm f2 lens, ISO3200, f14, 1/17 sec

At these temperatures the cameras are working well. Batteries do drain more quickly but it is not so cold that this is becoming a real issue at this stage. It is also not so cold yet that we have to put our cameras in poly bags when returning them to the vans to stop condensation forming and refreezing. This becomes an issue when the temperature gets lower – closer to minus 20. Then it is vital to bag and seal the camera body and lenses in sealed poly bags when moving from outside into the van or a building. This helps stop condensation forming. The condensation is not too much of a problem until you take the gear back into the cold when it instantly re-freezes. This kills cameras and when on the front of lens elements will need to be scrapped off, much like scrapping ice off of a car windscreen. Not something you want to be doing with your beloved pro-lenses.

For those interested in how the Fuji X-Pro 1 is performing I have a few things to mention. It is interesting. I am finding the Canon 5D mk3 easier to use with gloves on and some of the scenes are so stunning I am feeling the need to use the bigger sensor. I have noticed the ‘function’ button gets a bit sticky in the cold when it drops very low (I have the button programmed to quickly change the ISO). I haven’t been using it for long periods so I can’t say battery performance has seen a noticeable drop in performance. The image quality continues to be superb.

As we haven’t seen the aurora yet, I can report on how it performs being pushed to capture that!

We covered three locations today. The first was an inland fjord (you can see an image from here at the top of this post). Ice was forming at the edge of the fjord and the pink light in the sky was beautifully subtle. From here we moved to a small frozen lake with a range of jagged mountains behind. The group worked on capturing the snow, ice, small silver birch tree with some stunning Alpen glow on the mountains behind. Our final location was another fjord, with a great jetty to use as foreground with rugged mountains and delicious silvery blue light. Great for a lengthened exposure just to flatten the water a little. My image is shown below. Once we had finished here (which included shooting a lovely fisherman’s hut full of textures and detail) we dived into a coffee shop for some well earned Lattes and chocolate brownies (well, its not all work on these trips, you know!).

Back at the hotel we are now resting in our rooms prior to our evening meal. On an aurora trip its important to use the afternoon darkness to sleep in case we spend the night out shooting the skies. Over the meal we will consult the space weather, cloud cover, and auroral activity reports to see if everything might come together in our favour. Who knows what the night holds. (23:30 update – sadly the cloud has rolled in and although the charts show a little auroral activity it is impossible to see it. Even with no activity we had planned to go out and shoot star trails but with heavy clouds, a rising and biting wind with heavy wind chill this was just pointless, so it is back to bed. There is always tomorrow).

A New App from the Maker of the Photographers Ephemeris

new app ephemeris

I was very privileged to be asked by Stephen Trainor earlier this year to be one of the beta testers of a new app he has designed to complement the hugely successful and absolutely essential photographers app, The Photograpers Ephemeris (TPE).


TPE has been around for a while now and is available as a desktop program or as an iOS or Android app. For most landscape and outdoor photographers it has become an essential part of their location planning kit. I couldn’t imagine doing my job without it. I also can’t imagine the brains and ability that has gone into designing such a complex and useful program.

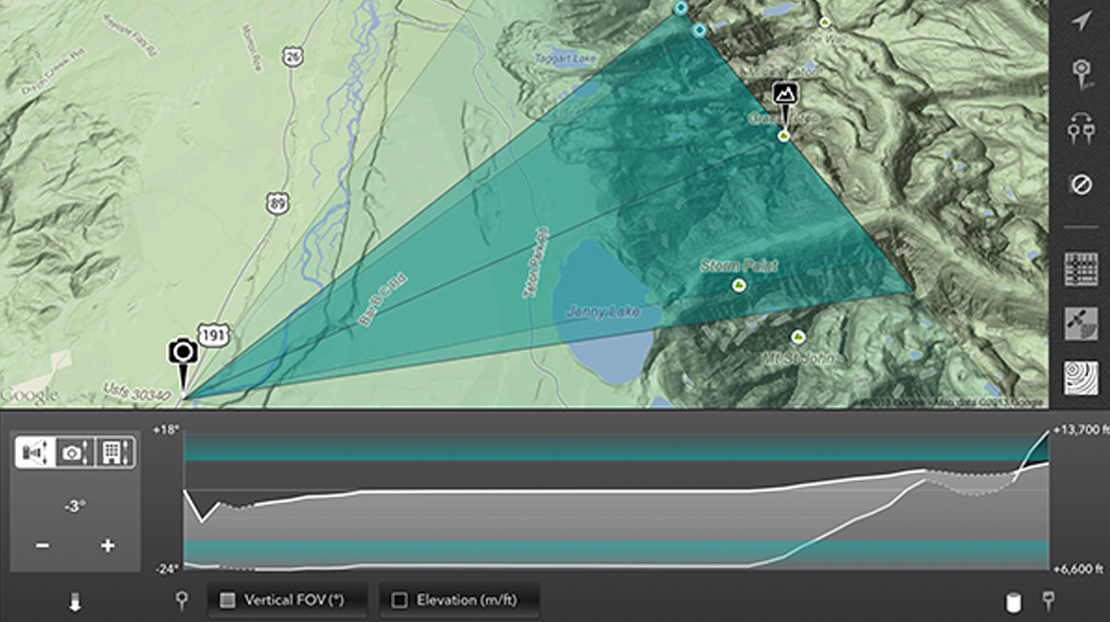
Not content with TPE, though, Stephen has forged ahead and designed a new app for us photographers called, officially, “The Photographers Transit” but it is shortened to “Photo-Transit”. This is an app which again uses Google Maps as it’s foundation. The app then adds the ability to place yourself at any point on Earth and face in any direction. You can then select any lens for your camera (and it takes into account you sensor/film size) and it shows you what field of view you will achieve at any given focal length. This means, no more worrying if you have packed the right lenses for a long hike or a flight where bag weight is critical. It also means you can plan key shots in advance based on your kit. You will know if your lenses have the width or reach you need for the shot you envisage. Or, before arriving at a location you will know exactly where to be to make best, use of your lenses to get the optimum image. This is location planning in real detail.


There is also the ability to look at elevation data in the app to give an idea of how the land rises and falls. This helps with understanding how shadows will appear, when the sun will break the actual horizon and so on. You can also flip from the app over into TPE to work with both apps together which is very useful. The app can be used offline with available data and to help visualise potential images close to roads you can combine the app with Google Streetview. Added to this is the unique ability to save location information as you plan it, or to take images at a location and tie the image together with the map/lens/body/field of view information and save it for future reference. There is also a linked website sharing facility so you can share this data with your friends, camera club members and so on, including sharing via message, email, Facebook, Twitter etc.


I was pleased to be able to grab some time with Stephen in his frenetic schedule to interview him about Photo-Transit and here is what he had to say.


DC: Thank you for agreeing to be interviewed Stephen. Can I ask first about your background and how did you come to design and program TPE?

SJT: Thanks for the opportunity, Doug. Maybe somewhere in my background is the semblance of a career plan, but if there is one, I haven’t found it yet! Over the years I’ve worked in classical music and opera, advertising, theatre engineering, telecoms and consulting, doing a variety of things along the way, including software engineering. I moved to Colorado from the UK in 2007 and started doing more landscape photography. Around a year later I signed up for a weekend workshop in nearby Rocky Mountain National Park . The workshop offered a ton of great advice and information on how to plan a shoot for the best light. Participants were asked to bring a number of items to the workshop, including paper topographic maps, rulers, protractors, calculators, pencils etc. It occurred to me that things in the digital world were by then at the point where all of this could be done in software. When I discovered that no such tool apparently existed already, TPE was born.

DC: Were you surprised at how popular TPE has become? Do you have any idea how many users there are now?

SJT: Very pleasantly surprised, yes! Across the various platforms we now have tens of thousands of monthly active users. The desktop version is downloaded around 75,000 times a year.

DC: Has anyone used TPE in ways you didn’t anticipate?

SJT: We’ve had some uses by archeologists looking for historical sun/moon positioning. Also, I’ve read about it being used by hunters, in the US mainly. Oh yes – and the trainspotters too!

DC: Is developing TPE and other photography apps your full time work, or do you have a ‘day job’?

SJT: I spend around half my time developing apps and the other half I do technology consulting, mostly in the area of digital media and online video.

DC: Are you a keen photographer yourself? If so, what style of photography do you like? Do you have a personal website where we can see your images?

SJT: I am. I like to shoot landscape primarily. I prefer a simple, clean style without too much post-processing. Photos that are “overdone” are all too common nowadays. At the same time, I’ve never much cared for the well-worn line of “my photography is an unaltered reproduction of what my eyes saw that day” and its variants. No matter how little processing is done, that’s clearly untrue, as cameras and photographic media, whether digital or film, just don’t work the same way as the eye. I’m definitely a fan of simpler compositions, although that’s something I continue to struggle to achieve in my own photography! I have a (slightly neglected) website at http://stephentrainor.com

DC: What are some of the technical issues in developing a program like TPE?

SJT: The initial challenge is implementing the various algorithms required to calculate accurate sun and moon data. Nowadays there are a few implementations out there, but the accuracy and sophistication does vary. Not all algorithms account well for factors such as atmospheric refraction, for example. (I certainly can’t take any credit for the algorithms themselves – in that regard, I’m standing on the shoulders of mathematical and astronomical giants!) Maintenance of the software becomes a bigger issue over time as the code ages and grows. I’m currently in the middle of a major modernisation of the TPE for iOS code base, much of which dates from 2009-2010 – the middle ages, in terms of iOS software. Once that’s done, the Desktop version will need to be reimplemented as a web app – all required to keep up with the technology of the day.

DC: What then gave you the idea to develop this new program, The Photographers Transit? (TPT)

The concept of displaying the field of view on a map was a suggestion made independently by a few different TPE users. I liked the idea very much and wanted to think about how to incorporate it into the app. However, after thinking it through, I decided to develop it as a separate app for the primary reason that there would be a lot more inputs required of the user to make it work: which camera? which lens? what orientation? where are you pointing it? etc. One of the keys to simplicity of use in an app is minimising the amount of input you require of the user. I think – and many would agree – that TPE is quite complex enough already without piling on yet more functionality.

DC: What is TPT designed to do for the photographer?

SJT: I think of Photo Transit as a general purpose digital planning tool for outdoor photographers. It provides a mix of digital “surveying” tools that you won’t find elsewhere, so far as I know: a horizontal field of view indicator overlaid on a map and a vertical field of view chart plus elevation profiler that shows what terrain is visible. In addition, we spent quite a lot of time on shot saving and sharing. You can create projects that contain multiple shots and share these easily with friends, colleagues, workshop participants etc. from the app. We were keen to make sure that any information you put into the app is easy to get out of it, so there’s the ability to email shots/projects, view them on a freely available web-site (http://share.phototransit.com) and to export as KML. You don’t need to own PhotoTransit to be able to view shots that have been planned using it. (BTW, ‘we’ is my wife, Alice, who does all of our graphic design, and I…)

DC: How do you see photographers putting TPT to use in their work?

SJT: It’s an advance planning tool, first and foremost: you can use it to build up a list of shots that you’d like to capture on forthcoming trips or shoots, having explored the compositional constraints of the location, your camera and lens ahead of time. Beyond that, I’d like to see photographers using it to share ideas for shots with one another. It provides an easy and complete way to share the physical setup for any stills image. I think it also has an educative role. Many people find numerical values such as field of view or focal length easier to understand when they can be visualized and, like TPE, Photo Transit is a visualization tool.

DC: How does TPT work with TPE?

SJT: Currently, you can open TPE directly from Photo Transit and match the same subject location. The next update to TPE will add the ability to open Photo Transit directly from TPE to go in the reverse direction. We have some further bells and whistles in the works too that will improve the interaction between the apps even more.

DC: What hurdles did you have to overcome to get TPT working?

SJT: Not too many – fewer than for TPE, I’d say. The data model in Photo Transit is definitely more complex (projects, shots, locations, cameras, sensors, lenses), so that took more work. However, many of the harder lessons were already learned with TPE. The Apple maps saga of 2012 cost many hours, but the lessons learned made the mapping choices and implementation for Photo Transit much more straightforward.

DC: Can you give us any clues as to your next project? or is it a secret? or are you still so tired after working to get TPT out that you haven’t had time to think about it yet?

SJT: We have another app in the works that we’re dusting off – it was shelved at the start of the aforementioned maps saga last year. It’s not directly photography related, but more than that I can’t say quite yet. We also have multiple TPE and Photo Transit updates and improvements planned.

DC: Final question, can you recommend websites of any photographers whose work you love? Who are some of your photographic heroes?

SJT: Some names that spring immediately to mind: Bruce Percy (http://brucepercy.com): I think Bruce’s photography was the first that really conveyed to me a sense of personal style. He does a great job of distilling, culling and crafting to achieve a portfolio that has an amazingly consistent ‘voice’. Jack Brauer (http://www.mountainphotography.com): Jack has an incredible collection of beautifully produced photography covering mountains all over the world. He produces wonderful photographs of places that I don’t ever expect I’ll have the strength or fortitude to reach! Guy Tal (http://guytal.com): Guy’s work from around the desert southwest of the USA is probably the most original and distinctive being produced today. He has a great eye for compositional simplicity.

 
You can visit the Photo Transit website HERE and you can follow on Twitter @photoTransit
 

First Impressions of the Fuji X Pro 1 – A Day on the Streets

first thoughts

and, no, this is not the Fuji X Pro 1, but a shot I took with it 🙂

I have taken the plunge and bought a second hand Fuji X Pro 1. Why? A number of reasons. I needed a smaller camera system for some trips that could produce high quality commercial images but without the weight and bulk of my DSLR system. I had also had a chance to use the X Pro and it’s sibling the X100sa nd both had blown me away both in terms of usability and in the ‘filmic’ quality of the images the sensor and lenses produce. I also hold my hands up and unashamedly admit to being seduced by the beautiful retro styling and the superb build quality of the Fuji’s. I have some workshop ideas for the camera too, so there were commercial considerations in my mind also.

As I bought second hand I didn’t have a choice of lenses. The kit I bought came with the 35mm f1.4 prime (which I would have chosen even if I was buying new) and the 18-55mm zoom lens which I probably wouldn’t have gone for, rather erring towards a set of primes. However, the zoom is by no means a ‘kit lens’, this is a full on, high quality piece of glass which is solidly made and performs incredibly well. So I may well hold on to it. Only time will tell.


I have had the camera just three days and today was the first real outing for it. So my comments here are based purely on this first days shooting and my feelings may modify with time. I am writing this on the train home so I have only seen the images on the back of the camera, and we all know how deceptive camera monitors can be! I will review the images when I get home to add some to this post and may have to add some paragraphs once I have seen the images full size.

But that aside, what are my initial thoughts on the X Pro?

Let’s look at the camera from a number of angles. Remember, I have been doing fast moving hand held street photography with it today, so my comments are based on this. I will blog about how it performs as a landscape camera once I have used it for that purpose.

So, firstly, what is it like ‘in the hand’? It is not a compact camera. With one of the Fuji lenses attached it has some weight but is quite usable one handed. I have the extended grip fitted (this is not a battery grip but it just makes the grip for the right hand bigger and more comfortable, especially if you have big hands – it costs about £75 as an extra). I also have fitted a leather wrist strap which I am delighted with. I can let go of the camera if necessary knowing it is secure on my wrist. I much prefer this to a neck strap. 


I also fitted a ‘thumbs up’ which is a small £5.99 accessory which slides into the hot shoe and provides an anchor for your thumb. It is designed to aid stability when shooting one handed (as street photographers often do). I have found these very useful on other cameras but today, on the larger X Pro, I found the distance from the right hand edge of the camera to the Thumbs Up was too large. I just didn’t find my thumb naturally sat in the groove and so I can see me removing it as unnecessary for me.(an overnight afterthought – I may try removing the hand grip and seeing if I prefer using the camera with the Thumbs Up and without the grip as removing the grip moves your thumb closer to the Thumbs Up. It also reduces the bulk of the camera somewhat.)


I did find my thumb kept activating the Quick Menu button inadvertently as it is placed right where the heel of my hand and my thumb naturally rest on the camera. This is not a major issue, but as I lifted the camera to my eye I had to press the shutter button half way to clear them I to see my shot which slowed me down a bit – a disadvantage when street shooting, without a doubt.


All of the controls are beautifully placed and you soon find you can adjust just about all the settings without taking the camera away from your eye. This is aided by the very sophisticated electronic viewfinder (EVF) which shows the menus as you access them through the eyepiece just as if you were looking at the rear screen. It also shows you your last shot, which is a nice feature too.


You can flick to the optical viewfinder (OVF) and this shows you a wider view than the lens sees, which many street photographers love. They can see people before they enter the frame and antipate when to fire the shutter. However, you have to get used to the fact you are not looking through the lens when you do this and the framing is slightly different to what the lens sees. You can still overlay technical information, like shutter speed and aperture etc into the OVF which is very useful.


The aspect ratio of the sensor is the same a s a full frame sensor, 3:2, but the sensor is not full frame. It is smaller. How’re the image quality is reputed to be amazing at 16mp and capable of exhibition quality prints at A3+ and above. Pete Bridgwood has exhibited prints from his X Pro to great acclaim. (Petebridgwood.com)

Other aspect ratios can be set including my beloved 1:1 as well as vararious rectangular ratios including panoramic modes. The raw files will always be imported at full size, no matter what aspect ratio y select but Jpegs will maintain the ratio you choose. This applies to the film simulation modes Fuji have built into the camera too. So you can shoot as if using Velvia, Astia or other film types along with some gorgeous mono styles utilising colour filters. I particularly like the mono mode with the red filter applied. In orders o maintain what I see on the monitor while maintaining the greatest flexibility with my files I have set the camera to shoot in fine JPEG and raw. Thus I can refer to the JPEG to see what I saw on the camera screen and use the JPEG if the file size etc suffices of my needs or use it as a reference to convert the raw to mimic that look back in the digital darkroom.

Another nice feature, shown to me today by Tim Allen, ( http://www.timallenphoto.co.uk/ ) is you can, in camera, take any raw file and apply any of the film or crop effects and save a copy as a JPEG. We quite enjoyed playing with this, taking shots we liked and experimenting with different versions in camera. The raw file remans untouched, of course, and you will have the various JPEG versions when you gets home.


You can set seven custom presets on the Fuji. I have used these straight away and found myself flipping between them all the time today. I programmed in various mono settings at different ISO settings etc and also a couple of Astia settings as these are my favorites already. It saved me messing about in menus and I could quickly grab the set up I needed for a particular set of images.

If you are a DSLR user you have to change the way you use the camera. Firstly, the autofocus is much slower than a DSLR, but apparently more accurate (I can’t verify or deny this yet, it’s what I have read). The autofocus works differently. Whereas with a DSLR we are used to locking on to high contrast areas, points where light and dark areas touch, with cameras like the Fuji this is exactly what you don’t want to do. The focus works best when aimed at surfaces with texture. This takes some getting used to, but is very effective once you do. The fact the focusing is slower is just something we have to accept for now. Fuji have issued several firmware updates (and it is easy to update the firmware for your body and each of your lenses, and ought to be done to get the very best from your system) and these have, apparently, improved things, but it is still slower and less responsive than a DSLR.


Now let’s talk battery life. I was surprised at how quickly the X Pro eats batteries. I am used to a Canon 5D mk3 which can go all day on one battery, two at most. I burned through two and run out of power nearly tw hours before my time to head home had come. I could have done with at least one more battery, probably two to be on the safe side. Now, I was shooting continuously, using the screen, and working the camera really hard. Nonetheless, it is obvious this is a power hungry beast. I will be ordering two more batteries when I get home. One other things about the batteries, they get to the point where they show red, quarter remaining then all of a sudden the camera just shuts down. The first part of the battery discharge gauge takes some time to fall then the last half goes really fast. Beware. It’s like a car with a. Fuel gauge that says full for ages then drops like a stone!


I really enjoyed using the camera. It is not tiring in the hand, it’s black body is unobtrusive and the 35mm lens is exquisite. I have a feeling more primes will be in the offing. There is a 56mm f1.2 due in January which sounds very nice indeed.

The camera was a dream to carry all day, with a spare lens and filters in my bag. It was so liberating not to have my big rucksack with all the DSLR kit. Will it replace my DSLR? I doubt it, but I am no ruling it out. I wil see what the image quality is like. I will see how it performs as a landscape camera from a usability point of view. I am not wedded to the DSLR by any means. If the Fuji proves it’s worth and can produce the quantity and size of files I need, I see no reason to carry on with the big DSLR kit. However, if it falls short, I am happy to run two systems and use whichever suits the job at hand ( but I will be reaching for the Fuji as often as possible due to its lightness and portability).

If you are considering the Fuji X Pro 1 then you really ought to be take a very close look at the X E-1 too (and the XE-2 which is rumoured to be released any day now). It takes all the same lenses. The sensor and many other specs are identical but it is smaller and lighter and may well be a wiser choice for you. Take a close look, see what you think.


I am excited to get home tonight and look at the images I have. Let’s hope they live up to my expectations.

(Added the day after) I have now had a chance to look at my images. first things first. I need to work on my skills as a street photographer!  I can see I missed some opportunities, sometimes by a fraction of a second. I am going to have to concentrate harder when doing this type of photography. I also have some images I am moderately happy with, especially as this was my first day out with a new camera I was totally unfamiliar with.

I have put a few images from the day into this post. Most were shot with the 18-55 lens, wide open although a few towards the end of the day were shot with the 35mm. I wish in hindsight I had used the 35mm more. I. Used this wide open too. Most of the images were shot at ISO1600. The day was dull and I wanted to ensure a decent shutter speed. I ignored the histogram, this is not landscape photography (as long as I wasn’t clipping the highlights). I just let Aperture Priority do it’s job for me. I have not run any noise reduction on these files, just tweaked them a little in Lightroom, and I have not sharpened the files either. I wanted to show them more as the camera produced them.

So, that’s my initial thoughts. No doubt, I’ll have more to say as I get used tot he camera. I have another day out with it next week on the south coast. A different environment and a different style of shooting to look forward to.


A BIG thank you to Tim Allen ( http://www.timallenphoto.co.uk/ ) for organising the day and our walking route and to both Tim and Valda Bailey ( www.valdabailey.co.uk ) for being such good company on this day out in London. I am sure their images will be way better than mine.

How do I put a simple border around my images?

I get asked a lot how to put a simple frame border around images, like this one. It is very simple.

These instructions apply to Photoshop, but also work in Elements and no doubt you can work out a similar way if you use some other software. For Elements and others the menu locations may be different but the commands similar.

1. Prepare your photo as usual – the border is the last thing to add.

2. Click the Image Menu and select Canvas Size

3. Make sure the ‘Relative’ box is ticked

4. In the Height and Width box enter a figure – I work in metric so I usually first put in, say 0.2 cm in each box

5. Make sure the centre box in the icon below this is selected (the one with arrows all round it – you will see what I mean when you are there!)

6. In the Canvas Extension drop down box select a colour – in this example above, I chose White – usually, depending on the colours in the image, white or black work best for this inner pin stripe.

7. Click Okay

Now you will see the fine border around your image.

Repeat the process above to add the thicker, outer frame but increase the dimensions to suit what you want – I often use 7, 9, 11 or even 13cm – I find odd numbers work best.

You can experiment with several borders of varying thicknesses – it sometimes looks good to put a 0.2cm white, then a 0.2cm black followed by a 11cm White and finish the outer edge with another 0.2cm black border.

If you are uploading to Flickr and want a white outer border it is always best to put a fine black border around as the page background on Flickr is white and this fine outer pinstripe defines your white border – otherwise it is lost on the page.

Combine a border with a signature – the instructions for which I blogged here a few days ago, and you are developing your own signed piece of artwork

How do I put a watermark on my photos?

I get asked this a lot by students so here is a post to provide the answer – it works in Photoshop or Elements (and the print and export modules of Lightroom have a custom function to add one also).

Watermarking your images is not a foolproof way to stop people using them without your permission. Some will ignore it and use it anyway. Others will spend a few minutes in Photoshop and remove it – with basic cloning skills it is usually not hard to do.

What watermarking your pictures does do is put off some who would steal your images and just emphasizes that it is against your wishes.

More effective is converting the image to 72ppi and reducing the size to say 1000 pixels on the longest side before uploading them. This makes the image unusable in any printed form. It will still display perfectly on a screen as these work at 72ppi – but printing will be useless. If you are using Flickr to display your images you can also switch off the ‘all sizes’ option in your account preferences which will make it much harder for people to steal your photos.

Anyway, on with the tutorial. There are two ways of doing this – by creating an Action or by making a Copyright brush. I tend to use the brush method.

1. In Photoshop create a new blank document. (click file, new). This should put a blank white page in front of you.

2. Next create a new blank layer

3. Select the Type tool to type your text – in my case I would then select a font and font size and type – Copyright 2010 © Doug Chinnery – (you can hold down the Alt key and type 0169 on the number keypad and this will inset the copyright symbol automatically)

4. When you are happy with it select the Rectangular Marquee tool by pressing the M key and drag a rectangle around your line of text.

5. Then go into the Edit menu and select ‘define brush preset’. When the dialog box opens give your brush a name (not a name like ‘Dave’ or ‘Debbie’ but call it Copyright Brush for example.) Then click OK.

6. Now in your brush presets drop down box you will find your copyright brush at the bottom of the grid. It will looked all squashed up but don’t worry, it will display correctly when you use it.

7. To use it, open a photo you want to copyright and add a new blank layer to it.

8. Select either white or black as your foreground colour – press D to set black and white as the foreground and background colours then press the X key to swap them if necessary. I use white mostly unless the image is very bright so white won’t stand out, then I use black.

9. Press B to get the brush tool selected and up on the options bar drop down the brush toolbox and click on your copyright tool brush at the very end of the set.

10. Use the [ or ] keys to make the brush bigger or smaller

11. Click on your image where you want the copyright info to be.

12. The in the layers palette on the blank layer with your copyright brush info use the opacity slider to adjust how the strong the brush is – you can really fade it out so it isn’t distracting or have it more prominent if you prefer.

13. When you are happy, flatten the image.

14. Remember to save the file with a different name so it doesn’t overwrite your master file – otherwise your original file will have your copyright info plastered across it – not good if you want to print it and hand it on your wall!!

I hope this info is helpful?

If you prefer to use Actions then record the above being done but instead of creating a new document just put a blank layer on a photo, type your copyright info, and set the opacity, flatten the image and then stop the action recording. Then it is just a case of running the action on future images – the only problem with this is that it will put the copyright info in the same place and at the same opacity on every image and sometimes this doesn’t look right., but the choice is yours.