
Dodging and burning is a technique which harks back to the days of film and darkroom developing. In the darkroom film users employ strange techniques to darken areas of their prints and lighten others to improve the look of the image. For those of us working digitally it falls to Photoshop to act as our digital darkroom to achieve the same effect.
‘Dodging’ refers to the lightening process while ‘Burning’ is the darkening of areas in the image. I remember which is which by thinking that burning an object blackens it, so burning = darkening. The goal is to introduce contrast into the image in such a way that the impression is of light falling on the subject in very controlled ways, highlighting the beauty or key aspects of the image. In my photograph above (and I have selected an extreme example rather than a subtle one) you will see I have burned the tractor tracks, areas of the clouds and areas of the surface of the wheat. To contrast with this I have dodged areas of cloud and highlighted the light falling on the barn with dodging. I was aiming for a dramatic image.
The biggest tip I can give you with this process is to do it very gradually, to be patient. Most people I see using this technique want to see dramatic effects too quickly and end up spoiling their image by creating a patchy look. The process is simple but it takes time and the vision to visualise the final result before you start. It is not good to approach it in a random way and hope the end result is going to be effective.
Now to the process. Firstly convert your image to black and white using your preferred method, either in Photoshop or a plugin such as Silver EfEx Pro 2. At the conversion stage, beware making the image too contrasty as you are going to tune the contrast carefully using the dodge and burn tools. Open the mono image in Photoshop.
Duplicate the background layer by selecting it in the layers panel and pressing cmd+J (windows = ctrl+J). Always do this and dodge and burn this new layer so that if you make a mistake you can always delete it an start again without spoiling the base layer. The layers panel should now look like the image below.

I decide whether to start with dodging or burning depending on the image but in reality it usually doesn’t matter which you start with as you will be alternating between the two. The image below shows the flyout toolbox from the main toolbox which shows the two tools.

I am going to select the burn tool first. The icon looks like a clenched fist. (don’t ask me why). The next step is to set the burn brush up correctly. This is done on the top toolbar as in the image below.
You will see I have selected a very soft brush and set the hardness to zero. This really feathers the effect and helps prevent hard edges to the burned areas. In the range drop down box you can see I have selected ‘shadows’. This is something important to understand when dodging and burning. The tones you select in this box tell the brush the only tones to affect. So if shadows is selected when you brush over pixels in the image the brush will only darken shadow, the darkest, pixels. It won’t touch mid-tones or highlights. Similarly, if you select mid-tones then only they will be darkened. Shadows and highlights will be unaffected. The same applies to the dodge brush. In most cases the other thing to remember is do not burn highlights and do not dodge shadows. If you do it usually gives the pixels a ‘damaged’ look because the change is too dramatic. Stick to burning shadows and mid-tones and dodging mid-tones and highlights.
The next vital thing to note in the above screenshot is the exposure level I have selected. In the shot above it is at 3%. This is where most people go wrong, they set the percentage too high. I work between 1 and 5%. I never go higher than 5% and rarely use that. I am usual working between 1 and 3%. When you use this setting the effect builds up very slowly and delicately giving you control. If you go higher you loose control and damage the image.

Now size the brush using the [ ] keys as usual and start brushing over the image. Use large flowing strokes. Avoid at all costs scrubbing away wit the brush at small areas as this soon creates a blotchy look. Keep switching between dodging and burning and build both together gradually. Keep changing between working on the shadows, mid-tones and highlights. Keep turning the layer on and off by clicking the ‘eye-con’ on the layers pane so you can see how far you are going and how far you have come. Work towards your pre-visualised goal. Take your time and don’t overdo it!
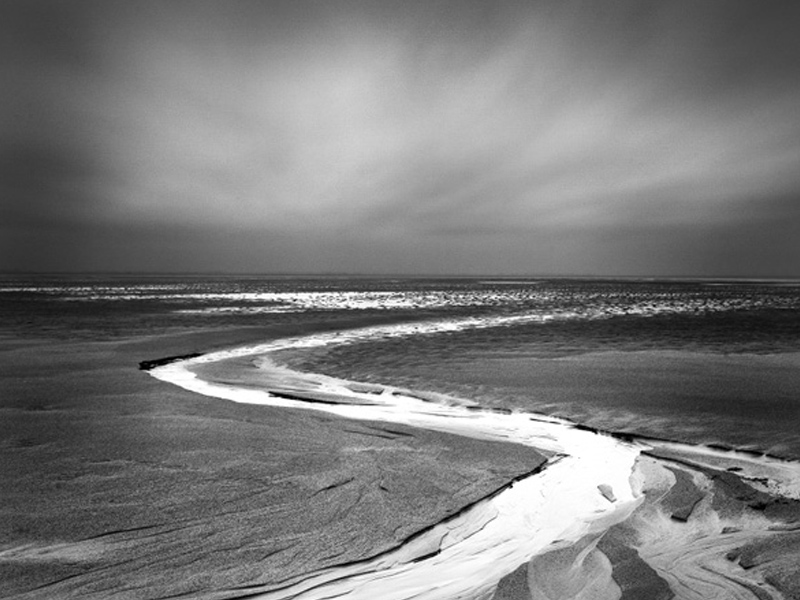
Here is my image. The first screen shot shows the basic mono conversion. The second it the dodged and burned final image. I have created a vignette to draw the eye to the water flow. I have brightened the water to give sparkle and punch and added a bit more drama to the sky.


Most mono film photographers would not consider printing an image without some dodging and burning to enhance it. Read what Ansel Adams wrote about this process as part of his print making to see how important he felt it was. He was a master of the technique. I hope you enjoy practising the effect and feel sure your mono images will improve dramatically as a result.
To learn much more about dodging and burning and all the other aspects of mono image making, why not consider coming on one of my specialist mono workshops where we work on thinking in mono, composing for mono and then processing to make mono images full of drama, light and character. You will find full details on the workshops pages of my website.