If you follow me on Twitter (@dougchinnery) or Flickr you will know that in addition to shooting on film for my personal creative work, I have also started developing my own black and white film myself.
It costs about £3.50 to have a mono film processed and supplied in negative strips ready to scan into the computer by a commercial firm. Processing the film myself reduces this to just a few pence per roll.
It was recommended to me to start with a simple process called “Stand Developing”. This is a basic process which is ideal for beginners before you move on to more standard techniques.
Usually in processing film the chemicals are kept at a instant temperature throughout and the film is ‘agitated’ in the liquid to ensure fresh developer comes in contact with the surface of the film throughout. Then, after a set period (of just a few minutes) the developing fluid is removed and another chemical is added to stop the development, otherwise the film can be damaged. Finally, the film is washed and dried, ready to scan.
Stand development takes a different approach. The developing chemical is mixed with water at a very dilute concentration, I have been using 1:100. The film is then left to stand in this fluid for an hour. As the developer is so dilute it first brings out the highlights in the images and as its effectiveness reduces it slowly brings out shadow detail. By the time an hour has passed it is almost expired and so no stop chemical is required, just water to wash it off the il before the fixing chemical is applied for a few minutes followed by a final rinse.
The developer I use is about the oldest available and is called Rodinol (R09). It has been in use for over 100 years and is readily available. For the fixing and rinsing I use Ilford chemicals. All are safe to be disposed of own the sink after use (although the fix chemical can be stored and reused many times).
People have asked me if you need a dark room to process film and the answer is “no”. The only part of the process which needs darkness is lading the exposed rolls of film into the developing tanks and this is done in a dark changing bag. These have two arm holes so you can out all you need in the bag, seal it, and then load the film in darkness with your hands in the bag. This is a bit tricky for the first couple of times but you soon get used to it. The developing drum will, in my case, take two rolls of 120 film at a time and is cleverly designed to allow you to add and pour out liquids without letting any light into the drum.
So here is the recipe I have been using. Please note this is ONLY for black and white film. Please also note, contrary to developing film by other methods, you can mix film types in the same developing drum with this method. Normally, if you are going to develop several rolls of film together (I have a drum that allows me to do three films at one, for example, to save time) you have to keep the film types the same. So three rolls of Ilford HP5 for example or 3 rolls of Tri-X.
First, load your film onto a reel in the processing drum inside a changing bag. Then carefully measure out 5ml of Rodinal. I use R09. To measure it accurately I use a small medical syringe with a ml scale on the side. Mix with this 500ml of tap water. (if you are using a drum with more than one roll, use 500ml per roll) There is no need to use warm water for this as you do with most developing processes as the water is standing for so long, warm would go cold anyway. In winter I would add some warm water to the very cold tap water just as a precaution. Pour this into the drum and agitate the drum for 30 seconds. By ‘agitate’ I mean invert and twist the drum in your hands repeatedly. Don’t just shake the drum but really move the liquid around so it has plenty of contact with the film. At the end of this period of agitation, tap the drum a couple of times on a firm surface to dislodge any air bubbles from the surface of the film and let the drum stand for 30 minutes. After 30 minutes just agitate the drum again 3 times only and then let it stand for another 30 minutes.
Once the last period of standing is up, pour the liquid down the sink but DO NOT open the drum yet. Fill it with cool tap water, agitate 5 times and pour away. Repeat but agitate 10 times and pour away. Finally repeat and agitate 20 times then pour the water away.
Now pour in 500ml (per roll of film) into your fixing solution. I use Ilford Rapid Fixer. This comes concentrated and so I mixed it with water at a ratio of one part fixer to three parts water in a clean storage bottle. Start a stopwatch (I use the one on my iPhone) and agitate for 30 seconds. Tap it and let it stand for 30 seconds. Then agitate it three times, tap it and let it stand for a minute. Repeat the three agitations on each minute until a total of 6 minutes has expired then pour the fixer back into its storage bottle as it can be reused many times.
Then fill the drum with water from the tap, agitate 5 times and pour away, repeat but agitate 10 times and then do it once more but agitate 20 times.
Finally, I fill the drum with a mix of water and a wetting agent. I use a tiny squirt of the Ilford wetting agent (some people just use washing up liquid). The amount you need in 500ml of water is tiny, just a couple of ml. Agitate the drum 40 times and then pour the mix away.
Open the drum and remove the spool with your film on. Do not wash the suds off of the drum under the tap as this will ruin the effect of using a wetting agent (which is to stop the tap water leaving smears on the film due to water hardness). Simply place a finger on each flat surface of the film and run them down its length to remove most of the water and wetting agent suds. Then I use a piece of clean chamois leather and run this down the film to dry it some more. What is vital when you do this is that there is no grit on your fingers or the chamois as this will scratch your film. Hang the film to dry slowly from a line. I use a bulldog clip to clip it to a wire I have put up in my bathroom. As dust free a place as possible is best for this (so not by the dogs bed!)
Once the film is dry you can cut it into frame lengths to suit your scanner. My scanner (an Epson V700) has holders which take two strips of three frames of 120 film so I cut a roll into four strips of three frames per strip. Now you can scan the images in and see what you have.
On reading this it may sound really complicated and long winded. It did to me when I was researching the process. However, once you have developed two or three films you will know the process by heart and be doing it without thinking. It is great to see your images emerge from the drum and to be part of the whole process from capture to final image. It also means I can go out and shoot and within an hour and a half of getting home I have my images in Lightroom – not quite the instant feedback of a digital camera but as close as you can get with film.
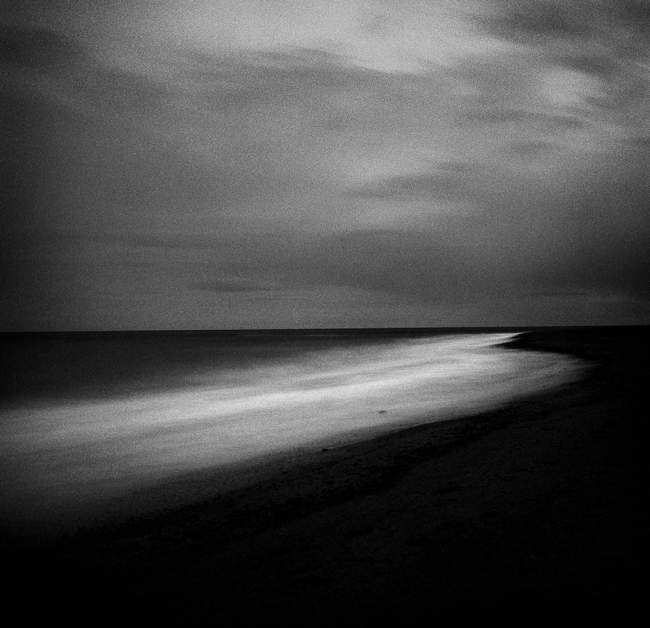
This process is about the simplest way to develop black and white film. The process tends to bring out the grain in the film. It also produces high contrast negatives. The blacks are often rich and dark while the highlights bright and punchy. You need to be bear this in mind if you want low contrast negatives which are more ‘subtle’. For these, Stand Development may not be the best choice.
I buy my chemicals from AG Photographic http://www.ag-photographic.co.uk/ They are a small UK firm who give good service and are very helpful on the phone if you have any questions.
If you are just getting in to analogue photography or are interested in trying stand developing as a new tool in your film processing arsenal, I hope you have found this post to be helpful. (the image below was Stand developed)