Tag: digital

Creative Photography Webinars with Onlandscape

Creative Photography Webinars

I made three hour long videos for OnLandscape magazine in 2013 and they are now available via YouTube.

I have collected them together here for you to watch (and enjoy?)

Part I – a discussion of my creative/alternative technique images and approach (the echo on Tim’s mike is removed after about a minute)

Part II – A session filmed with me working live in the field showing camera techniques

Part III – The final video where I demonstrate my Adobe Lightroom and Photoshop techniques for processing these types of images

I hope you find these videos useful.

Shooting Landscapes Handheld. You Are Joking!

Handheld

Dark Light III – Taken handheld from Rannoch Moor.

I have written some time ago about my thoughts on working with what you’ve got. Basically, the premise of my mantra is, if all you have is a 50mm lens, then shoot with it. If its raining, rather than giving you he technicolor sunrise you envisioned, shoot the rain. You get the idea.

Recently, on the day I broke my leg in fact, I had to work to my own maxim. 

I was leading a workshop up in the snows on Rannoch Moor and Glencoe, in Scotland. On the first day of the trip, just an hour into shooting my tripod head broke. It broke in a major way (and kudos to Manfrotto for replacing it for me straight away once they saw what had happened).

I tweeted about the failure and many of my followers replied with sympathy (and we all like a bit of sympathy). Several said how angry I must be feeling and how it would ruin my trip. I could understand their point of view but I just didn’t see it that way.

Kit fails. You have to get used to that which is why I have back ups or alternatives with me for virtually everything in my bag, including tripods and heads. Except this time. This time I was car sharing and to save space the one thing I hadn’t bought with me was my spare tripod & head. Ironic, huh?

Getting angry about it would have just spoiled the trip, it wouldn’t have actually changed anything. Here I was in the most stunning of locations with amazing light. I was going to work with what I had.

So this meant shooting landscapes, often in low light, handheld. 

So how did I approach this? I was using the Canon 5d mk2 and was happy taking the ISO up to 800 (and in very low light I went to 1600 at times – whatever it took to get the shot). I also went wide with my aperture. So I abandoned my usual preference for f11 (or f16)  most of the time and went wider, right down to f2.8 at times in low light, but often working at f8, all with a view to keeping the shutter speed high enough to get sharp images.

If this hadn’t been possible I would have gone over to shooting ICM (intentional camera movement) images. Again, working with what I had. 

Another approach I adopted was to shoot in burst mode. Firing three frames at least for each image to give me a better chance one would be sharp. It meant I came away with nearly 900 frames fom the day, but it did increase my success rate.

I also moved to auto focus. On a tripod, I use manual focus in Live View mode which is perfect, but hand holding it just isn’t practical to focus manually all day. There is no benefit in it, in fact, auto focus is perfect for just this situation. I use centre point focusing so I have complete control over what I am focused on. So I turn on just the centre focus point. I then point the centre of the lens very precisely at what I want to be my focus point, press the shutter button half way to lock focus and hold it there, reframe and then complete the shot. You can also use the Focus Lock button on the back of the camera in the same way. 

I found I got the best results using my longer lenses, especially the 70-200 f2.8 IS L zoom. This stayed on most of the day. The image stabilisation helped with sharpness and I followed the basic rule of thumb that you need to keep your shutter speed faster than your focal length so I tried to stay above 1/200 sec all day, using ISO and aperture to do that.

Another advantage of using the 70-200mm (and the 24-70 f2.8 L which I also used on the day) was they both have long full tube shaped lens hoods. On the day, blizzards kept blowing through and these hoods really helped to keep snow off the front element of the lens.

When I came to review the images later (and trust me, I had plenty of time to review them, lying in my hospital bed) I realised that broken tripod head had done me a favor.

I had an extraordinarily high “hit rate” for successful images on the day. I took many more that I was happy with than I normally would. I found I was able to react really quickly to the fast changing light up there. As the blizzards were blowing through we had amazing gaps in the clouds with shafts of light and wonderful cloud shapes. On a tripod I would have been faffing about and couldn’t have got half the  images I did. 

I also would have been shooting much wider lenses, 45mm or 24mm, out of habit and on reflection, images at those focal lengths wouldn’t have had the impact I got from the 70-200 lens. (For my wider shots with the long lens I shot several panorama sequences, all handheld, and Photoshop stitches them perfectly. It’s amazing).

I would also have been more likely to have been trying to use my Lee filters. This would have slowed me down even more and with the falling snow caused frustration and even more lost shots.

Yes, that tripod head did me a big favor. Of course, looking at it another way. If it hadn’t failed I would have had it with me later when crossing the river and would have been using it to steady myself so maybe I wouldn’t have fallen and broken my leg… But let’s not speculate.

So, the lesson. If something fails in the field or you forget something, work with what you have. Think laterally. Work around the problem. Find a solution. It might feel uncomfortable, but just do the best you can. Getting angry with yourself or your kit, or giving up and going home don’t help, and you never know, like this occasion, you might just produce something unexpected by approaching the problem with a positive frame of mind.

If its something really bad like leaving all your batteries or memory cards at home, then use your mobile phone camera. If that’s back in the car, then just sit back and enjoy the sunrise. There will always be another.

Dark Light II – Taken handheld at the mouth of Glencoe

What filters should I buy?

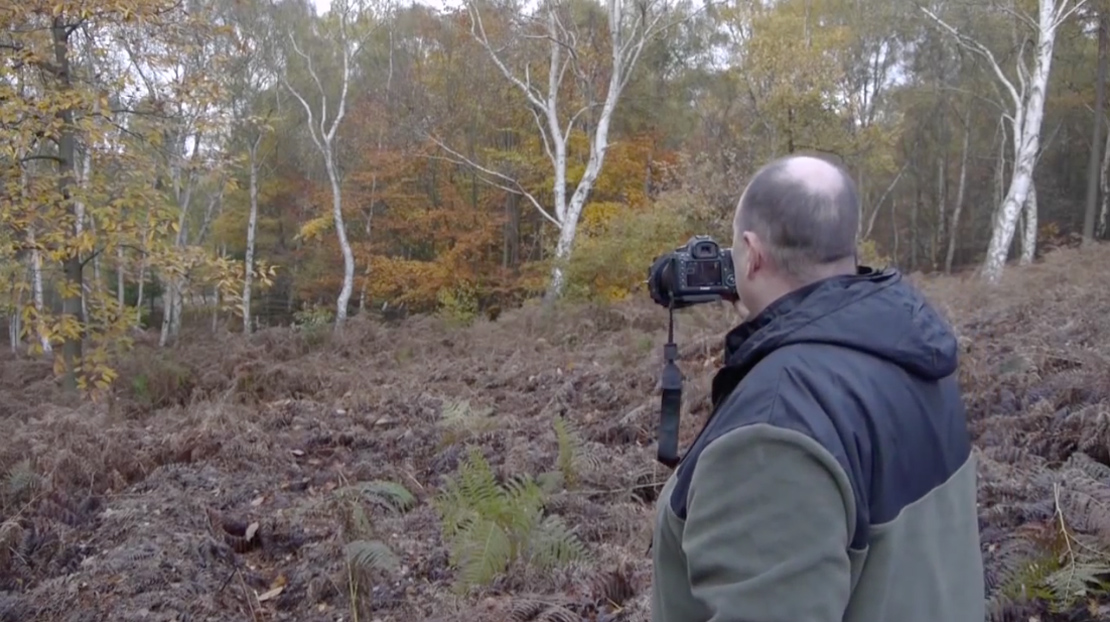
Landscape photographers fall into two camps. Those who like to get things ‘right’ in camera and, so, use filters to balance exposures, and those who prefer to make two or more exposures on location and then blend them together back in the digital darkroom.


Some will insist one way is ‘correct’ or better than the other but in reality, it’s just a personal choice. I use both methods. When the contrast in brightness between the sky and foreground is really high then I will use the blending option. If the contrast is more manageable, then I prefer to use filters.


I often get asked which filters to buy to get started in using them so I thought a post on what I would suggest might be useful. Filter systems are not cheap so it’s important to make an informed choice and not to buy items you probably won’t need.


The first choice is which system to invest in. This is down to money and is also influenced by how much of your photography is landscape based. If you are only an occasional landscaper (especially if funds are tight) then investing in the best system might not be worthwhile. Even if you do a lot of landscape work, if funds don’t allow, you might not be  able to buy the best but you may still be able to afford a mid priced system which will give you acceptable results.


The system I would strongly recommend avoiding is Cokin. They a very competitively priced and this makes them a tempting option. Please resist unless you absolutley can’t afford/bear to wait and save up for a better system. The filter holders are poorly designed, but, worse still, the filters will create horrible colour casts on your images which you won’t be able to correct in software. Most photographers who do buy into Cokin usually end up ruining so many precious images they sell up and get something better.


The next system which is an improvement over Cokin and is thus a possible option for the occasional landscaper or those on a budget, are High Tech. This newish brand is readily available on EBay and elsewhere, and is priced well. The filters fit the Lee system holders although they have their own holder available too. The downside? Some of the filters still give colour casts, but nothing as bad as Cokin. Optically they are not as pure as the Lee system. It’s always good to realise that our lenses are only as good as the cheapest piece of glass in the system. So if we have invested in some nice Canon or Zeiss lenses, putting cheap filters in front of them makes them much poorer. We might as well have bought cheaper lenses.


This is the reason I don’t have UV filters ‘protecting’ my lenses. Even if you buy the ‘pro’ range filters the glass is unlikely to be as good as the glass used on lenses such as those in the Canon L range. To protect my lenses I use a lens cap. Then I am getting the top performance from my glass. An additional benefit in not fitting UV filters is the reduced chance of vignetting with wide angle lenses when adding your filter system on the front of the lens.


The filter system I use and always recommend (even if it means going without them for a while, while you save up for them) is Lee. They are the best filters available. Lee have very tight quality control and each filter is individually hand made and checked. The process is very labor intensive, they even pour the resin themselves. Lee neutral density filters are truly neutral. No colour casts at all with Lee.


This explains the cost. Getting set up with the Lee system is going to cost you around £300 to £500, depending on what you buy. However, they will last you for many years (or life if you take great care of them) and will fit any future cameras of lenses you buy.


So, what do you need. I will describe the most basic system first. This can be expanded piece by piece as you find what will be of most use to you. Just about everything is available as an individual item so you can build on your starter kit gradually.


The first essential is the adaptor rings. These are bought to fit the diameter of your lens or lenses. If you have a 77mm diameter lens, you have to have a 77mm adaptor ring. These aren’t cheap at £30 to £40 each. Lee used to make two types, standard for non-wide lenses and wide angle (for wide angle lenses, funnily enough). I believe they have now decided to rationalise to just wide angle adapters, which fit all lens types and will help eliminate vignetting. I have one permanently fitted to each of my lenses that I use my filters on, so that I don’t have to keep fitting and removing them. I then use the white lens caps Lee make (a pack of three caps is about £7) and these fit onto the adapter ring, protecting the lens. I then write the type of lens on the front of the lens cap so I can see at a glance which lens is which when I open my camera bag.


The next essential item is the filter holder which clips on to the adapter ring and holds the filters in position, allowing you to slide the filters up and down to position graduations correctly. You can buy these individually but if you are just starting out it is more economical to buy Lees “Digital Starter Kit“. This will give you a filter holder with two slots in, a two stop hard graduated neutral density filter and a two stop Pro-Glass full neutral density filter as well as a lens cloth. All of these items are essentials and the kit gives you a cost saving over buying each item individually.


A good alternative to this is to buy the starter kit Lee produce exclusively for David Noton. It contains the adaptor ring as part of the kit (you select the kit with the adaptor ring you need for your main lens. The only issue has been availability and at the time of writing (19.10.12) they don’t have kits in stock. If it is available it might be a good option for you.


You now have enough to make a start in using filters but you will soon find the limitations of the starter kit. Your next addition will be a three stop neutral density graduated filters for higher contrast scenes. These can also be ‘stacked’ with your two stop grad to give you five stops, but this is rarely needed and if you do need this much filtration I would strongly considering making multiple exposures and blending them in Photoshop rather than using too many ND grads stacked up.


The question I am always asked is ‘should I go for hard or soft grads?” you will notice Lee give you a hard grad in the starter kit. This is because, in reality, the hard grads have quite a soft enough graduation when using digital SLR’s due to the sensor size. The filters were originally designed for medium format cameras and so the soft grads are very softly graduated on a DSLR. So if you are going for one type, go for hard.


Having said that, I carry both. I use hards mostly these days but if I have a scene with lots of things intruding into the sky (like trees, hills etc), it is sometimes best to use softs to really blur the change from the neutral density effect to the clear part of the filter. I would avoid using soft grads at the coast or anywhere you have a level distinct horizon as the graduated area will make the foreground a bit too dark. (a tip when positioning your grads is to hold in the depth of field preview button as you slide it into position. This will make sure the positioning is spot on as you will be seeing the shot as the lens will capture it

Do you need one stop graduated filters? If you want to perfectly balance some exposures, yes. But this is my least used filter and if you need to save cash you can do without it. Some times you may need to use the graduated filter tool in Lightroom later to adjust the exposure of the sky if the two stop filter was a it too strong but this is easily done.


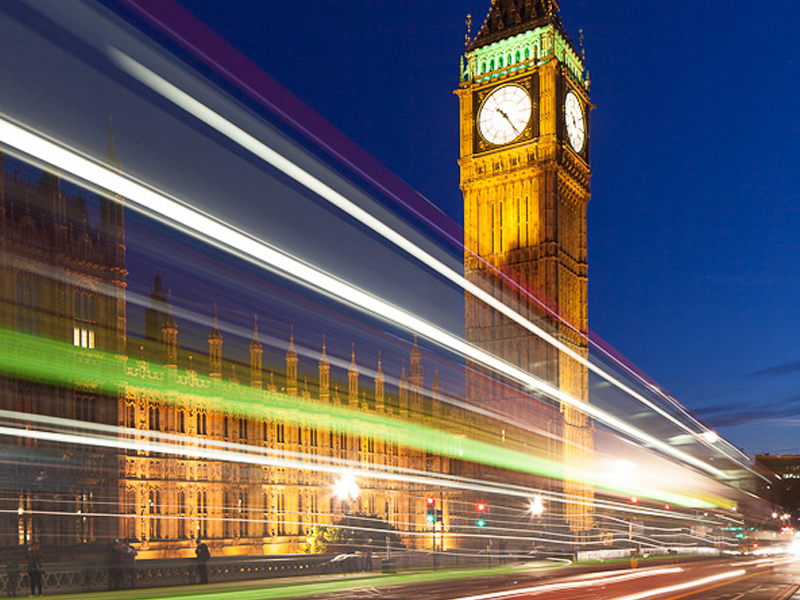
The next filters I would add are the three and ten stop full neutral density filters. The three stop is very useful, as is the two stop you got in the digital starter kit. For extending exposures. They will enable you to make light trail images, to blur waterfalls, create blur effects in breezy woodlands and a host of other great effects.


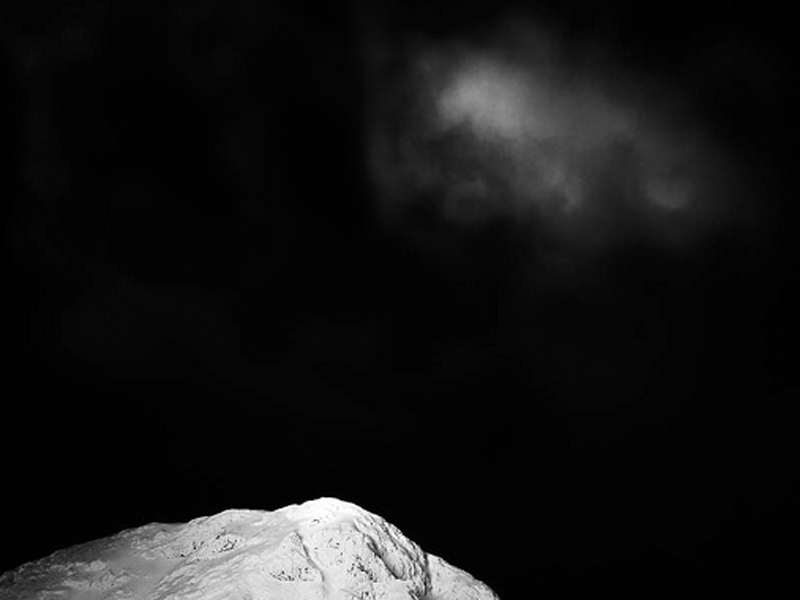
The ten stop filter, named by Lee the “Big Stopper“, is a tool I use a lot. They will enable you to extend exposures to several minutes to produce the minimal, ethereal shots which have become so popular in recent years (although they are becoming. bit of a photographic cliche). They enable me to make striking images outside of the golden hours when I wouldn’t have been shooting in times past due to the quality of the light.


You need to be aware that although they are thought of as ten stop filters it is impossible for Lee to control the manufacturing process that accurately. So your filter could be anything from about 9.25 to 11 stops in strength. This explains why your exposure times in identical conditions to a friend working beside you with a Big Stopper using identical settings can be quite different. A stop difference in filter strength can mean a two minute exposure for one person and the other needs four minutes to get the same exposure result. Please also note that Big Stoppers are very fragile, made of glass. I am on my fourth! Not a cheap thing to break at around £110 each.


The final filter to add to your arsenal is a polariser. In the Lee system this means buying another adaptor ring which screws on the front of your filter holder. This allows the polariser to be fitted on the outermost position of your stack which is important as it needs to be rotated to get the polarising effect. The adapter ring is another £30 to £40 but his pales into insignificance when you realise the filter is over £200. It is 110mm in diameter which reduces vignetting. It also means you can use one polariser with every lens you have to which you can fit your Lee system. The quality of the filter is very good.too, but nonetheless it’s an expensive item – but one I feel is essential (and I write as someone who has lost one on a mountainside and had to bite the bullet and buy a replacement.) the effect of the polariser is something that no software can replicate and will transform the quality of many images.


A slightly cheaper alternative is to buy a B&W 110mm LINEAR polariser. For digital cameras we should use a CIRCULAR polariser. This doesn’t describe the shape, it describes the way the glass is treated. Linear polarisers are of a older design and can affect the auto focusing of lenses. The lens may not be able to auto focus. I always focus manually so I was able to buy one of these and save myself about £50. Don’t buy one if you might need to auto focus with the filter fitted. The B&W filter fits the Lee holder ring.


The Lee filter holder comes with two slots so you can stack two filters. A useful and low cost improvement of the holder is to buy an extension kit which enables you to dissemble the holder and add one or two more slots. This allows more options for stacking filters. I have three slots in mine which is generally enough.


I also use the Lee filter cloths, they are very good quality and wash beautifully. I keep my filters in the three slot soft filter wraps from Lee and then have a three section Lee pouch. One slot has my hard grad filter wrap, the second my soft grad wrap and the final slot holds my wrap with my two, three and Big Stopper ND filters. I write on the wraps what each wrap holds so I can grab the right one quickly.


Lee do sell filter cleaning fluid which is fine. I, however, buy my cleaning fluid for my filters and lenses from Specsavers. They sell a 250ml bottle for about £3 (compare that with around £5 to £7 or more for the ‘proper’ cleaning fluid sold by lens and filter manufacturers) and I can’t tell any difference from the ‘proper’ fluids. They also sell a pump bottle with about 50ml which I refill from the big bottle and carry with me in my bag for lens and filter cleaning in the field. It works beautifully. I am sure some optical engineer will email me about particulate size or some technical reason I should use the over priced fluid from manufacturers but I would take some persuading to change.


That pretty much covers what you need to get set up with Lee filters. The cost is high, but the results justify this. I hope this helps you get set up. All you need now is one of my workshops to show you how to get the best from them 🙂


If you buy items using the links in this post I will receive a small referral fee but you will not pay more. This helps me in my business and is much appreciated.

How do I create light trail images?

light trails

Westminster by Night

Have you ever wondered how to go about capturing light trails? They look dramatic and add a dynamic feel to urban images and are easy to capture.

Before I go into technique there is an important factor about this image which lifts it above many light trail shots. The Sky. Its not just a case of shooting at night. In fact the ideal time is a short 15 minute period shortly after the sun has set. For architectural photographers and those after light trails this is the prime time to shoot. If you look at the image you will see the sky is not black, there is still some residual light (twilight) in the sky. In this brief period of minutes the light in the sky balances perfectly with artificial light which is why it is so perfect for capturing architecture and light trails. You can still shoot the light trails when the sky is black but the images won’t be quite as attractive. Have a browse of the finest architectural night photography and you will see the photographer works in this evening twilight period (or gets up early as a similar is experienced some time before sunrise).

Lets say you are in position at the right time. Get there well in advance so you can sort your composition out and get your exposure right before twilight. It is very frustrating to miss the brief twilight window becuase you weren’t in position and set up in time. Needless to say you need to be on a tripod with a remote shutter release. No graduated neutral density filters are needed as the camera can cope with the dynamic range of the image by this time. You may need a standard non-graduated neutral density filter (perhaps a 2-stop) to slow the exposure down if you are getting too short an exposure for the effect you are after (alternatively, you could use a narrower aperture, say, f16. I would avoid using f22 unless I was forced as the image quality will degrade due to ‘diffraction’, but thats another whole issue!)

For these images the lenght of the exposure is as important, if not a little more important, than depth of field. For my shot of Westminster I worked at f11 (which gave me sufficient DOF and kept me close to the sweet spot of the lens (around f8 would be about perfect). At ISO 100 (for the lowest noise possible), this gave me an exposure time of 4 seconds on my 24mm TSE lens. (As I was using a tilt and shift lens, I could have worked at f8 and used the tilt mechanism to give me the depth of field I needed but I was working quickly and didn’t want to complicate matters).

I test out several shutter speeds before the light gets to its best so that I am ready. The speed of the traffic and the brightness of the lights will dictate the length of exposure. Faster moving vehicles need a shorter shutter speed than slower vehicles. In my case, timing was vital. I could have shot when just cars were passing but I found it was worth waiting for a bus to appear as this gave a wider stripe of lights because of the upstairs windows. I fired the shutter, using a handheld remote release, a fraction of a second before the bus entered the frame. A few buses later, I had my image, the light dropped and it was time to head off for more night shots around London.

If you would like to master low light and night photography, why not join me on one of my London Night Workshops. We even have a London Black Cab to drive us around all of the best locations all night. Drop me an email if you are interested as these are selling out before I can list them on my website.

Tips for photographing in the rain

Rain Tips

Wet Day in the Forest

I am sitting in my studio with rain lashing down. April showers is one thing, but this is ridiculous! I thought it might be an idea to post my top tips on photographing in the rain.

Many photographers simply dismiss making images in wet weather out of hand, but in doing so I think they are missing out on some wonderful and different images. Granted, if  the rain is really driving and especially if it is blowing directly onto the lens, it is pretty much impossible to work outside. It is then I look for an indoor location or head home, fire up the iMac and do some image processing with some good music on and a nice hot cup of tea to enjoy.

However, we often get gentler rain or it is blowing in from behind us so the lens stays clear. It could be the rain is coming down vertically or is intermittent. In those circumstances it can be ‘game on’.

The first thing is to protect our gear. Whether we shoot on film or digitally, water and cameras are not a good mix. If our body and lenses are from a pro range, like the Canon 1ds and ‘L’ lenses, they are heavily sealed against water and dust and can perform in extreme conditions, but mid range bodies and lenses down, while having some weather sealing can soon start to be affected (often terminally) by water and dust. I have tried all kinds of camera protectors and to be honest, most are just impractical. At one end there are over designed complex polythene systems with arm holes and gussets, seals, elastic and goodness knows what that take a couple of days and a lot of patience to fit and are then so bulky and restrictive in their desire to totally protect the kit that operating the camera with them fitted is like trying to thread a needle with our hands submerged in a bucket of jelly.

There are other simpler protectors which are so flimsy they are worse than useless.

I do carry a couple of the disposable Optech ‘Rainsleeves’. These are low cost, come in packs of two and are designed to be used a few times and then thrown away. With careful use they can last quite a while. They take up little space in the kit bag and the price is very reasonable. It has to be bad for me to put them on though because, like most rain covers, they restrict us in using the camera. Everything becomes fiddly and a bit of a chore. The worst problem is getting your eye to the eye piece to compose and focus (or, if you use Live View, seeing the monitor clearly as the polythene is not optically clear enough to focus critically). There is a hole in the protector which is designed to go around the eye piece but to fit it you need to take the eye pice rubber off and then re-fit it over the polythene and by this time I am losing the will to live.

A simpler and much cheaper option is to carry a thick polythene bag. I carry one which is big enough to simply pop over the whole of my set up on the tripod. It covers camera, lens and filters. Obviously, you can’t work with this in place but it saves packing up for every shower. As soon as the rain has passed over, just whip it off and got on with the business of making images.

I also carry a cover similar to this one. Bought on EBay for less than £15 it gives good access to the cameras controls and is quick to fit and remove. Focusing and zooming are a bit tight but the cameras body controls are very easy to use, as is the eye piece and screen. I have been using mine for a couple of years and it is stills waterproof. Made from proofed nylon you buy one to fit each lens and body combination (in theory) but I bought one for my longest lens, my 200mm f2.8, and use it on all my lenses – the shorter lenses just have the cover a bit bunched up but it is not an problem for me.

Then, yesterday, on one of my bluebell wood workshops, a client had a new ‘device’ which seems like a brilliant idea to me (Thanks for the tip, Maria!). She was given the idea by photographer, Jeremy Walker. It may sound a bit strange but in really wet conditions yesterday she was able to shoot with ease and keep her kit dry. It was a very large sheet of Chamois leather. Told you it sounds strange. However, it is is not your average Chamois from Halfords. She got this from Skye Skynes – here on this page . Now, when you see the price (£22 delivered in the UK) you will probably have a sharp intake of breath and think I have finally lost my marbles, but before you shake your head and leave this post let me just tell you, these are the most amazing Chamois you have ever seen or felt. Skye Skyns make them from sheep skins on the Isle of Skye and they are very thick – many times thicker than the Chamois I use when cleaning the car. It is also the softest Chamois I have ever felt. The sheet is really big and you just drape it over your camera and lens. In between exposures you can drape it over the front of the lens (and filters) to protect the glass from drops of rain. It absorbs the rain and is perfect for wiping kit dry too. Because it is a sheet rather than something fitted you can double or triple fold it and just drape it over the lens and position it as you wish. As I watched my client work I was impressed with how easy it was for her. The Chamois has another advantage, it makes a great thing to wrap kit in to protect it. So even in dry weather it iso earning its keep in the rucksack. They are washable so when they get grubby they can be spruced up easily. I have ordered mine and can’t wait for it to be delivered, although knowing me it will come the day a long drought starts and I won’t get to use it in anger for months!

A good style of hat to wear in the rain is a hat with a rigid peak, like a baseball cap (but waterproof). This keeps us a bit drier and warmer but also the peak goes over the top of the camera while we have our eye to the eyepiece and helps stop the rain fogging the viewfinder. Absorbent lens cloths (and often several of them are needed for a rain session) are essential for drying fog off of the viewfinder and lens.

I also keep all those little bags of silica gel which come in many products packaging when they are delivered to us, you know the little white sachets with beads in which have ‘do not eat’ written on the outside. Silica gel absorbs moisture. I keep them all and drop a few in my camera bag, to help dry the air in the bag. Every now and then I swap them out, dry the old ones out at home and let the new ones do their job in my rucksack. (I also keep them in my laptop bag, lens cases and so on. Every little helps.

What about drying kit off after the session? I use absorbent cloths to dab the camera and lens dry, getting the worst of the wet off. I then let the kit dry slowly and naturally in a warm spot in the house, but not by direct heat. Then, once dry it needs a clean and polish to get any residue off of the body and glass. For cleaning my lenses I have stopped buying the ridiculously expensive lens cleaning fluid the manufacturers would like us to use. I get a big bottle of lens cleaner from my opticians for £2.75 (and that amount lasts me a couple of years!!). I use it to clean my glasses and honestly can’t see any difference when using it on my lens compared to the stuff sold by camera suppliers. I have a small spray bottle I decant some into to take into the field from the large bottle which stays at home.

That’s enough on keeping the kit dry. What about technique?

Passing Shower - Isle of Harris

Firstly, I don’t tend to use lens hoods for protecting against flare but I do use them to keep rain off of the lens. The two lenses I have which have particularly effective lens hoods are the Canon 24-70 L and the 70-200mm. Both of these come with a lens hood which is a full tube, not ‘petals’ which is more usual on wider angle lenses. These completely shield the lens glass from all but rain which is driving towards the lens in strong winds. The downside is that you can’t use Lee filters. To overcome this limitation I take bracketed exposures and blend them later in Photoshop. Problem solved.

I sometimes carry a golf umbrella which is useful to work under as long as there isn’t much wind. (This is the umbrella I use – designed for use in high winds – CLICK HERE) If the rain is coming in horizontally or the wind is strong, forget the umbrella, it is just impractical. I have been toying with the idea of trying studio lighting clamps to see if I can find one which will lock on to my tripod leg and hold the umbrella over me and the camera so that my hands are free to work. I will let you know if I find one that is suitable.

It makes sense not to fight the rain, so if it is blowing in from a particular direction, see if there are images to be made that will enable you to turn the lens away from the direction it is coming from. I also often head to woodlands in the rain. Trees in leaf will provide good cover although when the leaves get very wet it will start to get through to you, but it is dripping vertically from the leaves and not blowing in to the lens so with some of the protection I describe above we can continue working.

Cromer Pier - Winter Rain

So, there we are, all set up with a protected camera and some techniques to help us keep dry while we shoot. Is there any way we can use the rain to enhance our images? Most certainly.

The first thing to say is that the light as ‘bad’ weather passes or just before it arrives, is often spectacular. Foregrounds can be lit with glorious golden light with a deep black sky (one of the rare occasions that the sky is darker than the foreground). Shafts of light can pour from the clouds and glide across the land or sea. Rainbows decorate the sky. It is the photographer who is prepared to be out in the rain that gets to capture this glory.

In rain I often focus on making detail images, intimate landscapes. In woodland or in amongst the shelter of rocks there are lots of fascinating details which look great when wet. The diffused soft light when it rains is perfect for detail images as there are no strong shadows to contend with and the colours are rendered beautifully. The woods or rocks provide some cover and working on the close landscape provides a nice change from shooting the wider world.

While it is raining keep an eye open for things being back-lit. As the sun emerges from the clouds, wet trees, plants and buildings can glow as the sun catches the wet surfaces. If you want the opposite effect and want to kill reflections and saturate colours, fir a polarising filter and rotate it while looking through the eyepiece and see the reflections disappear. Shooting in the rain is also an ideal time for more creative image making – try shooting through wet glass from inside a car or cafe. The rain blurs the world and creates an impressionistic feel to things. Or go the whole hog and have a go at ICM (intentional camera movement) utilising the low light to lengthen the shutter speed and create images with blur by moving the camera.

If you like long exposures, try shooting them in the rain. If you can keep the kit dry, the effect of the long exposures is to turn the rain into mist and you end up with an image which looks like it has been shot on a misty or foggy day.

A final idea is to shoot puddles and running water. The raindrops create radiating patterns and often the light and colours above the water is reflected in it and yields great creative possibilities.

It has taken me a few days to put this post together. Now, as I finish it, the day is warm and bright. the rain seems a million miles away, but it is forecast again for tomorrow. I find myself hoping it will rain, so I can go out and have a go at capturing something with my camera. I hope you feel inspired to, too.

A Break in the Cloud


How do I create Panoramas?

Panoramas

Before getting in to answering this question I just wanted to mention I am running a “Capture-to-Computer” workshop in Skegness, Lincolnshire on Saturday 21st January 2012. One place is taken but there is one free place left. The basis of the workshop is creative and artistic photography – blur, ICM (Intentional Camera Movement) and textures. The morning will be spent with me showing you the techniques for shooting this style of image and then after a meal (included) I will spend the second half of the workshop showing you how to process these images in Lightroom and Photoshop. If you would like to book the second place the price is £149. Please drop me a message and I will organise it for you. Right, now on with the business of making panoramas!

I love panoramic images and with modern digital cameras and software they are easy to make. I find myself rejecting the use of super wide lenses in favour of making panoramas more and more in my photography. I am not keen on the heavy distortion that comes with the super wides and the converging verticals they create. With a panorama I can get in even more width and maintain a natural looking image with far less distortion.

You can by purpose made panoramic tripod heads, such as the Panosaurus, which are designed to rotate the camera on the ‘nodal point’. If the camera is rotated while held on this point and kept absolutely level will allow it to create almost perfect panoramas with little distortion and a very natural look. However the heads are expensive and you either have to have them fitted to a dedicated tripod or be prepared to switch heads in the field, and few of us are that dedicated or have the backpack space to carry two tripod heads.

There are two very acceptable alternatives which are ideal for most of us and I use both in my image making. I will cover both methods here. You can use a tilt and shift lens (the expensive but easier option) or you can use a standard prime or zoom lens. Both require stitching images together in software and both produce great images if done carefully.

So, if you want to make high quality panoramas, how should you go about it? The first step is to get your tripod as level as possible and make sure the camera is as level as possible on the head. This is far better than angling the camera slightly upwards or downwards. The more our of level the tripod and camera are, the more distorted the final image and the area you will need to crop away from the edges of the pano will be larger. I use the small round level bubble on the top of my tripod below the head to level the tripod itself. This can be fiddly as you need to tweak the leg lengths to get it right but it is worth doing. I then level the camera on the head using my hotshot spirit level.

Next is getting the settings in the camera right before you start shooting. It is critical that nothing changes between shots or you will not be able to seamlessly stitch the image. Turn off auto focusing on your lens so the focus point does not change between shots. Switch the white balance to daylight so it doesn’t alter between shots. Zoom out further than you want to to allow for cropping the stitched image which you will have to do to a greater or lesser extent. Don’t frame the image as you want it to finally appear as some of the edges will be lost. Start the panorama further to the left or right than you want to for the same reason. I use the camera in portrait orientation for panoramas to give a larger file size and more depth for cropping (unless I am using a tilt and shift lens, but I will come to that later).

Working in aperture priority or manual, choose one area of the pano to set your exposure and focus. The exposure is often the tricky part, especially around dawn and dusk or when the scene has high contrast. I tend to aim to set my exposure based on the area of the pano which is almost the brightest. I take a test shot to get the histogram across to the right. You have to accept then, that as the camera moves to wares the darker area of the pano it will begin to under expose but we can tweak this later in the software to balance the image. I set my neutral density graduated filters for the same frame as the one I use to set the exposure. You have to accept that as you take the other frames the positioning of the grad may not be quite perfect, especially if the land rises or falls across the width of the range of shots but it will look worse if you try and move the grad up and down for each image. (I prefer to use soft grads for panos to make the transition line less obvious).Do not use a polarising filter when doing panos as this will cause havoc with the look of each frame and you won’t be able to stitch the images acceptably. Focus hyper focally or on a point very close to the base of the frame. I usually use f16 for panoramas to give a bit more latitude on depth of field, whereas in my other landscape work I am usually trying to get the aperture to f13 or f11.

Once you are all set up rotate the camera to the left or right hand end of the pano sequence. Remember go further left, or right, than you want to include in the final image you have in mind. I then take a single shot with my hand in front of the lens with my thumb up. This tells me the next image is the start of a pano sequence. Once I have taken the final shot in the sequence I take another with my thumb down. This indicates the end of a sequence. Believe me, you will be pleased you did when you get home as it can be hard to tell which images are for panos.

Take the first shot and then rotate the camera for the next as quickly as possible. The absolutely critical thing to remember is to overlap each frame by at least 30%. It is better to overlap by 50% than to go lower than 30%. The more data and overlap Photoshop has to work with the better the quality of the panorama you will get. The reason for working quickly during the sequence shooting is to minimise movement of objects in the pano. Anything moving makes it harder for the software to do the stitch, so scudding clouds, branches of trees blowing in the wind and so on can cause issues.

Don’t forget, panoramas don’t have to be horizontal. For a really different type of image use the same system but shoot vertically. Vertical panoramas look great on the wall.

Back at home on the computer there is some very specific things you can do to make the panorama stitching go well. I use Lightroom to work on my raw files so the screenshots below will show that, along with Photoshop for the stitching but Elements works in just the same way although the menu items might be in slightly different places. You can also get specific panorama stitching software but I have never used this so can’t comment on it.

Import the raw files into Lightroom. Do not allow the import dialog box to apply any changes to the images on import such as adjusting white balance or applying some preset as this will make stitching difficult or impossible to do seamlessly. It is vital you don’t do any work on them whatsoever before they are stitched. Find the sequence of images and shift click to elect them (this is when the thumbs up and thumbs down shots are a big help, but obviously don’t include them in the stitch!). Right click the selected images and select Edit in >> Merge to panorama in Photoshop. (see screenshot below)


This will open Photoshop (or Elements) with the following dialog box open


On the left hand side select the Auto  radio button and in the centre area of the window you will see the list of raw files you are using. Click OK. Now just leave Photoshop to do its thing. It will take a while depending on how many raw files you are stitching and how fast your computer is. On slower machines you will have tome to go and make coffee :).

Once stitched the image will look something like this;

Now you can see why cropping is required. In the layers panel you can see how Photoshop has stacked the three images and then masked them to achieve the stitch. The next step is to flatten the layers and then crop the image to the panoramic shape, losing all of the irregular edges. I then save this image as a tiff (or psd, if you prefer) and take it back into Lightroom. Now you can start making adjustments to the exposure, contrast, clarity and so on because now it will be across the whole image and will look right.

Once you have made the adjustments you want in Lightroom, move the image back to Photoshop for any final tweaks and adjustments there, and you are done.

The process is identical with Tilt and Shift lenses, with a few differences. Firstly, when doing horizontal panos you keep the camera in Landscape orientation. You make the sequence of images by using the shift mechanism and make three images, one shifted all the way to the left, one in the centre position and the final one shifted all the way to the right. All the information above about levelling and camera settings still apply and the stitching process is identical, you just need the three shots. The advantage of this method is the overlap the TSE lens produces is way beyond 30% so the stitch works well and the amount that needs to be cropped away is usually less as the lens tends to give a clean stitch if the tripod and camera have been set level.


So, why not have a go next time you are out with your camera. They are great fun to make and can be quite addictive. Enjoy!


New Digital Photography Workshops for Winter/Spring 2012

digital workshop

Here is the new winter/spring 2012 workshop schedule for my digital photography workshops.

I am introducing a range of new workshops and locations for 2012. You will also see I have teamed up with two more very talented photographers as co-leaders on some special locations. I will be posting full details of these workshops on my website in a few days time and soon you will be able to book and pay online via PayPal. Direct booking via email will still be available.

As a special offer for the new season I am offering the first ten who book and pay their deposits a 10% discount off of the cost of a workshop in the schedule. This does not apply to Capture-to-Computer workshops but will apply to one-to-ones. (just four reduced places now remaining)

If your family or friends are struggling to buy the perfect gift for you, why not suggest they buy you one of my gift vouchers. They can select any value they wish from £10 upwards and it can be redeemed against any workshop, one-to-one or Capture-to-Computer workshop of your choice. If the value of the vooucher exceeds your chosen workshop I will refund the difference or it can be credited towards another workshop. If the workshop exceeds the value of the voucher you can use it in part payment. I even send you a blank greetings card with the voucher with one of my images on for you to present the gift to a loved one.

JANUARY

6th & 7th – ‘Coast & Castles’ Northumberland, with Antony Spencer (now a Light & Land tour leader). Two days photographing the spectacular coast of Northumberland so beloved of photographers like Joe Cornish, including three castle locations. £149 per day or £125 per day if booking both days. Includes breakfast. Does not include accomodation.

13th – Capture-to-Computer’, Yorkshire Coast, Yorkshire Limited to two people & includes breakfast. £149 per person

16th – Black & White Landscapes, Peak District. Includes processing in Silver EfEx Pro & Photoshop. Includes breakfast. £70 per person

22nd – Beginners introduction to your camera, Clumber Park, Nottinghamshire. Three hours approx. Any camera no matter how basic. £35 per person

23rd – Complex Compositions – Bole HIll Quarry, Peak District. Includes breakfast. £70 per person

30th – Peak District (New Locations) includes breakfast. £70 per person

FEBRUARY

11th – Lakeland Landscapes. A day spent photographing classic lakeland locations. Includes breakfast. £70 per person.

18th – Northumberland. A day photographing the finest coastal locations in Northumberland. Includes breakfast. £70 per person.

24th – Capture-to-Computer, Somerset coast. Limited to two people and includes breakfast. £149 per person

25th – Black & White Photography, including long exposures, with co-leader & mono specialist, Paul Wheeler. Weston-Super-Mare. Inlcudes breakfast & ‘how-to’ pdf’s. £99 per person.

29th – Peak District Landscapes, Half day, including refreshments. £45 per person.

MARCH

3rd – North East Coast – Nature & Industry – Saltburn & Paddys Hole. £70 per person including breakfast

5th – Peak Woodlands, Bole Hill Quarry. Includes breakfast. £70 per person

9th – Capture-to-Computer – Yorkshire Coast for Seascapes & Long Exposures. Includes breakfast. Limited to two people. £149 per person

10th – Long Exposures, Yorkshire Coast with long exposure specialist, Noel Clegg. Includes breakfast. £99 per person.

17th – Capture-to-Computer, Spurn Point, Yorkshire. Limited to two people, includes breakfast. £149 per person.

18th – Beginners introduction to your camera, Clumber Park, Nottinghamshire. Three hours approx. Any camera no matter how basic. £35 per person

APRIL

2nd – Peak District Landscapes, with Antony Spencer. £125 per person, includes breakfast.

3rd – Peak District Landscapes, with Antony Spencer. £125 per person, includes breakfast.

10th – Private macro workshop for members of the Nottingham Photographic Society.

13th – Bole Hill Quarry, Peak District woodland landscapes, half day, including refreshments. £45 per person

22nd – Peak Landscapes, half day to sunset, including refreshments. £45 per person

28th – Bluebells in Ashridge Forest, Buckinghamshire with co-leader Tim Smalley. Includes breakfast. £99 per person.

I look forward to seeing you on a workshop soon

Best wishes

Doug

Some recent testimonials from customers;

“Just wanted to say a huge thank you for a fantastic weekend!”

“I thought all the venues were spot on and enjoyed the fact that both of you brought so many different skills and knowledge to the event.”

“Since I started doing “serious” photography about 7 or 8 years ago I’ve been on at least half-a-dozen workshops or courses. I gained more from this one day than I have from all the others put together.”

How do I dodge and burn in Photoshop?

dodge burn


Dodging and burning is a technique which harks back to the days of film and darkroom developing. In the darkroom film users employ strange techniques to darken areas of their prints and lighten others to improve the look of the image. For those of us working digitally it falls to Photoshop to act as our digital darkroom to achieve the same effect.

‘Dodging’ refers to the lightening process while ‘Burning’ is the darkening of areas in the image. I remember which is which by thinking that burning an object blackens it, so burning = darkening. The goal is to introduce contrast into the image in such a way that the impression is of light falling on the subject in very controlled ways, highlighting the beauty or key aspects of the image. In my photograph above (and I have selected an extreme example rather than a subtle one) you will see I have burned the tractor tracks, areas of the clouds and areas of the surface of the wheat. To contrast with this I have dodged areas of cloud and highlighted the light falling on the barn with dodging. I was aiming for a dramatic image.

The biggest tip I can give you with this process is to do it very gradually, to be patient. Most people I see using this technique want to see dramatic effects too quickly and end up spoiling their image by creating a patchy look. The process is simple but it takes time and the vision to visualise the final result before you start. It is not good to approach it in a random way and hope the end result is going to be effective.

Now to the process. Firstly convert your image to black and white using your preferred method, either in Photoshop or a plugin such as Silver EfEx Pro 2. At the conversion stage, beware making the image too contrasty as you are going to tune the contrast carefully using the dodge and burn tools. Open the mono image in Photoshop.

Duplicate the background layer by selecting it in the layers panel and pressing cmd+J (windows = ctrl+J). Always do this and dodge and burn this new layer so that if you make a mistake you can always delete it an start again without spoiling the base layer. The layers panel should now look like the image below.


I decide whether to start with dodging or burning depending on the image but in reality it usually doesn’t matter which you start with as you will be alternating between the two. The image below shows the flyout toolbox from the main toolbox which shows the two tools.


I am going to select the burn tool first. The icon looks like a clenched fist. (don’t ask me why). The next step is to set the burn brush up correctly. This is done on the top toolbar as in the image below.

You will see I have selected a very soft brush and set the hardness to zero. This really feathers the effect and helps prevent hard edges to the burned areas. In the range drop down box you can see I have selected ‘shadows’. This is something important to understand when dodging and burning. The tones you select in this box tell the brush the only tones to affect. So if shadows is selected when you brush over pixels in the image the brush will only darken shadow, the darkest, pixels. It won’t touch mid-tones or highlights. Similarly, if you select mid-tones then only they will be darkened. Shadows and highlights will be unaffected. The same applies to the dodge brush. In most cases the other thing to remember is do not burn highlights and do not dodge shadows. If you do it usually gives the pixels a ‘damaged’ look because the change is too dramatic. Stick to burning shadows and mid-tones and dodging mid-tones and highlights.

The next vital thing to note in the above screenshot is the exposure level I have selected. In the shot above it is at 3%. This is where most people go wrong, they set the percentage too high. I work between 1 and 5%. I never go higher than 5% and rarely use that. I am usual working between 1 and 3%. When you use this setting the effect builds up very slowly and delicately giving you control. If you go higher you loose control and damage the image.

Now size the brush using the [ ] keys as usual and start brushing over the image. Use large flowing strokes. Avoid at all costs scrubbing away wit the brush at small areas as this soon creates a blotchy look. Keep switching between dodging and burning and build both together gradually. Keep changing between working on the shadows, mid-tones and highlights. Keep turning the layer on and off by clicking the ‘eye-con’ on the layers pane so you can see how far you are going and how far you have come. Work towards your pre-visualised goal. Take your time and don’t overdo it!

Here is my image. The first screen shot shows the basic mono conversion. The second it the dodged and burned final image. I have created a vignette to draw the eye to the water flow. I have brightened the water to give sparkle and punch and added a bit more drama to the sky.

Most mono film photographers would not consider printing an image without some dodging and burning to enhance it. Read what Ansel Adams wrote about this process as part of his print making to see how important he felt it was. He was a master of the technique. I hope you enjoy practising the effect and feel sure your mono images will improve dramatically as a result.

To learn much more about dodging and burning and all the other aspects of mono image making, why not consider coming on one of my specialist mono workshops where we work on thinking in mono, composing for mono and then processing to make mono images full of drama, light and character. You will find full details on the workshops pages of my website.


Landscape Photographer of the Year 2011

LPOTY 2011

I am pleased to announce that this image of mine entitled ‘Scintilla IX’ which forms part of my ‘Lone Cloud’ project has been commended by the judging panel in this years Landscape Photographer of the Year competition. As such it will be featured in the AA Publications book of the winning entries which is to be published in November. It will also form part of the exhibition of the winning images in an exhibition at Londons National Theatre on the South Bank.

Free downloadable long exposure calculator chart

I have just put on the downloads page of my website a free pdf long exposure calculator chart

Just download it, print and laminate it for use in the field.

I hope you find it helpful.

I plan to add some other free downloads so please sign up for my email newsletter for advanced notice of these – just use the form on the right hand side of this page.

if you have any ideas for useful downloads, please drop me a message using the ‘Contact Me’ form on the right.

Top ten tips for photographing seascapes

Landscape photographers love the chance to photograph the sea. We love the wide horizons, big skies and the magnification of the glorious light at dawn and dusk reflected in the water. To make the most of your trips to the coast here are some tips for making great seascape images.

1. Go prepared. Welly boots, while not glamorous, are the best footwear on the shore. They allow you to work in soft mud, lapping waves and rock pools without worrying about getting wet, cold feet. Neoprene lined wellies are more expensive but much more comfortable and warmer than cheaper brands. I have also found seawater rots the adhesives and stitching in modern walking boots. I had a pair of new boots fall apart after a trip to Skye due to me wading about in seawater for two weeks.

2. Check the tides in advance. Often the best time to make seascapes is with a falling tide at sunrise or sunset. The exposed rocks and sand will be wet from the receding tide which reflects the light in the sky and adds much more interest than a drier foreshore with an advancing high tide. To find the tide time for your location enter the name of the nearest harbour or port into Google along with the words ‘tide table BBC’. this will bring up a link for the generally reliable tide tables on the BBC website. If you don’t live in the UK just enter the nearest harbour name and the words’ tide table’ and you should get a link for your country. Being aware of the tide times also helps you be aware of not being cut off from the mainland by a fast rising high tide. Very easy, believe me, when you are engrossed in making images.

3. Check where and when in relation to the location the sun will rise and set to find the best time to visit that location. The best way to do this is to download ‘The Photographers Ephemeris’. This free software uses Google Earth and shows on the map exactly where the sun and moon rise and set in any location on the planet on any day. One of the best bits of software a landscape photographer can have on the computer. You will find it here. There is even a version for the iPhone.

4. Take a towel, lens cloth and lens cleaning fluid. You will find, even in quite calm conditions that your lens and filters start to get coated in salt while making images at the sea. This soon ruins images. Keep an eye on this and clean your glass regularly. I also have a golf towel clipped to my tripod for quickly drying off salt spray from the camera and for draping over the camera if the waves start to get high.

5. Wash you tripod legs in fresh water after a seascapes session. Tripods often get stood in seawater to get the perfect shot, and get coated in abrasive sand from beaches. To preserve your kit, wash it off well with fresh water after the shoot.

6. Get there early. I usually get my best seascapes 30, 45 minutes or more before the sun is due to rise. Trust me, that extra 20 minutes in bed is not worth missing the best light for.

7. Stay late. As with the preceding point, at the end of the day i often get my best images up to an hour after the sun has set. Don’t pack up and go home when the sun dips below the horizon – keep shooting.

8. Get the tripod down low. So often photographers fully extend the tripod legs so the camera is at head height for comfort or out of habit. Get down low for more interesting images with a different perspective.

9. Use ND filters. ND filters from 2 to 10 stops help lengthen exposures and create wonderful effects on moving water and clouds. The 10 stop filters, such as the Lee Filters ‘Big Stopper’ enable me to shoot great seascapes long after the best light has gone thus lengthening the shooting time on location. they also enable great images to be had in poor light and cloudy conditions.

10. Shoot details. it is easy to just shoot the wide seascape before you and to miss some of the beautiful ‘intimate landscapes’ of the shore. Rock patterns, seaweeds, shells and pebbles, patterns in the sand, beach furniture and buildings and so on.

I hope you have found these tips helpful. I would be interested in hearing from you if you have tips to add.

If you would like more help with improving your seascape photography, please use the form on the right to add your email address to my mailing list. You will get advanced notice of all of my future seascape and other workshops before they are announced elsewhere.

Should photographers use Twitter?

Twitter is certainly a phenomenon. It has appeared as if from nowhere and people seem to love it or scorn it. 140 characters per message only. Is it a gimmick that will fade as quickly as it emerged? Or has it filled a niche and become an indispensable feature of our online lives? In particular, for us as photographers, is it a useful tool? Or a waste of time? If we are running a business does it provide tangible benefits or is it a distraction that consumes time we could spend making our living more effectively elsewhere?

I was a sceptic but am now committed to Twitter. It has its drawbacks but I believe it has quickly become a vital tool in my social networking system.

For those of you who haven’t been on Twitter and wonder what it is all about, here is a brief description. You create a free account and sign in. You are presented with a text input box in which you can type anything you want – the question beside it asks ‘Whats Happening?’. So you type something, within the constraint of 140 characters (and spaces count as a character – you soon learn to be very concise). Press’Tweet’ and your message is launched.

But who is going to read it? At this stage, no one. You have no friends, no ‘followers’. I guess some brave souls tweet away and hope someone will stumble on their tweets and decide to follow them. However, the best way to get followers is to follow others. Twitter will analyse what you tweet and suggest like minded people who you may wish to follow. You can read what they tweet and decide if it is of benefit for you to follow them. From the people you follow, Twitter will suggest more people you may be interested in. You can also see who people you follow are following and some of these you may decide it is beneficial for you to follow.

What happens when you follow someone. Simply put, their tweets will appear on your home page in chronological order. The most recent will always be at the top. Your list of tweets will be a unique combination of all the tweets of everyone you follow. It is unlikely anyone else on the planet will have an identical list to you – they would have to be following exactly the same people as you.

If one of your contacts says something you feel your contacts would be interested in you can ’retweet’ it with a click of the mouse and their tweet will be sent to all of your contacts. In the same way you can reply to a tweet if you feel you have something to say in response to it.

Tweets can contain links to useful or interesting web pages or images. Or, they can be just text. Its up to you. Long URL’s you want to tweet can be shortened by websites which convert them into ‘tiny URL’s’ to save characters.

You do have to be aware that every tweet you make is visible to the World and all of your contacts will see it and be able to read it. The exception is if you send a private message to one of your contacts.

Your followers can send you private messages and you are informed of these in your email inbox. You also get an email each time a new person follows you, giving you the chance to check what they are saying on Twitter to see if you wish to follow them back. Here I add a note of caution. You will soon get bizarre people following you… who obviously have no intention of ever reading what you write because they are following thousands of people. They couldn’t possibly be interested in what you are saying. What they want is for you to follow them and read what THEY are saying. Most are online marketeers or people promoting their own businesses and products. I do not follow anyone who has an unmanageable amount of contacts. I believe Twitter should be a two way thing. The only exceptions I make are one or two ‘celebrities’ who do say interesting or funny things and will obviously have thousands of followers but what they say is of value to me in one way or another, so I make an exception. I follow about a quarter of the people who follow me. If you want me to follow you, then you have to be saying things that are interesting, useful, humorous and so on (and I don’t follow anyone who uses foul language or tells off-colour jokes).

Now we come to its benefits for us as photographers. As with many forms of Social Networking, Twitter has given us the ability to be put in direct contact with many like minded people. Ordinary photographers, many of whom have a vast knowledge of equipment, techniques and contacts. I have tweeted brief questions and within seconds got back the answer from contacts. I also try and respond to the questions of others (I get mad with people in Social Networking who are only on the take – it should be a two way thing – photographers I follow who only post stuff about what they are doing and images they are uploading and so on soon get deleted from my list of contacts. I don’t want to hear just what a great guy you are – -I want to interact with you.)

I do get business from my contacts. I may post about a space on a workshop and get a booking as a result which is a real benefit to my business, but it also means my customers can contact me for advice or just to tell me what they have been doing since we met and because of the 140 character limit it has to be brief and to the point. It is often so much quicker than email.

I have linked my Facebook account to my Twitter feed so when I upload something on Facebook a tweet with a link to it appears in Twitter. Now Twitter is becoming a dynamic part of my social networking system. If a follower clicks that link they go to my Facebook stream and now they don’t see other peoples tweets, they are focused on my stream alone and this may lead them to clicking a link to my website and now they are purely focused on my work and from here they may link to my blog and start reading stuff I have put up. Twitter, in this way, has become an essential tool in social networking.

As with all social networking it can become a time waster. If you have too many contacts you can spend hours every day following everyones tweets, checking all the Facebook friends streams, commenting on all your contacts Flickr uploads, processing emails, reading and writing blogs, recording podcasts and listening to those of others and so on. It can become all consuming and thats before you have searched for bargains on EBay! Very soon you will get no work done. YOu have to be disciplined and apportion a sensible amount of time to social networking – enough to give real benefit to your customers and friends and enough to derive benefit yourself, but not so much that your business or life suffers. It is just a matter of self control.

I quickly came to see Twitter as indispensable.  I love how quick it is and how it puts you in direct contact with great photographers who soon form a part of your network. Most of the guys and girl photographers on Twitter are genuinely friendly and keen to help. It enables us to interact with people we would never have had chance to contact 15 years ago. Imagine being a budding landscape photographer in the 1960’s, 70’s or 80’s. We would have had no chance to talk to Charlie Waite, Joe Cornish or other greats. Their equivalents today are on Twitter, Flickr and Facebook and we can. We can ask them questions, get their feedback and perhaps even help them (they are human too). This has enormous and real value.

So, I don’t think Twitter is a waste of time (but it could be – thats down to you) and I do see real benefit to my business in Twitter. I also have learned a huge amount from the help of my contacts on Twitter and hopefully have been able to help others too. I recommend you check it out and make up your own mind.