Tag: icm

What is Photographic Expressionism?

Ever since the earliest days of photography, this new method of creative expression has sat uneasily in the art world. Many steeped in the more traditional techniques of painting, drawing, sculpture, along with a large proportion of gallery owner’s, collectors, critics and museum curators have viewed it as a somehow less worthy art form. Perhaps it seems rather easy compared to other crafts – more dependent on the equipment than the skill of the practitioner. Yet, the earliest photographers were artists first, intrigued by this new medium and it wasn’t long before they were looking for ways to abstract the images they were making. 
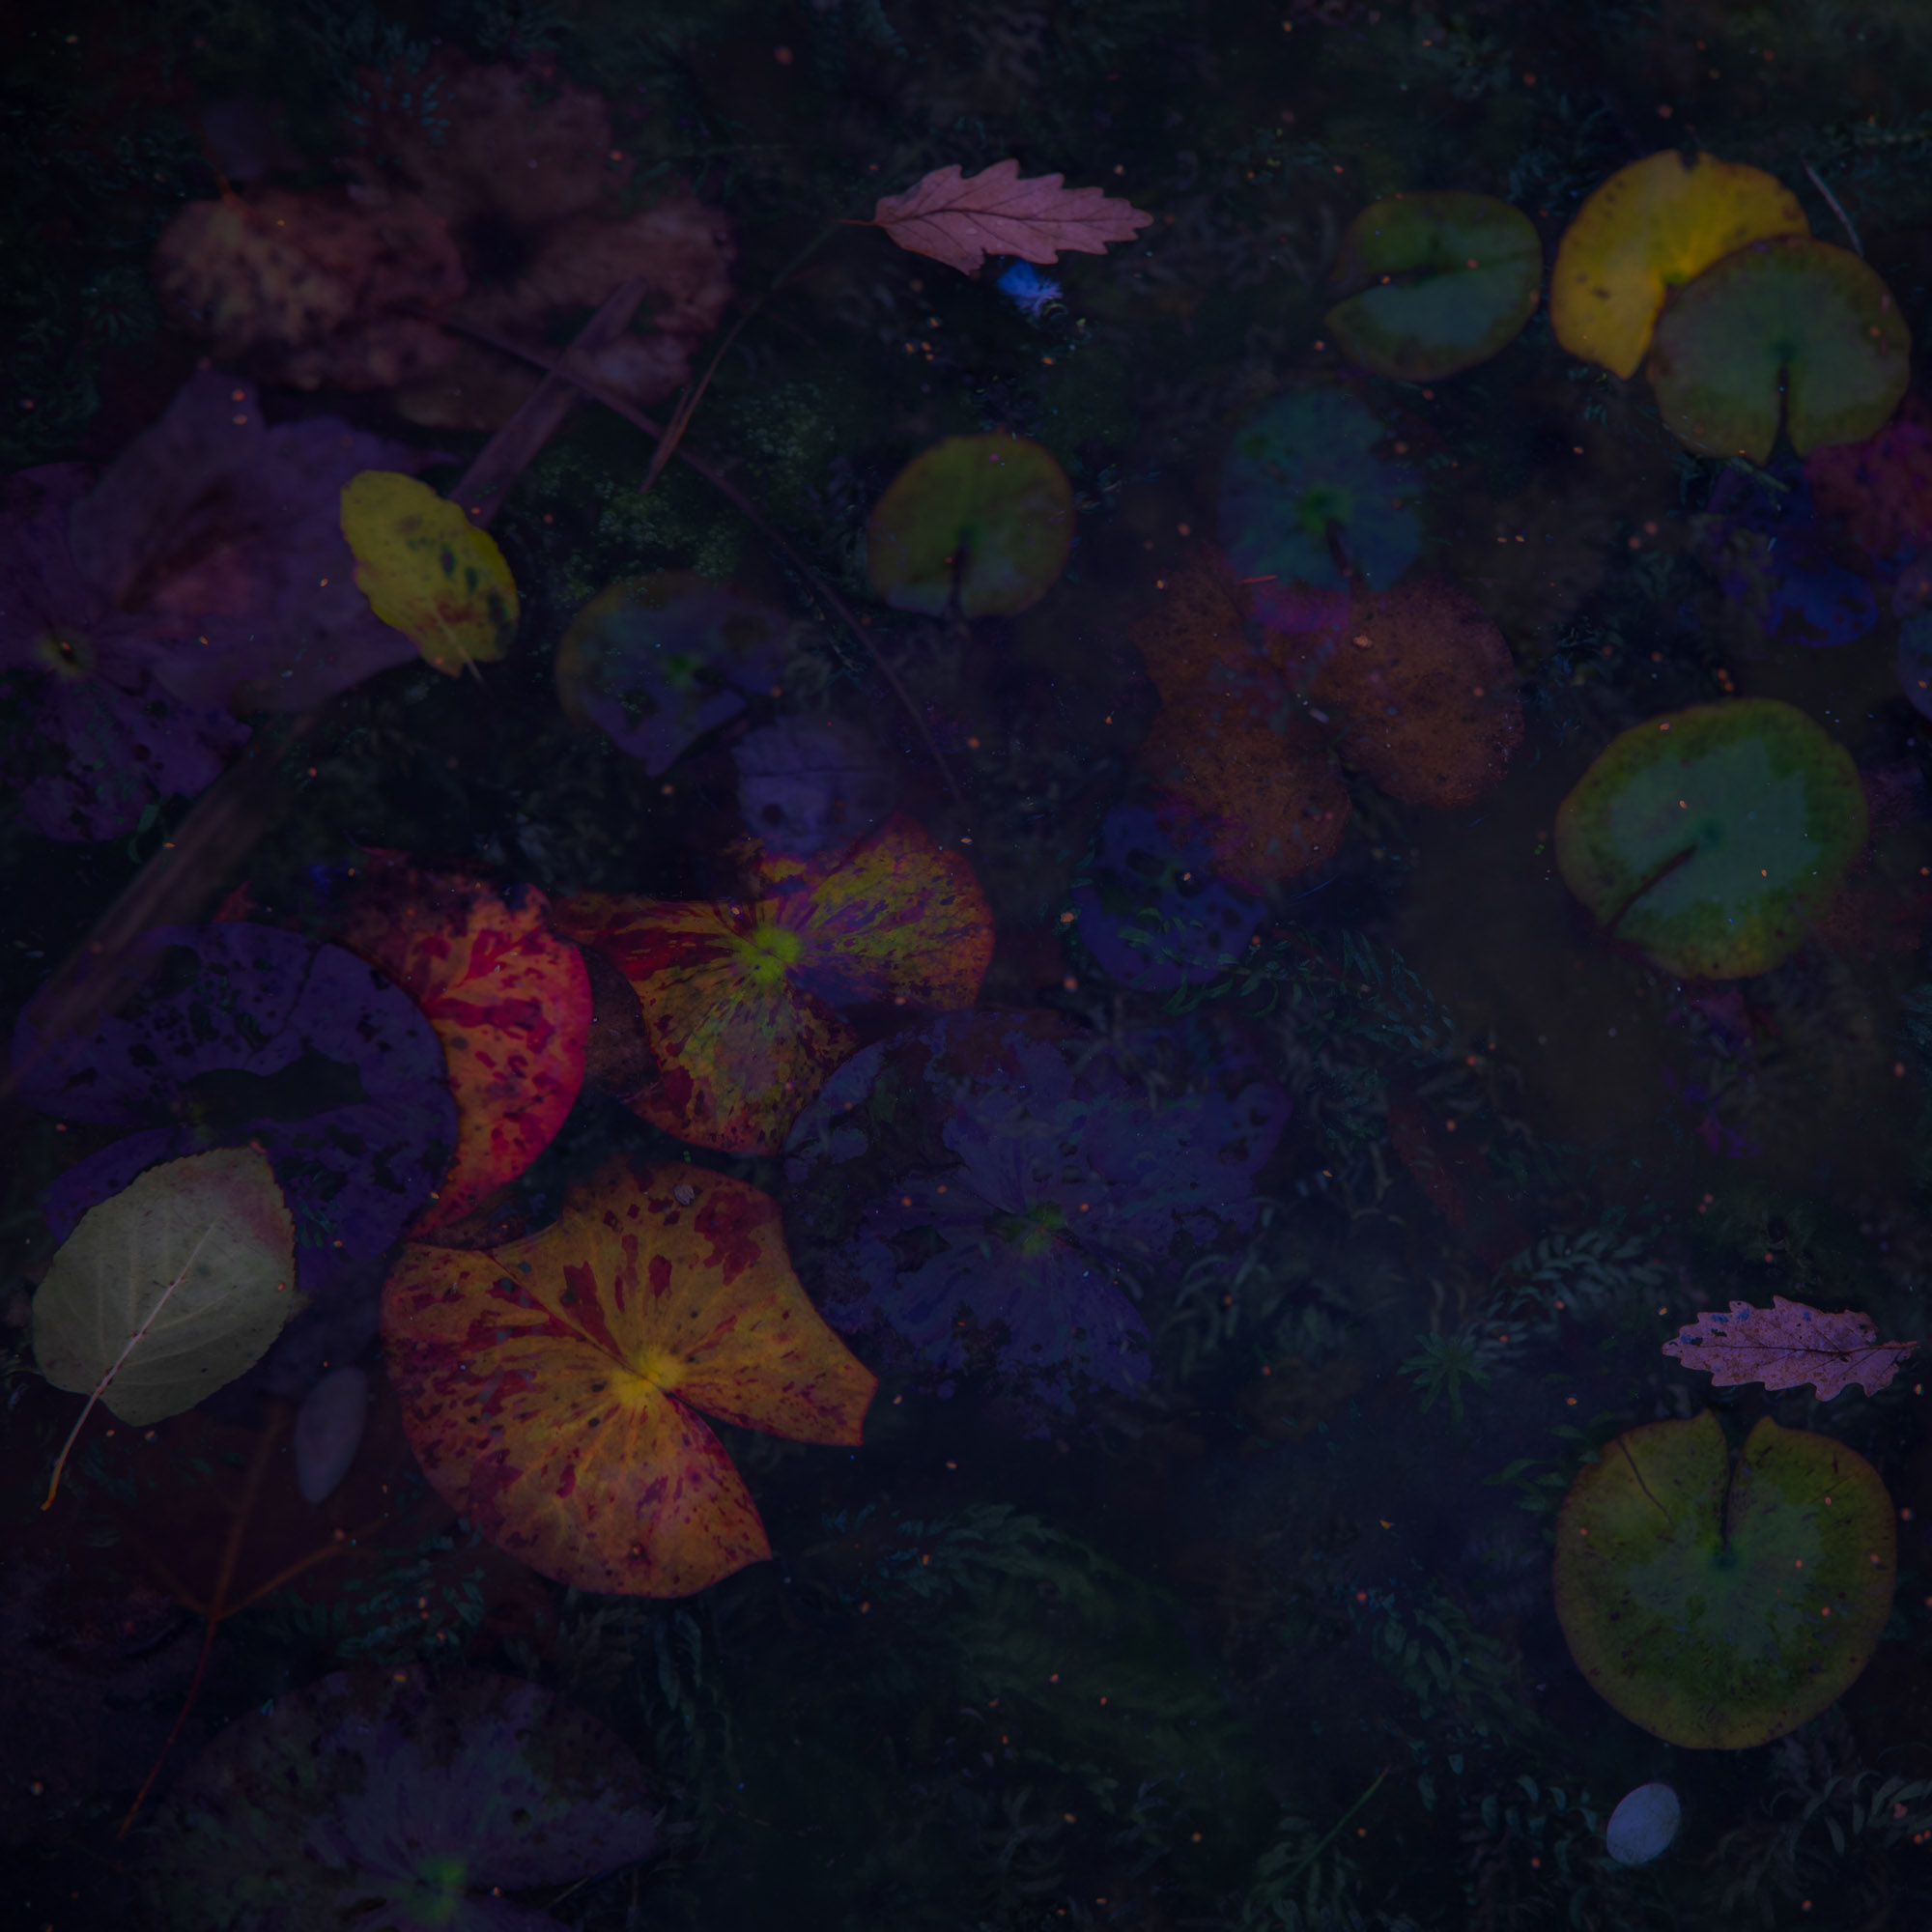
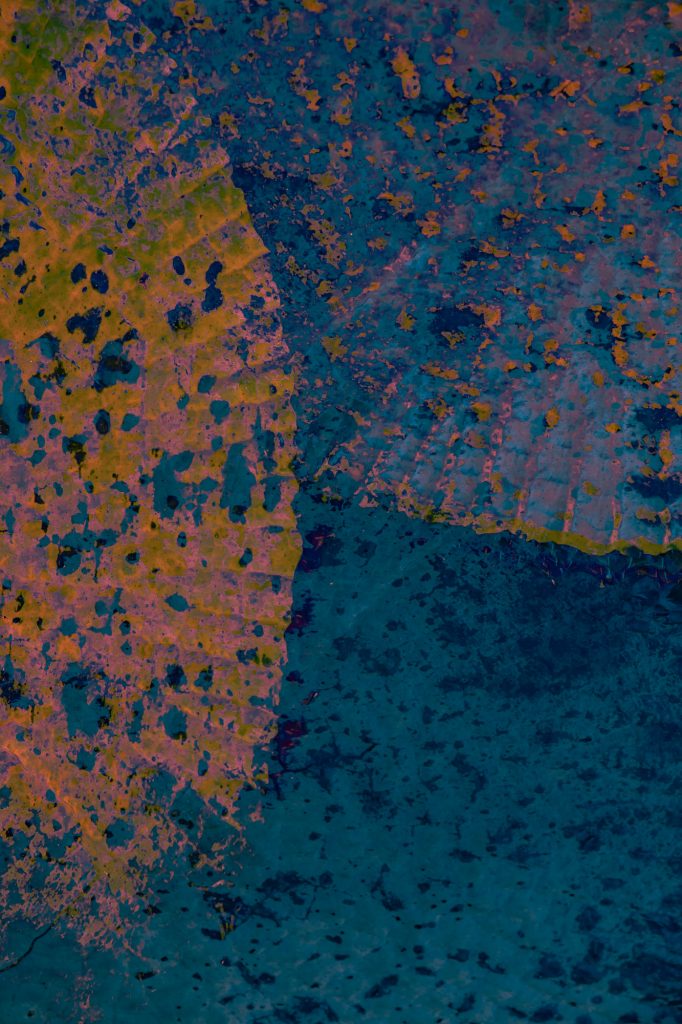
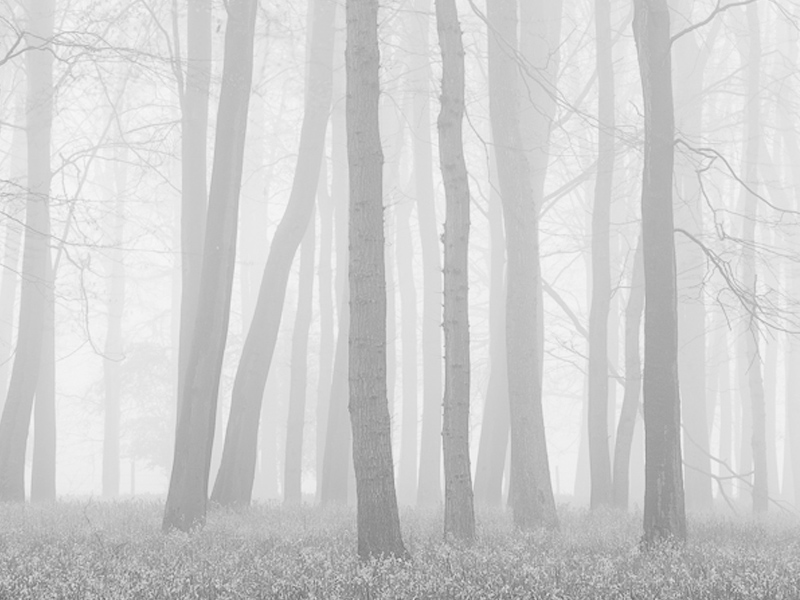
The paucity of significant museum exhibitions devoted to abstract photography testifies to this state of affairs. MOMA in New York held a flurry of three such exhibitions between 1948 and 1960 (In and Out of Focus 1948, Abstraction in Photography 1951 and The Sense of Abstraction 1960) The next internationally important exhibition was ‘Shape of Light’ at Tate Modern, London in 2018 – a gap of almost sixty years. This seems to bolster the view that abstract photography is the poor relation of the art world.

Despite this wariness toward photography, we can see it shares a history with art over the last century as abstract explorations in the darkroom ran parallel with Cubism and other forms of modern art. While photography is the ideal tool for creating perfect copies of reality, there have always been photographers who are mentally emancipated from the need for slavish reproduction – those searching for a more impressionistic way of making images. Back in 1905, Alfred Stieglitz opened his ‘Little Galleries of the Photo-Secession’ at 291 5th Avenue in New York (which soon became better known by its nickname, ‘291’). His goal was to showcase the newly emerging Pictorialist photography. Within a short time, the gallery became a hub for this and avant-garde art – from both Europe and America. Edward Steichen became involved, helping with the selection of artists who would be exhibited based on his experience from living in Paris. It became a place to see works by Cezanne beside Stieglitz, Picasso and Braque accompanying Steichen and Matisse along with the abstracts of Paul Strand.

Interestingly, in conjunction with running his 291 gallery, Stieglitz was also a founder member of the Photo-Secession group. Other notable members included Steichen, Clarence H. White, Gertrude Käsebier, and Alvin Langdon Coburn. These photographers broke away from the more traditionalist Camera Club of New York in 1902 and pursued Pictorialism. This approach espoused manipulating negatives and prints to produce the effects of drawings, etchings, and oil paintings. They produced a quarterly magazine entitled ‘Camera Work’ and actively promoted photography as an art form. 

Even earlier, in 1892, a group had formed in Europe called the Linked Ring (or, more formally, the Brotherhood of the Linked Ring), that had similar goals. While members made images in differing styles, they were united in rejecting the technical approach to photography that traditionalists were propounding. Several members of the Photo-Secession group went on to become members, including Steichen, Stieglitz, Gertrude Käsebier, and Clarence H. White.
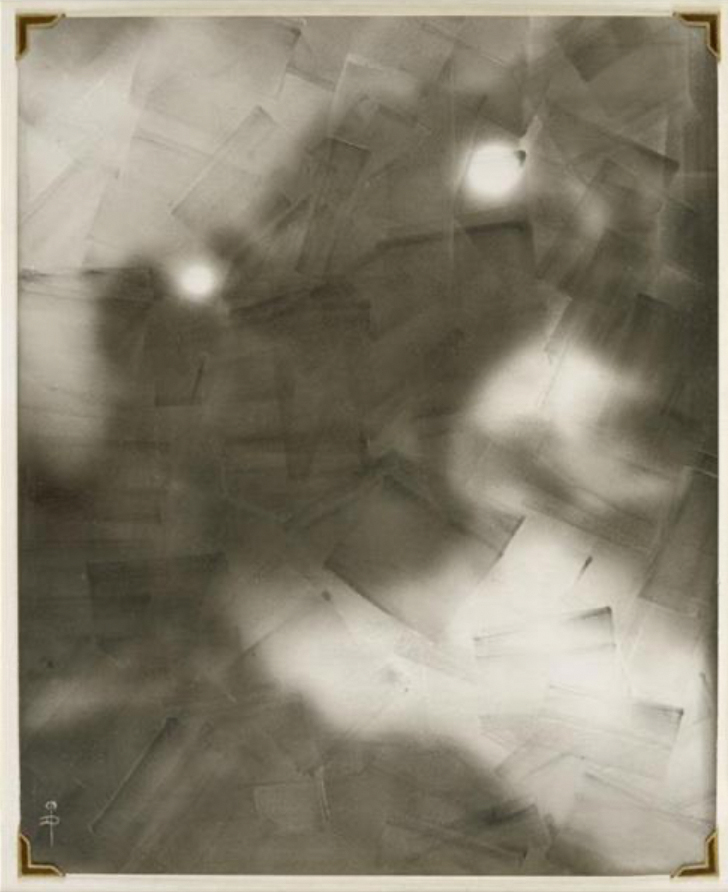
If we discount scientific photography, then perhaps the first truly abstract photograph could be “Winter Landscape” made in 1909 by George Seeley. It is suggestive rather than descriptive, a snowy landscape as the source, but reduced to pure shadow and curve forms, leaving much room for audience interpretation. Around this time Alvin Langdon Coburn made a remarkable image in his home city of New York, looking down on a Manhattan roundabout from a skyscraper. ‘The Octopus’ of 1912 was a visual shock to viewers unused to viewpoints such as this. In 1911, Linked Ring member Pierre Dubreuil explored both cubism and vorticism with his photograph, ‘Interpretation Picasso, The Railway’ which he embellished with ink and pencil. From these early explorations, abstraction in photography became more widely explored. Examples include Man Ray and his poetic ‘Rayographs’, which he created by drawing with light on sensitive paper. Or László Moholy-Nagy, the constructivist artist and instructor at the Bauhaus school, who was fascinated by creating Photograms with light, forming geometric shapes arranged over the surface.
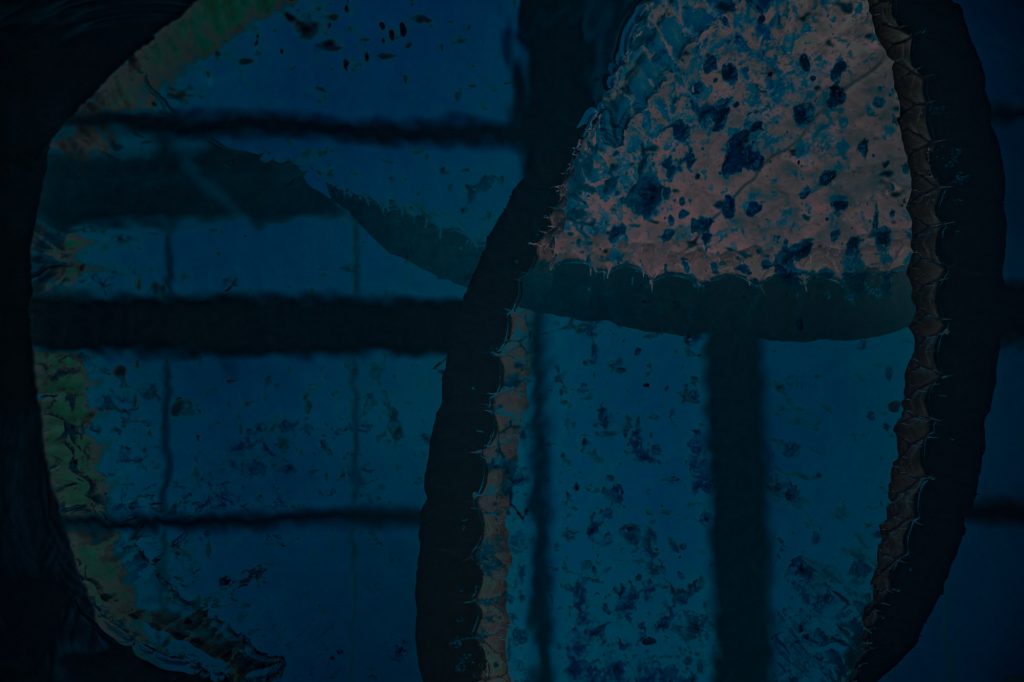
While abstract photographers were keen to establish that their practice was an art form in its own right, that is not to say that they weren’t significantly influenced by artists working in abstract painting. Take, as one example, the photographer Aaron Siskind. He taught alongside Robert Rauschenberg and Cy Twombly at the Black Mountain College. Siskind’s abstract photography went on to be exhibited at the important Egan Gallery in New York – a gallery that also showcased paintings by Franz Kline, Willem de Kooning and Rauschenberg. Siskind, influenced by such painters experimented with the presentation of his photographs, eschewing the mundaneness of regular frame and mount configurations, replacing them by mounting his images on Masonite boards. He became known as ‘a painters photographer’. This cross-pollination of ideas worked both ways. For example, it is believed that De Kooning used an abstract photograph of Siskind’s, ‘New York’ (1950) as he worked on his painting, ‘Woman/1950-2’. So, this may indicate that among a few practising abstract artists there was respect for at least some photographers working in this area, despite the relative youth of photography.
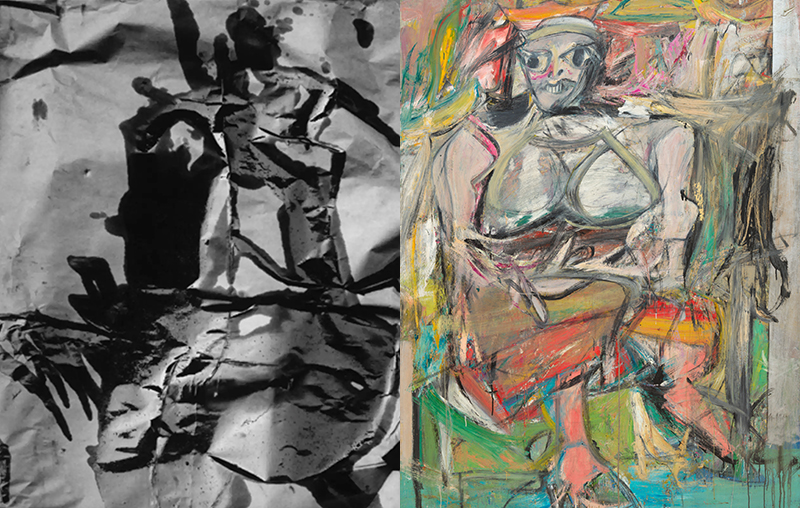
The majority of abstract photography which has gained credence in the art world is analogue, either made entirely in the darkroom from pure light and light-sensitive materials (such as Arthur Siegel’s ‘Motion-Light’ studies) or more conventionally with cameras and lenses and then processed in the darkroom. The advent of digital photography appears in most ‘official’ quarters to have been met mainly with much scepticism. 

This is understandable. Modern cameras are essentially computers with shutters and lenses – capable of amazing optical gymnastics, should the operator so wish. Much of the perceived craft associated with analogue photography appears to have gone – especially that which is part of large format image-making. All the upside down and reversed composing under dark cloths, working with silver gelatin and platinum palladium – the mathematics, the alchemy and chemistry of it all. The pure struggle of getting an analogue image to print adds perceived value, certainly. To the uninformed, the point and shoot, click and print world of digital for the masses just doesn’t cut it with those interested in ‘serious art’.

As a result of this, we have found ourselves in a no man’s (no person’s?) land. Caught creatively, not just in the void between photography and traditional art practices – but also cut off from the part of photography that has scraped acceptance in some areas of the art world. 

As we are part of something new, neither side really know what to make of us. They don’t know how to define us or judge what we create. The more conventional, representational photography world have no labels or beloved rules by which to judge and classify us. We don’t fit in with them. On the art world side we seem to be tarred with the iPhone/Hipstamatic generation/Photoshop tomfoolery/Digital/‘it’s so easy my kid could do it’ brush and swept aside. 

But this experience is similar to many new art movements in the past. It takes time for the world to catch up. In the meantime, as passionate artists, we remain undeterred and will forge on in our craft whether it be recognized or not. As all artists know, the urge to create is a fire that burns inside us and it is not dependent on recognition. We must create.

Throughout the twentieth century, various proponents of abstract and expressionistic photography were proposing different ways of describing what they were doing. In addition to Stieglitz ‘Photo-Succession,’ we have, in the early 1950s, German photographer and critic Otto Steinert coined the phrase ‘Subjective Photography’. Another German photographer, Peter Keetman, used the term ‘Fotoform’. The Bauhaus school spoke of ‘New Vision’ and so on. All these and any subsequent attempts to describe impressionistic abstract photography seem to fall short in capturing the essence of what, as artists, we are trying to convey. For this reason, none of these terms has stuck.

This search for a term to describe what they were doing addresses an issue with calling it ‘abstract photography’. While convenient, it feels somehow inadequate. Those of us working now with digital techniques, like intentional camera movement (ICM) and multiple exposures (ME) have also been debating the fact that using these terms is to describe our work is equally unsatisfactory.
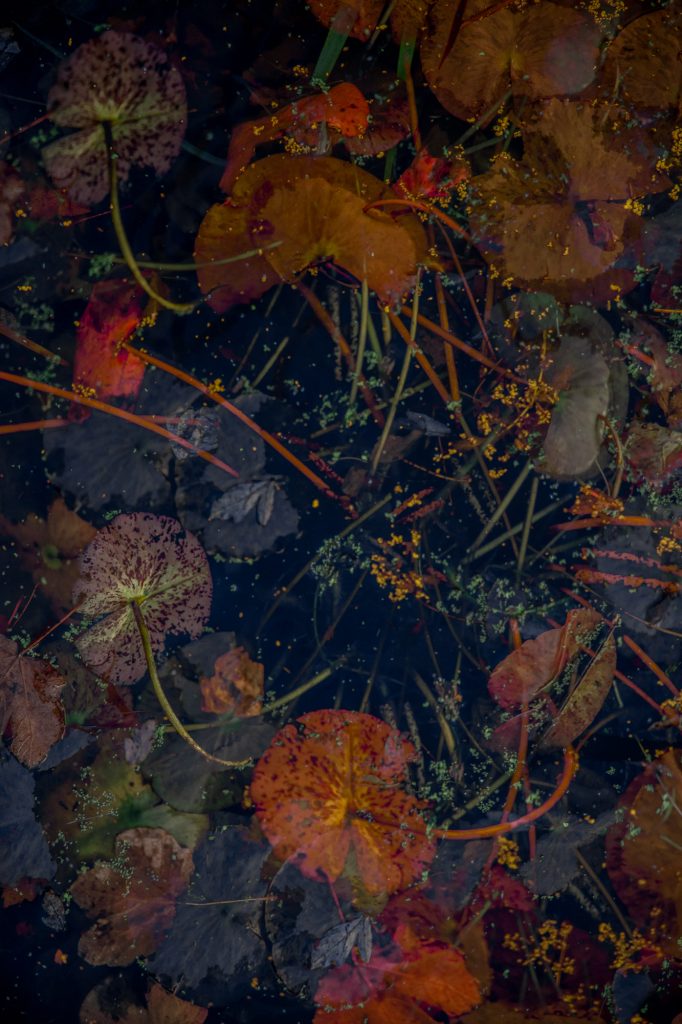
Firstly, we are not process focused. Yes, we may well have used ICM and/or ME techniques as part of creating our work. But we may also have used other in-camera techniques, manipulated the image significantly in the digital darkroom and latterly outputted the file as a physical print and then applied any combination of physical processes to embellish the print to create a ‘one of one’ unique physical work of art, far removed from any in-camera technique.

It is also true that while we may use a particular technique on one of our images, we may not use it on others. What we have been searching for is a term that encompasses the style or genre of work we are creating, much as artists working in more traditional forms have. 

Valda and I have had long discussions around this subject. We have talked around the kind of words most often used by artists working in our field or by those talking about our style of work such as ‘painterly’, ‘abstract’, ‘impressionistic’ ‘creative’ and ‘expressionistic’. Which seem most universally applicable? We are also keenly aware of the influences of Modern Art movements, including the Abstract Expressionists, Cubists, the Bauhaus and others in what we do. 

After long deliberation, and with huge respect for the giants on whose shoulders we stand, we would like to propose that we define ourselves as ‘Photographic Expressionists’.

We feel this links us both to the artists work that we derive inspiration from while being proud of our roots in photographic practice. It allows us full scope to work in mixed media – be that digital or analogue as well as incorporating art and other materials in the presentation and embellishment of our work.

We certainly don’t claim to have invented this term. A quick Google search will reveal a Flickr group with it included in its subtitle and the photographer Rick Doble claimed to have coined the phrase ‘photo-expressionism’ back in 1999. No doubt it is used elsewhere from time to time. What we would like to do is establish it as a clear definition for the kind of work we are doing so that it becomes an accepted and understood genre.

We should also make it clear that we don’t feel a need to categorise our work for our own benefit. We are quite clear in our own minds what we do and love having complete creative freedom to make images in any way we choose. Rather, we offer this genre as a means to help others (such as the aforementioned gallerists, critics, museum curators, judges and so on) who do seem to need a way of identifying our work in order to accomodate us and welcome us ‘into the fold’. In the meantime, we are more than happy to make our work with the excitement we have always felt exploring art free of rules and boundaries – something which ‘Photographic Expressionism’ espouses.

It is our fervent hope that then over time, more galleries, museums, critics and collectors will also understand and accept what we do and see us as the next natural step in the evolution of expressionistic and abstract photography – blurring the gap further between the photographic and more traditional art disciplines.

This will certainly be the way we describe our work from this point forwards. So, welcome to the world of Photographic Expressionism.

©Doug Chinnery 2022

References

Using the Canon EOS R Mirrorless Camera for Multiple Exposure & ICM Photography

Using the Canon EOS R Mirrorless Camera for Multiple Exposure & ICM Photography

The new Canon EOS R full frame mirrorless camera system was released recently with much fanfare. Valda and I were immediately keen to get our hands on one and Rob Cook at Canon UK very kindly provided us with loan bodies, lenses and adaptors to give us that chance. (I made all of the images in this article on one day with the EOS R).

Our hectic lives, as usual, meant that time with the camera was frustratingly limited, but over the few weeks we had them we did manage to clock up several hours of use. Enough to put them through their paces and get a real feel of how this system performs for those of us that are working with the creative use of multiple exposures and intentional camera movement (ICM).

If you also use your camera for more conventional image making, this blog, while not concentrating on those areas (you will find hundreds of others out there that do) should also give you a feel for its potential.

Firstly, I’ll deal with some of the fundamentals around your possible reasons for switching to this new system.

1. Saving weight – mirrorless cameras tend to be lighter (and less bulky) than DSLR’s. The ‘R’ is no exception. It is, roughly, 30% lighter than a 5D mk4, for example. If you use a Fuji or Olympus, it is heavier, but it has more the feel and build quality of a DSLR, along with the high quality weather and dust sealing of pro Canon DSLR’s. For those who found the Fuji’s and Olympus systems too small and fiddly in the hand, you shouldn’t find this an issue with the ‘R’. The 24-105mm f/4 lens is a high quality L glass lens so it adds weight. Noticeably so, but it is also very versatile with 4 stops of image stabilisation and very sharp results (if sharpness is your thing). The 35mm lens (which is also a macro) is far lighter. I haven’t tried the 50mm. The EF adaptor which allows you to use all your EF lenses with all functions (auto focus, metering etc) weigh very little. I tried using my EF 70-300mm L lens and found it well balanced and very comfortable. The weight added depends on the lens, obviously.

2. The electronic viewfinder (EVF) is a revelation. It is fast, responsive and very sharp. I found I soon forgot I was using an EVF. For the multiple exposure image maker, the EVF is a real gamechanger over other Canon DSLR’S that have the blending modes. This is because as you make each frame you can see the next one overlaying the previous in the viewfinder. This allows precise lining up of frames. The effect of the blend mode is not shown until after you fire the shutter (but you do get to see that through the EVF which is especially good in bright light when viewing the live view screen is difficult. The overlay of the image is subtle but good enough to position things carefully. For me this is a major reason to switch to this new camera, the benefit is so significant.

3. The EF Adaptor with built in variable ND filter. ( https://www.canon.co.uk/mount-adapters-ef-eos-r/ ) This is the other game changer for me and a really innovative idea from Canon. The adaptor not only allows us to use our EF or EFs lenses on the EOS R, but it also has a slot in it, into which fits a beautifully designed two to nine stop variable neutral density filter. The strength of the neutral density effect is applied by rotating a small wheel on the filter holder. This innovation is perfect for those of us who love ICM and ME photography. It obviates the need for a Lee Filter system hanging off the end of the lens, or having to screw filters onto the end of the lens. It is so much neater, compact and is permanently available. These adaptors will be available in the UK from February 2019. (there is also a polariser and UV filter which can be purchased to slot into the adaptor – only one filter can be used at a time). The above link will show you just how beautifully designed this option is.

4. The tilt and swivel touch screen. A more minor benefit to me, but a benefit nonetheless. The screen tilts and swivels. This is very useful for low and high level images. It also means the screen can be completely rotated when the camera is not in use so it is facing the camera and not exposed and thus prone to being scratched. Additionally, the screen is touch sensitive. This means lots of things can be adjusted by touch instead of scrolling through menus with wheels and switches. You can also touch focus and even fire the shutter by touch on the screen if you wish. I particularly found making major changes to white balance much faster by touch than using the scroll wheel as on my 5D mk4.

There is an issue with the camera that has been much debated since its release. It has only one SD card slot. Many people have flown into a rage about this. For the sake of balance I would just throw a few points out there. Yes, I agree, it should have had a second slot. It would allow backing up images while shooting (or shooting alternative formats to each card etc). I am sure the next model will have a second slot. However, I think the outrage is overdone. Firstly, many people I have worked with often don’t have a card in the second slot. Those that have often have no idea how their camera is set up to use the second card – whether it is backing up the first, or writing jpegs, or perhaps filling one card then the other. There is also the fact that it is also only relatively recently that cameras have had two slots. We managed quite well with one for years prior to that and I have to say in all my years of using digital cameras, I have only ever had one card failure. So yes, it should have two card slots, I wish it did, but it’s not going to stop me owning the camera.

Let’s talk now about usability. The first thing I found was using the ‘R’ slowed me down. I guess we all get a certain amount of ‘muscle memory’ in using a particular camera model. When we switch to a new one it takes a while to adjust to the new button positions, menu layouts and just the general feel of the camera. Everything on our old camera is set up just the way we like it for the way we use it. It takes a while to get the new camera set up just so. I found this quite irritating at first, I longed to go back to the mk4. However, after a few hours, the familiarity with the ‘R’ started to build and I was able to focus less on operating the camera and more on making images.

The camera has a ‘multi-function bar’ which is operated by sliding your finger along it or tapping each end. It has the potential to be a useful control, but if I am honest, I found it lacked responsiveness. I couldn’t get it to work in a consistent way. This led to me being frustrated with it and I very quickly deactivated it. It would be difficult, if not impossible to use wearing gloves. I am sure some will get the hang of it quickly and really love it. I, however, am not a fan, sorry Canon.

A new innovation which is useful, is an additional ring on the ‘R’ Lenses (and fitted to one of the EF adaptors to add the function to all of our older EF lenses). So you now have three on a zoom lens, the focus and zoom rings plus a third which can be programmed to alter several settings according to your preference. (On a prime lens you have two, a focus ring and the new one). You can set the new ring to change aperture, shutter speed, ISO, exposure compensation etc. I set mine for ISO. I just found I had to take care when the camera was to my eye and I was, say, changing the focal length, that I didn’t hold the wrong ring by mistake and inadvertently find my ISO 3200 without noticing. The surface texture of each ring is different to help and if you prefer not to use it, the rings function can be deactivated.

Many have asked me what is it like using EF lenses with the new body? I tried it with my EF 70-300 IS L and the EF adaptor. The first thing to say is, yes, it is heavier – naturally. ‘L’ lenses, because of their build quality are weighty. But you are still saving the 30% of weight over an average DSLR. I found the balance was good, supporting the lens with my left hand as I would with a DSLR. This camera is not as small and light as, say, a Fuji XT-3, but I prefer the size. It fits my hands better, the buttons and dials are spaced and placed in a more ergonomical way and suit my hands. I like the grip design and balance, and I am speaking as someone who absolutely loved my Fuji cameras so I don’t say this lightly.

If you are looking to make the camera into a very lightweight system, I would seriously consider some of Canons lighter, mid-priced EF lenses, which are cheaper and will save a great deal of weight over the ‘L’ lenses. Yes, some image quality will be sacrificed, but they are still excellent for classic photography and for multiple exposures and ICM images the quality of the lens is fairly irrelevant. Take Canons lowest price, lightest 50mm f/1.8 lens for example, which is available for a little over £50. It weighs almost nothing and is ideal for ME and ICM.

To use the camera for multiple exposure images, I found the fastest way to access all the menus I needed – the ME menu itself, ISO and White balance primarily – was to add them all to a custom menu. I was then able to access this with one button push and go into whatever setting I needed. Very quickly I was using the camera instinctively and concentrating on image making, as I mentioned earlier.

Some of you may be thinking about waiting for the next iteration of the ‘R’ before investing, perhaps wanting a higher resolution sensor, for example. If you are a multiple exposure image maker I would add a word of caution. Making multiple exposures on the 50mp 5Dr is a very slow process compared to the 5D mk4 (which has the same sensor as the EOS R – 30mp approx). It seems combining several 50mp files takes its toll on the processing power of the camera. If the next ‘R’ has an upgraded sensor (and it seems logical the sensor from the 5Dr could be slotted in without too much trouble) then, unless Canon really beef up the processing power, the camera will be much slower for us ME photographers. It will be fine for classic image makers, but not for us. I have taken the decision not to upgrade to the 5Dr for just this reason, the slowness of it would hamper my creativity and the extra 20mp are simply not worth it for me.

As for image quality, it is breath-taking. All the images in this article are made with it. The sensor is a tried and tested full frame 30mp sensor from Canons 5D mk4. This has fabulous resolution, with superb colour and contrast. The camera is fast and reliable. The raw files are full of detail and can be cropped and manipulated to your hearts content. The prints from the files are glorious. You will have no quality issues from this camera as regards images – unless you are some anal pixel peeping geek who is more interested in discussing the micro contrast in the shadows on relentlessly boring internet forums and barrel distortion tables on mindlessly obscure websites than in actually going out and making images. But that applies to most cameras these days – let’s face it, they are all pretty amazing. If I need to remind myself of this fact, I go back and look at images from my first 4mp digital camera. Case closed.

In conclusion, while I found it took me a few hours of using the camera intensively to get used to it and I had to customise the menus and controls to suit my way of working, I soon found it a very natural tool that felt comfortable in the hand and didn’t get in the way of my creativity. This is exactly what I want from a camera. I don’t really want to have to think to much about the camera at all, I want to think about the image. If I am having to fuss about too much with my equipment, if the gear is getting in my way or irritating me then I am using the wrong gear.

So once I was over the hurdle of unfamiliarity, and I was able to seriously concentrate on making images, I was able to enjoy the advantages that the EOS R has for me as a multiple exposure and ICM photographer. Being able to use the EVF to line up ME compositions was a dream and a major step forward in our genre of image making. Being able to see the blended image in the EVF straight after each frame is made was also hugely beneficial, not only in bright sunlight but in all conditions.

While I couldn’t try out the new EF adaptor with the variable ND filter, I have no doubts this will be a game changer for me. I am itching to get my hands on one in February when they arrive in the UK. I am expecting demand to be huge.

The weight and size saving is nice to have, but not a game changer for me. It will certainly help me as someone who travels the world constantly – but I am more interested in functions and usability than weight.

The big question, will I be changing to the EOS R as my system of choice? The answer? Yes, if I can. My big frustration is I bought a brand new 5D mk4 only a few weeks before the EOS R was released. I don’t think I can afford to lose what I have invested in the new body by trading it in so soon for the ‘R’. This breaks my heart but as a professional running a business I have to be pragmatic. These are tools of the trade for us and have to earn their keep. It might seem as though pros always have nice gear – and we most often do – but we have to work very hard to afford it and most of us can’t just keep jumping from one body to the next without thinking about the financial implications. So I may have to wait awhile before I can justify it. However, if you are able to afford it, I wouldn’t hesitate in recommending this very excellent new system to you. It is superb.

Now, a few final thoughts from Valda –

We decided to wait to put out this review until I had returned from Venice. When we led the three one-day EOS R Discovery Day workshops in London recently we had more people than cameras and it was me who drew the short straw and didn’t really get to use it.

I took one of the loan bodies to Venice recently – unfortunately once again, my time with it was limited. Partly because I was teaching but partly because there were no shortage of clients in the group wanting to try it out for themselves. It really has generated an enormous amount of interest.

I’m not sure I can add anything more to Doug’s lengthy and comprehensive review. I actually found the multi-function bar very useful for changing white balance but really couldn’t get to grips with the function ring on the front of the lens – I found myself grappling with the wrong wheel. Of course its use would no doubt become second nature after shooting with it for a lengthy period.

Like Doug, I found the newness of the camera got in the way of my creativity, but this cannot obviously be blamed on the equipment. Within an hour or so, it was all becoming very much easier. I love the EVF – the best I have ever used – and the overlay feature during multiple exposure made the building up of layers a lot more fun.

There was a slight hiccup when it appeared that the autofocus wasn’t working. Such is the complexity of modern cameras, it took me about four hours to realise that the last client had enabled the back button focus, thus disabling the button I usually use. Again, not the camera’s fault at all, but half a day lost in trying to figure out what might be the problem.

I too, have only recently invested in the 5D4 so I won’t be changing any time soon I don’t travel with a lot of gear anyway, so the weight issue is not a hindrance to me. I am very excited about the adaptor with the slot for a drop-in ND filter – I don’t get on well with accessories and other extraneous bits and bobs that can be sat on, broken, lost, smeared or cracked. So for me, the more streamlined the kit, the better.

My technical knowledge only extends as far as I need it to in order that I can make my images so I’m really not in a position to predict how this camera stacks up against the competition. However in terms of usability, and for what I would use it for, I think it is certainly a winner.

First thoughts on the Canon EOS R and Multiple Exposure Photography

I had the chance this week to briefly test the brand new Canon EOS R mirrorless camera with the 24-105mm lens (and the EF adaptor along with my EF 70-300mm IS L lens). This was courtesy of my good friend Carl, who had pre-ordered the camera and was prepared to entrust it to me.

My reasons for wanting to try it revolved around the weight saving of a mirrorless body and the advantages of having an electronic viewfinder for multiple exposure photography (EVF). I have been, in the past an advocate of the Fuji mirrorless systems – both the X and GFX medium format body – loving the weight saving and EVF as well as the image quality. However, the lack of a serious multiple exposure mode coupled with having to carry two systems in order to have a proper ME system meant I recently abandoned Fuji for good and dedicated myself to Canon. As someone who travels a great deal I need one system that does all everything and so I currently use the superb 5D mk4 and only have one lens, the 70-300mm L.

Before I go further, some clarification. I am not sponsored by Canon. This review is entirely impartial. I will aim to tell it exactly as it is. It is based on just a couple of hours at most with the camera, using the 24-105mm R lens and barely 15 minutes with my 70-300mm lens and the EF adaptor. All of this time I was working in multiple exposure mode, so please don’t expect a review of using the camera for classic photography.

I would also add that I am not interested in this camera for shooting video. I may shoot some, but I am an art photographer and this review is written from that perspective. I am sure other reviews will guide you if you have interests in serious video work.

My final plea concerned the images – I was working quickly and just experimenting around my home – they aren’t meant to be serious work, just samples of the camera in action. Please don’t be too hard on me!

I am also aware of the near apoplectic rage there seems to be that the camera only has one SD card slot. My feelings about this? Yes, I would have liked two card slots (both SD, for me please Canon). But I do think we need some perspective. Yes, two slots has become the norm in cameras of this quality and I am sure the next iteration of this body will have them. If it is that big an issue for you I would just suggest waiting. However, in my experience, most photographers don’t know how their second slot is utilised – whether it is having a backup copy written to it, or if one card fills and then the second card fills – or if one card has raw files writing to it and the second has jpegs writing to it. Many cameras I have seen clients using don’t even have a card in the second slot. I have been using digital cameras for, I don’t know, 12 or 14 years and I have only had a card totally fail once in all that time. Once. I buy quality cards and I push my cameras hard in all weathers – I don’t wrap them in cotton wool (or polythene). Its not so long ago all cameras only had one card and prior to that, one roll of film. We managed somehow. My feeling is that the outrage is just a little over done – and I know that me just saying this will outrage some people. But I am just being honest (but please Canon – get another card slot in ASAP, I am pretty certain your design guys can make one fit).

Now that is death with let us get down to the nitty gritty. My first impressions about the camera. The build quality is excellent, as you would expect from Canon. I have big hands but ergonomically it is very comfortable in the hand. The balance is good and I liked the shaped grip. I work with one hand a lot of the time and this suited me well. I was surprised at how light it felt, even with the quality lens fitted. The EF adaptor is ridiculously light – this is because it is, in effect, just an extension tube. There is no glass in it. It just moves the EF lenses further away from the sensor and links up the electronics. So all of the lens functions still work as normal and everything still works in the EVF – you notice no difference in operating the camera. Even with a big lens like the 70-300mm attached it felt well balanced and lighter, obviously, than my 5D mk4. The weight saving is not huge but it is noticeable but it is also physically smaller so when travelling it takes up less bag space and it is less obtrusive in the hand, attracting less attention. Yes, using your L EF glass brings the weight right up, but you have the quality of the glass and it will be lighter than your DSLR. For some of you the weight saving while using your DSLR lenses will not be enough – but the R lenses are L glass quality and lighter. Canon will widen the range quite rapidly. I am happy to use the 24-105 for now along with my L 70-300 and the adaptor and cope with the weight – while benefitting from the physical size decrease (and it is lighter – noticeably so) while I wait for a lighter 70-300 R lens to be released.You will need to decide for yourself what you can cope with.

The 24-105mm lens was superb – the optics were brilliant as you would expect from Canon L glass. The image stabilisation was faultless as was the auto focus. Don’t ask me about frames per second and whether this would be a good camera for shooting wildlife on the Serengeti – that is above my pay grade. I am sure other blogs will help you with those questions.

What does the EOS R have to offer us as respects multiple exposure modes? This was a question we were really interested in. The answer is, it has all of the modes and functions of the 5D mk’s 3 and 4 (and other fully featured Canon DSLR’s). You will not lose anything by switching. But will you gain anything? The answer, I feel, is ‘yes’, which is why I would like to move to the ‘R’ myself.

Firstly, I want the size and weight saving. I am a traveller and I am always looking for savings in this area as long as functionality is not compromised. The EOS R gives me this. It has the same 30mp sensor as my current 5D mk4 so image quality is identical. I am guessing the next iteration of the body will have an ‘improved’ sensor but with this I give a warning. Valda had the 5Dr for some time which has the amazing 50mp sensor. Now, while this produces eye watering quality and huge files it brings with it a big issue to multiple exposure photographers. It becomes painfully slow. Stacking up several 50mp files and blending them in camera takes huge processing power and time. Valda found this really slowed her down in the field and, to an extent stifled her creativity so she switched ‘down’ to the 5D mk4 and is happier as a result. You may not find this to be an issue but we certainly did – so unless new bodies have significantly more processing power and speed, we would be reluctant to move to them. We have never had an issue as professionals with the 30mp files with our clients and galleries. The 30mp files for us still allow image cropping and manipulation to meet our needs. You need to decide what your needs are.

The second, and for me game changing improvement for multiple exposure work with the EOS R, is the EVF. This allows you to see the image ‘shadowed’ as you make each frame. You can’t see the effect of the blend mode being applied before you fire the shutter (but you do see, in the EVF the blended image after the next frame is added) however the big advantage is being able to line objects up. This helps hugely with composition. The next frame you see shadowed in the EVF is ‘brighter’ and so you need to look closely but it is sufficient to do what you need to do. The EVF also works seamlessly, I was not conscious it was an EVF, to be honest, it didn’t interfere it only assisted me. I like to have the camera to my eye when making ME images and previously I had to visualise in my mind where objects would be. You could use the live view screen, but this slowed the process down and meant holding the camera away at arms length which I found didn’t suit my way of working. I was blown away by the difference using the EVF made to my workflow. I am now finding using my 5D mk4 very frustrating indeed. I have opened Pandoras Box!

I have heard people expressing concerns about the controls on the camera – that there is only one control dial and so on. This is not the case. You have two control wheels so you can change aperture and shutter speed independently (or exposure compensation). The touch screen is a delight (but would be tricky with gloves in cold weather) However everything can be accessed through the quick menu and control buttons (no joystick on this camera) There is a slider bar which I didn’t have time to get to grips with.

The tilt screen also swivels – which would be a first for a camera I own. Exciting for me. Little things please me. I am also delighted to see Canon have used the same battery for the ‘R’ as used in the 5D range. This means all of the spare batteries I have acquired over the years will fit. How good to see a manufacturer doing this when so many use the release of a new model to change the battery shape in order to force us to buy more new batteries at exorbitant prices.

Another innovation which is interesting and useful is the addition of an extra ring on the R lenses. This ring can be programmed in a menu so that you can use it to change shutter speed, ISO or aperture – whichever is most useful to you. I didn’t get time to check, but it wouldn’t surprise me if you could program it to change something else too, if you prefer, like white balance etc. This may be very handy for working in cold weather or to save you accessing a menu for something you alter frequently.

My final comment is about the another adaptor Canon has issued. It is a very clever piece of kit, sitting between the body and lens into which you can drop either a polariser or a variety-ND filter so that these do not have to be fitted to the front of the lens. For me, this is a revelation. It is such a simple solution, so small and compact and will allow me to do ICM images with such ease. The ND filter goes from 2 to 9 stops – which is absolutely perfect for me. A stroke of genius from Canon and one I will definitely be adding to my kit bag.

So my verdict. For multiple exposure and ICM shooters, I think this camera is a game changer. I see no reason to stay with a DSLR any more. You can keep all of your EF lenses and slowly replace them if you with with R lenses – or not – the choice is yours. I see no real deal breaking disadvantages with the camera. I think if you have any other brand of mirrorless camera such as Fuji and you have a passion for multiple exposure photography, I would seriously consider switching. It is a big thing to do, but I don’t think you will be disappointed. This is a seriously good camera that for me and my work ticks all the boxes (just get a second card slot in the next one, please, Canon…. and maybe come up with some more, new, innovative blend modes that we can see being applied live in the viewfinder before we press the shutter – then you really do have something amazing).

Valda and I are running some one day workshops in November where every participant has a loan EOS R for the day courtesy of Canon UK – you can read full details and BOOK HERE

Creative Photography Webinars with Onlandscape

Creative Photography Webinars

I made three hour long videos for OnLandscape magazine in 2013 and they are now available via YouTube.

I have collected them together here for you to watch (and enjoy?)

Part I – a discussion of my creative/alternative technique images and approach (the echo on Tim’s mike is removed after about a minute)

Part II – A session filmed with me working live in the field showing camera techniques

Part III – The final video where I demonstrate my Adobe Lightroom and Photoshop techniques for processing these types of images

I hope you find these videos useful.

Tips for photographing in the rain

Rain Tips

Wet Day in the Forest

I am sitting in my studio with rain lashing down. April showers is one thing, but this is ridiculous! I thought it might be an idea to post my top tips on photographing in the rain.

Many photographers simply dismiss making images in wet weather out of hand, but in doing so I think they are missing out on some wonderful and different images. Granted, if  the rain is really driving and especially if it is blowing directly onto the lens, it is pretty much impossible to work outside. It is then I look for an indoor location or head home, fire up the iMac and do some image processing with some good music on and a nice hot cup of tea to enjoy.

However, we often get gentler rain or it is blowing in from behind us so the lens stays clear. It could be the rain is coming down vertically or is intermittent. In those circumstances it can be ‘game on’.

The first thing is to protect our gear. Whether we shoot on film or digitally, water and cameras are not a good mix. If our body and lenses are from a pro range, like the Canon 1ds and ‘L’ lenses, they are heavily sealed against water and dust and can perform in extreme conditions, but mid range bodies and lenses down, while having some weather sealing can soon start to be affected (often terminally) by water and dust. I have tried all kinds of camera protectors and to be honest, most are just impractical. At one end there are over designed complex polythene systems with arm holes and gussets, seals, elastic and goodness knows what that take a couple of days and a lot of patience to fit and are then so bulky and restrictive in their desire to totally protect the kit that operating the camera with them fitted is like trying to thread a needle with our hands submerged in a bucket of jelly.

There are other simpler protectors which are so flimsy they are worse than useless.

I do carry a couple of the disposable Optech ‘Rainsleeves’. These are low cost, come in packs of two and are designed to be used a few times and then thrown away. With careful use they can last quite a while. They take up little space in the kit bag and the price is very reasonable. It has to be bad for me to put them on though because, like most rain covers, they restrict us in using the camera. Everything becomes fiddly and a bit of a chore. The worst problem is getting your eye to the eye piece to compose and focus (or, if you use Live View, seeing the monitor clearly as the polythene is not optically clear enough to focus critically). There is a hole in the protector which is designed to go around the eye piece but to fit it you need to take the eye pice rubber off and then re-fit it over the polythene and by this time I am losing the will to live.

A simpler and much cheaper option is to carry a thick polythene bag. I carry one which is big enough to simply pop over the whole of my set up on the tripod. It covers camera, lens and filters. Obviously, you can’t work with this in place but it saves packing up for every shower. As soon as the rain has passed over, just whip it off and got on with the business of making images.

I also carry a cover similar to this one. Bought on EBay for less than £15 it gives good access to the cameras controls and is quick to fit and remove. Focusing and zooming are a bit tight but the cameras body controls are very easy to use, as is the eye piece and screen. I have been using mine for a couple of years and it is stills waterproof. Made from proofed nylon you buy one to fit each lens and body combination (in theory) but I bought one for my longest lens, my 200mm f2.8, and use it on all my lenses – the shorter lenses just have the cover a bit bunched up but it is not an problem for me.

Then, yesterday, on one of my bluebell wood workshops, a client had a new ‘device’ which seems like a brilliant idea to me (Thanks for the tip, Maria!). She was given the idea by photographer, Jeremy Walker. It may sound a bit strange but in really wet conditions yesterday she was able to shoot with ease and keep her kit dry. It was a very large sheet of Chamois leather. Told you it sounds strange. However, it is is not your average Chamois from Halfords. She got this from Skye Skynes – here on this page . Now, when you see the price (£22 delivered in the UK) you will probably have a sharp intake of breath and think I have finally lost my marbles, but before you shake your head and leave this post let me just tell you, these are the most amazing Chamois you have ever seen or felt. Skye Skyns make them from sheep skins on the Isle of Skye and they are very thick – many times thicker than the Chamois I use when cleaning the car. It is also the softest Chamois I have ever felt. The sheet is really big and you just drape it over your camera and lens. In between exposures you can drape it over the front of the lens (and filters) to protect the glass from drops of rain. It absorbs the rain and is perfect for wiping kit dry too. Because it is a sheet rather than something fitted you can double or triple fold it and just drape it over the lens and position it as you wish. As I watched my client work I was impressed with how easy it was for her. The Chamois has another advantage, it makes a great thing to wrap kit in to protect it. So even in dry weather it iso earning its keep in the rucksack. They are washable so when they get grubby they can be spruced up easily. I have ordered mine and can’t wait for it to be delivered, although knowing me it will come the day a long drought starts and I won’t get to use it in anger for months!

A good style of hat to wear in the rain is a hat with a rigid peak, like a baseball cap (but waterproof). This keeps us a bit drier and warmer but also the peak goes over the top of the camera while we have our eye to the eyepiece and helps stop the rain fogging the viewfinder. Absorbent lens cloths (and often several of them are needed for a rain session) are essential for drying fog off of the viewfinder and lens.

I also keep all those little bags of silica gel which come in many products packaging when they are delivered to us, you know the little white sachets with beads in which have ‘do not eat’ written on the outside. Silica gel absorbs moisture. I keep them all and drop a few in my camera bag, to help dry the air in the bag. Every now and then I swap them out, dry the old ones out at home and let the new ones do their job in my rucksack. (I also keep them in my laptop bag, lens cases and so on. Every little helps.

What about drying kit off after the session? I use absorbent cloths to dab the camera and lens dry, getting the worst of the wet off. I then let the kit dry slowly and naturally in a warm spot in the house, but not by direct heat. Then, once dry it needs a clean and polish to get any residue off of the body and glass. For cleaning my lenses I have stopped buying the ridiculously expensive lens cleaning fluid the manufacturers would like us to use. I get a big bottle of lens cleaner from my opticians for £2.75 (and that amount lasts me a couple of years!!). I use it to clean my glasses and honestly can’t see any difference when using it on my lens compared to the stuff sold by camera suppliers. I have a small spray bottle I decant some into to take into the field from the large bottle which stays at home.

That’s enough on keeping the kit dry. What about technique?

Passing Shower - Isle of Harris

Firstly, I don’t tend to use lens hoods for protecting against flare but I do use them to keep rain off of the lens. The two lenses I have which have particularly effective lens hoods are the Canon 24-70 L and the 70-200mm. Both of these come with a lens hood which is a full tube, not ‘petals’ which is more usual on wider angle lenses. These completely shield the lens glass from all but rain which is driving towards the lens in strong winds. The downside is that you can’t use Lee filters. To overcome this limitation I take bracketed exposures and blend them later in Photoshop. Problem solved.

I sometimes carry a golf umbrella which is useful to work under as long as there isn’t much wind. (This is the umbrella I use – designed for use in high winds – CLICK HERE) If the rain is coming in horizontally or the wind is strong, forget the umbrella, it is just impractical. I have been toying with the idea of trying studio lighting clamps to see if I can find one which will lock on to my tripod leg and hold the umbrella over me and the camera so that my hands are free to work. I will let you know if I find one that is suitable.

It makes sense not to fight the rain, so if it is blowing in from a particular direction, see if there are images to be made that will enable you to turn the lens away from the direction it is coming from. I also often head to woodlands in the rain. Trees in leaf will provide good cover although when the leaves get very wet it will start to get through to you, but it is dripping vertically from the leaves and not blowing in to the lens so with some of the protection I describe above we can continue working.

Cromer Pier - Winter Rain

So, there we are, all set up with a protected camera and some techniques to help us keep dry while we shoot. Is there any way we can use the rain to enhance our images? Most certainly.

The first thing to say is that the light as ‘bad’ weather passes or just before it arrives, is often spectacular. Foregrounds can be lit with glorious golden light with a deep black sky (one of the rare occasions that the sky is darker than the foreground). Shafts of light can pour from the clouds and glide across the land or sea. Rainbows decorate the sky. It is the photographer who is prepared to be out in the rain that gets to capture this glory.

In rain I often focus on making detail images, intimate landscapes. In woodland or in amongst the shelter of rocks there are lots of fascinating details which look great when wet. The diffused soft light when it rains is perfect for detail images as there are no strong shadows to contend with and the colours are rendered beautifully. The woods or rocks provide some cover and working on the close landscape provides a nice change from shooting the wider world.

While it is raining keep an eye open for things being back-lit. As the sun emerges from the clouds, wet trees, plants and buildings can glow as the sun catches the wet surfaces. If you want the opposite effect and want to kill reflections and saturate colours, fir a polarising filter and rotate it while looking through the eyepiece and see the reflections disappear. Shooting in the rain is also an ideal time for more creative image making – try shooting through wet glass from inside a car or cafe. The rain blurs the world and creates an impressionistic feel to things. Or go the whole hog and have a go at ICM (intentional camera movement) utilising the low light to lengthen the shutter speed and create images with blur by moving the camera.

If you like long exposures, try shooting them in the rain. If you can keep the kit dry, the effect of the long exposures is to turn the rain into mist and you end up with an image which looks like it has been shot on a misty or foggy day.

A final idea is to shoot puddles and running water. The raindrops create radiating patterns and often the light and colours above the water is reflected in it and yields great creative possibilities.

It has taken me a few days to put this post together. Now, as I finish it, the day is warm and bright. the rain seems a million miles away, but it is forecast again for tomorrow. I find myself hoping it will rain, so I can go out and have a go at capturing something with my camera. I hope you feel inspired to, too.

A Break in the Cloud