Tag: camera

Trying a different approach to rucksacks

Trespass

Ask any photographer and they will tell you, you can never have enough camera bags. Or it might be that we can never find the perfect camera bag. I’m inclined to think that there is no single one bag that meets all our needs. I have different situations I go into with my camera and need a different bag for each. Recently, I found myself frustrated with a limitation placed upon us by camera bag manufacturers and so turned to a conventional rucksack manufacturer, Glasgow based company Trespass, for the solution.

The Fuji X-Pro 1 – Is It a Landscape Photographers Camera? Some Initial Thoughts.

fuji initial thoughts

As followers of my work will know, I have been shooting exclusively wit he Fuji X-Pro 1 for about a month now. My main camera is a Canon 5D mk3 (and I also shoot on film with an ancient and much beloved Hasselblad 500C and wooden Zero Image pinhole camera).

I bought the Fuji primarily for lightweight travel photography, street photography and as a carry anywhere camera. However, as soon as I started to see the results it produced I was keen to see how it performed in my main shooting environment as a professional – the landscape.

First a few caveats. This is not a full frame camera like the 5D mk3, the sensor is smaller and has a lower pixel count. The Fuji has 16 million pixels compared to the Canons 22 million. The aspect ratio of the sensor is the same as the Canon at 3:2. I am also mindful that the range of lenses available for the Fuji is far smaller than for the Canon, but more on this later. So I knew I was not comparing apples with apples.


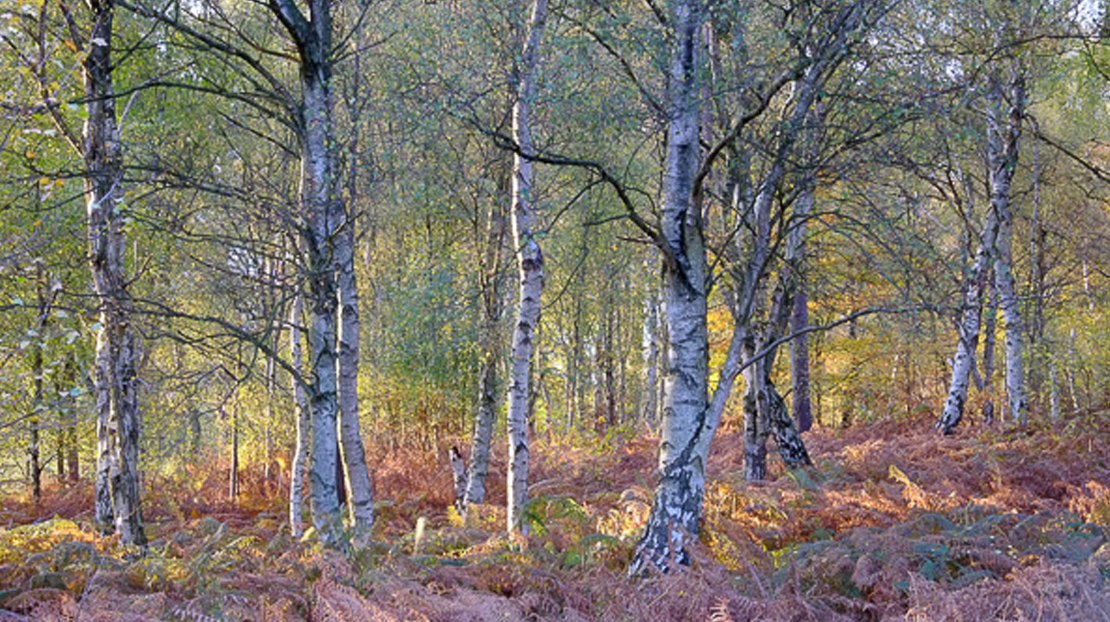
Autumn Woodland. Handheld, ISO1600, f11, 1/30 sec

Having said that, the results shooting landscapes have blown me away. (all the images in the post are taken with the X-Pro 1. Sorry they are all tree images, but it is autumn and it would be rude not to spend my time in the woods. Please also note, all of these images are jpegs either straight out of camera or at most have just had a little high pass sharpening applied for uploading to the web. One or two have had VERY slight contrast tweaks, but that is it. I haven’t had time to really set about working on raw files from the camera yet). The X-Trans sensor is astounding. I am not a techno geek on such matters, but whatever Fuji are doing, long may it continue. The clarity of the files, the rendition of colours and contrast is stunning. I am sure this is partly due to the wonderful Fuji lenses which I see as being on a par with, if not exceeding the quality of the Canon L lenses, and that is saying something.

I am loving the weight and lack of bulk of the Fuji. I have bought a smaller travel tripod to use with it which is more than adequate. It fits in a tiny bag and even with several prime lenses, filters and spare batteries it weighs a minute fraction of the DSLR kit. I have been surprised at how much pleasure this has given me back. I can work for longer and walk further without fatigue and I am much more inclined to have the camera with me, in fact I rarely go out of the door without it. (I am in London as I type this and have it in my jacket pocket with the 18-55mm lens on. Couldn’t do that with the 5D). My feeling is that a lot of photographers as they get that bit older or as aches and pains start will be keen to move to a lighter more portable kit to help them maintain their joy in the field. I also think as the quality of these cameras will mean more will gradually move away from DSLR’s, especially if a full frame version emerges.


Padley Gorge - Handheld, ISO1600, f8, 1/30 sec


All the images in this article have been taken in the last month with the Fuji using the in camera “film simulation” presets for Astia and Velvia films. (I am sure these will annoy film users as they can’t possibly be anything like true Velvia or Astia, they are just adjustment presets, but he results can still be very nice, just don’t expect them to replace true films by any stretch of the imagination).

I have been shooting with raw plus fine Jpegs switched on. Annoyingly, when Lightroom imports these files it copies them all to the computer but only imports the raws into the Lightroom database. You will find the Jpegs in the same folder, but they won’t show in LR. I tend to go in to Finder (on the Mac, Windows Explorer on Windows) and find the JPEG file I am after and drop it into Photoshop. There I tweak it if necessary and save it as a tiff. This tiff is then imported into LR using the synchronise folder command in the Library module. A bit of a faff, but it works for me. (I have just been sent this tip by great photographer Lizzie Shepherd – In LR, go into Preferences and on the General tab you can tick a box which gets LR to treat jpegs as separate images next to raw files – problem solved, thanks Lizzie!)

I am shooting Jpegs as well as raw files because the quality of the Jpegs is really VERY good. I like the mono conversions the camera does as well as the film presets and these are permanent in the Jpegs whereas they are not saved in the raw files. The Jpegs also preserve the aspect ratio presets I use in the field. You can set the Fuji to shoot in square format (which I use a lot) and in a 16:9 panoramic format. For portraits and less critical images the Jpegs are often quite sufficient for my needs. For landscapes and images I will use professionally, it’s the raw files I will process.


Tree, North Wales. Tripod, ISO200, f22 (in error - rather extreme!) 1.6 sec


A word on some of the niggles I have with the Fuji, because it does have some quirks in the way it needs to be used, especially if you are used to a DSLR, and it has some very irritating “features” too.

Firstly, let’s talk about that battery life. It’s dire. I suspect it’s the electronic viewfinder that’s the culprit but if I am shooting for a day I will go through four batteries. I carry five and still feel nervous. I will be buying a couple more. I just can’t stand having to economise on battery power as I work. The batteries you can get on Amazon for around £12 seem to work just as well as the genuine Fuji ones which sell for £60. Guess which I am buying?

The other really irritating thing is the position of the tripod mount. This really hasn’t been thought through by Fuji. As soon as you fit a quick release plate it partially covers the battery/memory card bay door. Seeing as you have to change batteries every two hours, it is very annoying to have to unscrew the quick release plate every time to do this when simply positioning the tripod thread a few centimeters further away would prevent the issue.

I have found a couple of the buttons on the rear of the camera are easily activated in error. I particularly seem to catch the Q’ menu button. It is placed on a raised part of the body moulding and this makes it prone to being pressed. However, I notice this button has been recessed on the Fuji XE-2 which has just been released which is great (and I love it that Fuji really seem to listen AND RESPOND to customer feedback on these cameras. How many manufacturers ask for feedback but then never implement any of the changes we ask for? 

There are also some quirks in how you use the camera in the landscape. At least I see these as quirks having been used to using a Canon DSLR. The first is the focusing system employed by the Fuji. It works in a completely different way to a DSLR. On a DSLR the focusing sensors are most accurate when they can detect high contrast edges, where light areas but up against dark areas. By locking on to these they can measure distance and achieve focus. However, on the Fuji, such high contrast edges are just what the focus sensors don’t want to lock on to. They are most accurate when they can find a surface with texture, say a tree trunk or the surface of a wall. This takes some getting used to but I have found when the Fuji does lock focus I get a higher proportion of sharp shots compared to using autofocus with the DSLR. It is very accurate.


Silver Birch - Clumber Park. Tripod, ISO200, f16, 1/4sec


This leads me to another change I make in my workflow when making landscape images with the Fuji compared to the Canon. With the Canon I use Live View focusing with the lens on manual and love this approach. It is very accurate and allows for checking of depth of field with ease. However, on the Fuji, I have found It easier and more effective to have the lens set to auto focus but to press the AF button on the rear of the camera and select the AF point I want it to use. This locks the focus accurately for me and at f11/f16 I am getting excellent depth of field. With the sensor size of the Fuji, I am now experimenting with shooting wider, f8/f11 to see if this maintains sufficient depth of field while getting me closer to the sweet spot of the excellent Fuji lenses. My next experiment is to try back button focusing with the Fuji. I understand you can switch the lens to manual focus but still use the BBF button to focus and this sounds like it might be a good system.

Now I am used to how the Fuji works I have developed a modified workflow and have found I can already work at speed in the field with it, enabling me to stop thinking too much about camera operation and focus more on capturing changing light and composition which is much more important to me.


Tran Hows, Dawn - Tripod, ISO200, f16, 0.5 sec


I am finding the light meter on the Fuji to be very accurate and so, as opposed to how I work with the DSLR where I shoot in full manual, I have been using aperture priority and then tweaking the exposure after checking the histogram using the exposure compensation dial on the top of the camera. This is working really well for me. Other than in really low light or very contrasty light, though, I am tending to find the light meter is pretty accurate.

I have now used the Lee Filters Seven5 system on the Fuji and love it. If you have the full sized Lee system you can save a lot of money by just buying step up rings as it works fine. It’s a bit big, but the cost saving is significant. However, if you can afford it or if you are new to Lee Filters the purpose designed system is a delight. Small, beautifully made and balanced it is the perfect match to cameras of this size. As always with Lee, you get what you pay for and the optical quality and clarity of the grads is superb. Positioning the grads using the live view screen is a doddle and they do the job just as designed.


Padley Gorge - Derbyshire. Tripod, ISO200, f9, 1/5 sec


I have been trying a vari-ND filter for my ICM shots with the Fuji and have been pleasantly surprised with it. It is very convenient being able to dial in the amount of neutral density effect you need and being a screw on filter it is better suited to ICM work than using a Lee holder. I also have a Tiffen screw on 10 stop filter but have to try this out, so no verdict as yet, but I see no reason why it shouldn’t be perfectly fine.

I am taking delivery of the brand new 23mm f1.4 lens on Monday (it has since arrived. Sadly the first lens had two scratches on the front element but the replacement was fine) and am excited to try this out. If it is as good as the 35mm it will be a terrific lens. I must add, my next lens purchase, which surprises me to say it, will be the XF 55-200mm. (since typing this on the train I have caved in and flexed the plastic and am now the proud owner of said lens). The last few weeks have made me realise how much I use a long lens in my landscapes. I often have my 100mm macro on my Canon (both as a macro and as a landscape lens) and I also carry the 70-200mm which I use a lot in my landscapes. I had anticipated shying away from long lens for the Fujis I imagine it might look a bit ungainly, but I have really missed the reach of a longer lens.I have also bought the 60mm macro, partly because (great excuse) my wife now has the XE-2 and she loves macro photography, but of course, we can share 🙂

I am travelling to Norway in two weeks to co-lead an aurora workshop with Antony Spencer for Light and Land. I will be taking my 5D kit, but the Fuji is coming with me too. This will be a great test for it, both as a landscape camera but also the ultimate test for long exposure high ISO shooting, with the 5D to compare it to. It will also be interesting to see how it copes with the low temperatures north of the arctic circle. (All bar two days of the trip we will have no daylight at all as the sun won’t rise above the horizon – we will be living I a world or twilight and darkness for 10 days). Note to self. Buy even more batteries for the Fuji.

I will try and find time to blog from up there to let you know how it goes as well as posting some images. Watch this space.


Clumber Park - Tripod, ISO200, f18, 1/3 sec


First Impressions of the Fuji X Pro 1 – A Day on the Streets

first thoughts

and, no, this is not the Fuji X Pro 1, but a shot I took with it 🙂

I have taken the plunge and bought a second hand Fuji X Pro 1. Why? A number of reasons. I needed a smaller camera system for some trips that could produce high quality commercial images but without the weight and bulk of my DSLR system. I had also had a chance to use the X Pro and it’s sibling the X100sa nd both had blown me away both in terms of usability and in the ‘filmic’ quality of the images the sensor and lenses produce. I also hold my hands up and unashamedly admit to being seduced by the beautiful retro styling and the superb build quality of the Fuji’s. I have some workshop ideas for the camera too, so there were commercial considerations in my mind also.

As I bought second hand I didn’t have a choice of lenses. The kit I bought came with the 35mm f1.4 prime (which I would have chosen even if I was buying new) and the 18-55mm zoom lens which I probably wouldn’t have gone for, rather erring towards a set of primes. However, the zoom is by no means a ‘kit lens’, this is a full on, high quality piece of glass which is solidly made and performs incredibly well. So I may well hold on to it. Only time will tell.


I have had the camera just three days and today was the first real outing for it. So my comments here are based purely on this first days shooting and my feelings may modify with time. I am writing this on the train home so I have only seen the images on the back of the camera, and we all know how deceptive camera monitors can be! I will review the images when I get home to add some to this post and may have to add some paragraphs once I have seen the images full size.

But that aside, what are my initial thoughts on the X Pro?

Let’s look at the camera from a number of angles. Remember, I have been doing fast moving hand held street photography with it today, so my comments are based on this. I will blog about how it performs as a landscape camera once I have used it for that purpose.

So, firstly, what is it like ‘in the hand’? It is not a compact camera. With one of the Fuji lenses attached it has some weight but is quite usable one handed. I have the extended grip fitted (this is not a battery grip but it just makes the grip for the right hand bigger and more comfortable, especially if you have big hands – it costs about £75 as an extra). I also have fitted a leather wrist strap which I am delighted with. I can let go of the camera if necessary knowing it is secure on my wrist. I much prefer this to a neck strap. 


I also fitted a ‘thumbs up’ which is a small £5.99 accessory which slides into the hot shoe and provides an anchor for your thumb. It is designed to aid stability when shooting one handed (as street photographers often do). I have found these very useful on other cameras but today, on the larger X Pro, I found the distance from the right hand edge of the camera to the Thumbs Up was too large. I just didn’t find my thumb naturally sat in the groove and so I can see me removing it as unnecessary for me.(an overnight afterthought – I may try removing the hand grip and seeing if I prefer using the camera with the Thumbs Up and without the grip as removing the grip moves your thumb closer to the Thumbs Up. It also reduces the bulk of the camera somewhat.)


I did find my thumb kept activating the Quick Menu button inadvertently as it is placed right where the heel of my hand and my thumb naturally rest on the camera. This is not a major issue, but as I lifted the camera to my eye I had to press the shutter button half way to clear them I to see my shot which slowed me down a bit – a disadvantage when street shooting, without a doubt.


All of the controls are beautifully placed and you soon find you can adjust just about all the settings without taking the camera away from your eye. This is aided by the very sophisticated electronic viewfinder (EVF) which shows the menus as you access them through the eyepiece just as if you were looking at the rear screen. It also shows you your last shot, which is a nice feature too.


You can flick to the optical viewfinder (OVF) and this shows you a wider view than the lens sees, which many street photographers love. They can see people before they enter the frame and antipate when to fire the shutter. However, you have to get used to the fact you are not looking through the lens when you do this and the framing is slightly different to what the lens sees. You can still overlay technical information, like shutter speed and aperture etc into the OVF which is very useful.


The aspect ratio of the sensor is the same a s a full frame sensor, 3:2, but the sensor is not full frame. It is smaller. How’re the image quality is reputed to be amazing at 16mp and capable of exhibition quality prints at A3+ and above. Pete Bridgwood has exhibited prints from his X Pro to great acclaim. (Petebridgwood.com)

Other aspect ratios can be set including my beloved 1:1 as well as vararious rectangular ratios including panoramic modes. The raw files will always be imported at full size, no matter what aspect ratio y select but Jpegs will maintain the ratio you choose. This applies to the film simulation modes Fuji have built into the camera too. So you can shoot as if using Velvia, Astia or other film types along with some gorgeous mono styles utilising colour filters. I particularly like the mono mode with the red filter applied. In orders o maintain what I see on the monitor while maintaining the greatest flexibility with my files I have set the camera to shoot in fine JPEG and raw. Thus I can refer to the JPEG to see what I saw on the camera screen and use the JPEG if the file size etc suffices of my needs or use it as a reference to convert the raw to mimic that look back in the digital darkroom.

Another nice feature, shown to me today by Tim Allen, ( http://www.timallenphoto.co.uk/ ) is you can, in camera, take any raw file and apply any of the film or crop effects and save a copy as a JPEG. We quite enjoyed playing with this, taking shots we liked and experimenting with different versions in camera. The raw file remans untouched, of course, and you will have the various JPEG versions when you gets home.


You can set seven custom presets on the Fuji. I have used these straight away and found myself flipping between them all the time today. I programmed in various mono settings at different ISO settings etc and also a couple of Astia settings as these are my favorites already. It saved me messing about in menus and I could quickly grab the set up I needed for a particular set of images.

If you are a DSLR user you have to change the way you use the camera. Firstly, the autofocus is much slower than a DSLR, but apparently more accurate (I can’t verify or deny this yet, it’s what I have read). The autofocus works differently. Whereas with a DSLR we are used to locking on to high contrast areas, points where light and dark areas touch, with cameras like the Fuji this is exactly what you don’t want to do. The focus works best when aimed at surfaces with texture. This takes some getting used to, but is very effective once you do. The fact the focusing is slower is just something we have to accept for now. Fuji have issued several firmware updates (and it is easy to update the firmware for your body and each of your lenses, and ought to be done to get the very best from your system) and these have, apparently, improved things, but it is still slower and less responsive than a DSLR.


Now let’s talk battery life. I was surprised at how quickly the X Pro eats batteries. I am used to a Canon 5D mk3 which can go all day on one battery, two at most. I burned through two and run out of power nearly tw hours before my time to head home had come. I could have done with at least one more battery, probably two to be on the safe side. Now, I was shooting continuously, using the screen, and working the camera really hard. Nonetheless, it is obvious this is a power hungry beast. I will be ordering two more batteries when I get home. One other things about the batteries, they get to the point where they show red, quarter remaining then all of a sudden the camera just shuts down. The first part of the battery discharge gauge takes some time to fall then the last half goes really fast. Beware. It’s like a car with a. Fuel gauge that says full for ages then drops like a stone!


I really enjoyed using the camera. It is not tiring in the hand, it’s black body is unobtrusive and the 35mm lens is exquisite. I have a feeling more primes will be in the offing. There is a 56mm f1.2 due in January which sounds very nice indeed.

The camera was a dream to carry all day, with a spare lens and filters in my bag. It was so liberating not to have my big rucksack with all the DSLR kit. Will it replace my DSLR? I doubt it, but I am no ruling it out. I wil see what the image quality is like. I will see how it performs as a landscape camera from a usability point of view. I am not wedded to the DSLR by any means. If the Fuji proves it’s worth and can produce the quantity and size of files I need, I see no reason to carry on with the big DSLR kit. However, if it falls short, I am happy to run two systems and use whichever suits the job at hand ( but I will be reaching for the Fuji as often as possible due to its lightness and portability).

If you are considering the Fuji X Pro 1 then you really ought to be take a very close look at the X E-1 too (and the XE-2 which is rumoured to be released any day now). It takes all the same lenses. The sensor and many other specs are identical but it is smaller and lighter and may well be a wiser choice for you. Take a close look, see what you think.


I am excited to get home tonight and look at the images I have. Let’s hope they live up to my expectations.

(Added the day after) I have now had a chance to look at my images. first things first. I need to work on my skills as a street photographer!  I can see I missed some opportunities, sometimes by a fraction of a second. I am going to have to concentrate harder when doing this type of photography. I also have some images I am moderately happy with, especially as this was my first day out with a new camera I was totally unfamiliar with.

I have put a few images from the day into this post. Most were shot with the 18-55 lens, wide open although a few towards the end of the day were shot with the 35mm. I wish in hindsight I had used the 35mm more. I. Used this wide open too. Most of the images were shot at ISO1600. The day was dull and I wanted to ensure a decent shutter speed. I ignored the histogram, this is not landscape photography (as long as I wasn’t clipping the highlights). I just let Aperture Priority do it’s job for me. I have not run any noise reduction on these files, just tweaked them a little in Lightroom, and I have not sharpened the files either. I wanted to show them more as the camera produced them.

So, that’s my initial thoughts. No doubt, I’ll have more to say as I get used tot he camera. I have another day out with it next week on the south coast. A different environment and a different style of shooting to look forward to.


A BIG thank you to Tim Allen ( http://www.timallenphoto.co.uk/ ) for organising the day and our walking route and to both Tim and Valda Bailey ( www.valdabailey.co.uk ) for being such good company on this day out in London. I am sure their images will be way better than mine.

How do I create Panoramas?

Panoramas

Before getting in to answering this question I just wanted to mention I am running a “Capture-to-Computer” workshop in Skegness, Lincolnshire on Saturday 21st January 2012. One place is taken but there is one free place left. The basis of the workshop is creative and artistic photography – blur, ICM (Intentional Camera Movement) and textures. The morning will be spent with me showing you the techniques for shooting this style of image and then after a meal (included) I will spend the second half of the workshop showing you how to process these images in Lightroom and Photoshop. If you would like to book the second place the price is £149. Please drop me a message and I will organise it for you. Right, now on with the business of making panoramas!

I love panoramic images and with modern digital cameras and software they are easy to make. I find myself rejecting the use of super wide lenses in favour of making panoramas more and more in my photography. I am not keen on the heavy distortion that comes with the super wides and the converging verticals they create. With a panorama I can get in even more width and maintain a natural looking image with far less distortion.

You can by purpose made panoramic tripod heads, such as the Panosaurus, which are designed to rotate the camera on the ‘nodal point’. If the camera is rotated while held on this point and kept absolutely level will allow it to create almost perfect panoramas with little distortion and a very natural look. However the heads are expensive and you either have to have them fitted to a dedicated tripod or be prepared to switch heads in the field, and few of us are that dedicated or have the backpack space to carry two tripod heads.

There are two very acceptable alternatives which are ideal for most of us and I use both in my image making. I will cover both methods here. You can use a tilt and shift lens (the expensive but easier option) or you can use a standard prime or zoom lens. Both require stitching images together in software and both produce great images if done carefully.

So, if you want to make high quality panoramas, how should you go about it? The first step is to get your tripod as level as possible and make sure the camera is as level as possible on the head. This is far better than angling the camera slightly upwards or downwards. The more our of level the tripod and camera are, the more distorted the final image and the area you will need to crop away from the edges of the pano will be larger. I use the small round level bubble on the top of my tripod below the head to level the tripod itself. This can be fiddly as you need to tweak the leg lengths to get it right but it is worth doing. I then level the camera on the head using my hotshot spirit level.

Next is getting the settings in the camera right before you start shooting. It is critical that nothing changes between shots or you will not be able to seamlessly stitch the image. Turn off auto focusing on your lens so the focus point does not change between shots. Switch the white balance to daylight so it doesn’t alter between shots. Zoom out further than you want to to allow for cropping the stitched image which you will have to do to a greater or lesser extent. Don’t frame the image as you want it to finally appear as some of the edges will be lost. Start the panorama further to the left or right than you want to for the same reason. I use the camera in portrait orientation for panoramas to give a larger file size and more depth for cropping (unless I am using a tilt and shift lens, but I will come to that later).

Working in aperture priority or manual, choose one area of the pano to set your exposure and focus. The exposure is often the tricky part, especially around dawn and dusk or when the scene has high contrast. I tend to aim to set my exposure based on the area of the pano which is almost the brightest. I take a test shot to get the histogram across to the right. You have to accept then, that as the camera moves to wares the darker area of the pano it will begin to under expose but we can tweak this later in the software to balance the image. I set my neutral density graduated filters for the same frame as the one I use to set the exposure. You have to accept that as you take the other frames the positioning of the grad may not be quite perfect, especially if the land rises or falls across the width of the range of shots but it will look worse if you try and move the grad up and down for each image. (I prefer to use soft grads for panos to make the transition line less obvious).Do not use a polarising filter when doing panos as this will cause havoc with the look of each frame and you won’t be able to stitch the images acceptably. Focus hyper focally or on a point very close to the base of the frame. I usually use f16 for panoramas to give a bit more latitude on depth of field, whereas in my other landscape work I am usually trying to get the aperture to f13 or f11.

Once you are all set up rotate the camera to the left or right hand end of the pano sequence. Remember go further left, or right, than you want to include in the final image you have in mind. I then take a single shot with my hand in front of the lens with my thumb up. This tells me the next image is the start of a pano sequence. Once I have taken the final shot in the sequence I take another with my thumb down. This indicates the end of a sequence. Believe me, you will be pleased you did when you get home as it can be hard to tell which images are for panos.

Take the first shot and then rotate the camera for the next as quickly as possible. The absolutely critical thing to remember is to overlap each frame by at least 30%. It is better to overlap by 50% than to go lower than 30%. The more data and overlap Photoshop has to work with the better the quality of the panorama you will get. The reason for working quickly during the sequence shooting is to minimise movement of objects in the pano. Anything moving makes it harder for the software to do the stitch, so scudding clouds, branches of trees blowing in the wind and so on can cause issues.

Don’t forget, panoramas don’t have to be horizontal. For a really different type of image use the same system but shoot vertically. Vertical panoramas look great on the wall.

Back at home on the computer there is some very specific things you can do to make the panorama stitching go well. I use Lightroom to work on my raw files so the screenshots below will show that, along with Photoshop for the stitching but Elements works in just the same way although the menu items might be in slightly different places. You can also get specific panorama stitching software but I have never used this so can’t comment on it.

Import the raw files into Lightroom. Do not allow the import dialog box to apply any changes to the images on import such as adjusting white balance or applying some preset as this will make stitching difficult or impossible to do seamlessly. It is vital you don’t do any work on them whatsoever before they are stitched. Find the sequence of images and shift click to elect them (this is when the thumbs up and thumbs down shots are a big help, but obviously don’t include them in the stitch!). Right click the selected images and select Edit in >> Merge to panorama in Photoshop. (see screenshot below)


This will open Photoshop (or Elements) with the following dialog box open


On the left hand side select the Auto  radio button and in the centre area of the window you will see the list of raw files you are using. Click OK. Now just leave Photoshop to do its thing. It will take a while depending on how many raw files you are stitching and how fast your computer is. On slower machines you will have tome to go and make coffee :).

Once stitched the image will look something like this;

Now you can see why cropping is required. In the layers panel you can see how Photoshop has stacked the three images and then masked them to achieve the stitch. The next step is to flatten the layers and then crop the image to the panoramic shape, losing all of the irregular edges. I then save this image as a tiff (or psd, if you prefer) and take it back into Lightroom. Now you can start making adjustments to the exposure, contrast, clarity and so on because now it will be across the whole image and will look right.

Once you have made the adjustments you want in Lightroom, move the image back to Photoshop for any final tweaks and adjustments there, and you are done.

The process is identical with Tilt and Shift lenses, with a few differences. Firstly, when doing horizontal panos you keep the camera in Landscape orientation. You make the sequence of images by using the shift mechanism and make three images, one shifted all the way to the left, one in the centre position and the final one shifted all the way to the right. All the information above about levelling and camera settings still apply and the stitching process is identical, you just need the three shots. The advantage of this method is the overlap the TSE lens produces is way beyond 30% so the stitch works well and the amount that needs to be cropped away is usually less as the lens tends to give a clean stitch if the tripod and camera have been set level.


So, why not have a go next time you are out with your camera. They are great fun to make and can be quite addictive. Enjoy!


Free downloadable long exposure calculator chart

I have just put on the downloads page of my website a free pdf long exposure calculator chart

Just download it, print and laminate it for use in the field.

I hope you find it helpful.

I plan to add some other free downloads so please sign up for my email newsletter for advanced notice of these – just use the form on the right hand side of this page.

if you have any ideas for useful downloads, please drop me a message using the ‘Contact Me’ form on the right.