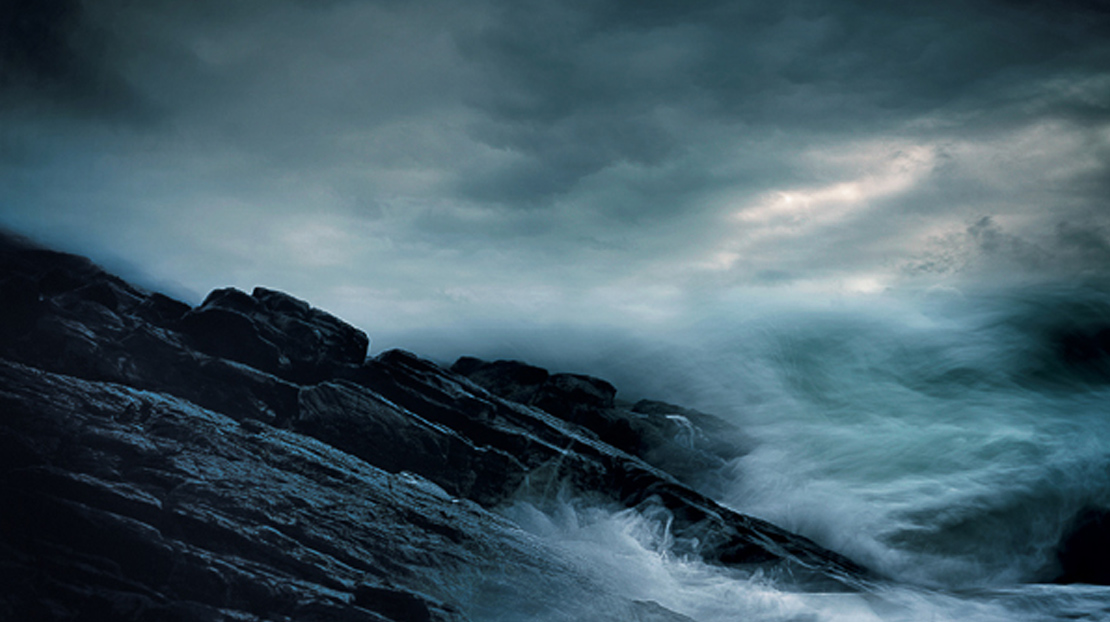

"David Bakers - "Sea Fever" Cover
David Baker, or Milouvision as many of his online followers will know him, has been photographing and blogging for years (www.milouvision.com). Building his following and honing his skills with the camera, he has risen to real prominence over the last couple of years, first winning Outdoor Photography magazines “Outdoor Photographer of the Year 2012” title, followed by three successful exhibitions and the 2012 Landscape Photographer of the Year “Your View” category winner, culminating now in the publication of his first book, “Sea Fever”.
Published by Triplekite Publishing, Sea Fever is a collection of 26 of Davids stunning signature coastal wave images.
So, what are you to expect when you receive your copy of “Sea Fever”?
The first thing that will strike you is the stunning cover image, a taste of things to come. The image is one which was on display at the Masters of Vision exhibition at Southwell Minster ( http://mastersofvision.co.uk/david-baker/ ) this summer and it is a fitting image to lead us into the book. An image full of power and drama.

Inside, the foreword has been written in a beautiful alliterative style by accomplished landscape photographer, Pete Bridgwood. To quote Pete as he describes how David approaches his image making of the sea,
“He has a rare ability; to completely concentrate his creativity, to focus his intentions and develop a deep relationship with his subject…. it is immediately evident that this is no dalliance, no brief fling; this is an aching, impassioned love affair”
This gives an idea of the intensity and depth of the images that reveal themselves as we turn the pages. David also gives a brief introduction to his approach to making the series of images.

The book is printed in portrait format, an unusual choice for a book based mainly around landscape orientation images. However, the images that are shot in portrait orientation display well and then many of the landscape orientation images are displayed (by Dav Thomas, who has done a great job with the layout and design of the book) spread across two pages, often bleeding off of the edges to give the greatest impact. Others are often given wide margins, lots of ‘breathing room’ and this is pleasing to the eye. The fact that Triplekite have decided on such a generous page size means this all works well. Nothing feels cramped or stifled in any way. The images are the stars.
Davids “Sea Fever” images captured the imaginations of lovers of seascapes as soon as they began to appear. (and I have already seen a few ‘Sea Fever’ wannabes imitating the style! I suppose imitation is the sincerest form of flattery?). They have a power and transcendent beauty which seems to connect with all who have a love (and respect for) the sea. By slowing the shutter just a little he retains enough detail in the waves to show the power, movement and flow of the waves while softening the effect and merging the waves into the sky. There is no real, defined horizon in his images – they become almost ‘as one’. In fact, the skies are not playing ‘second fiddle’ to the waves but enhance and complement them perfectly, almost becoming part of the waves themselves.

Every image in the book is just beautiful. Some are full of stormy ominous power, others gentle light and gracious delicacy. There is not a weak image in the portfolio and I would love to have any of these on my walls at home. Each has a mesmerising quality to hold our interest for many years.

I had the opportunity to interview David a few days ago about the book and his work and thought you might enjoy his comments.
D: First of all, let me congratulate you on the publication of your first book, “Sea Fever”, I have seen an advance pdf copy and it looks stunning. How did you feel when you first saw the design?
DB: Many thanks! Yes, a great feeling to see the flow of images due to Dav’s design skills.
D: How did the book project come about?
DB: I was fortunate to be one of the exhibitors at Masters of Vision which opened in late July 2013 and during that weekend I met David Breen (Triplekite Publishing) and Dav Thomas. I knew of David’s photographic work and of course of Dav’s book. In early August David emailed suggesting a book based on the Sea Fever project part of which had been exhibited at MoV. A really good day!
D: How did you decide to focus on such a tight project as “Sea Fever”? Was it more difficult, do you think, than doing a retrospective on your work, or would that have been harder?
DB: I’ve held previous exhibitions which have been a selection of my favourite images and at the time of MoV I had just completed a show of the Ridge Trees project and was in the midst of Sea Fever so it seemed natural to show what I was passionate about.
D: How did you find the process of selecting the images for the book? Was the choice difficult? How did you go about narrowing down the selection?
DB: There wasn’t a huge selection anyway as I’m a ruthless editor. But for the book I provided the required number plus an extra 25% I think and then Dav undertook the skilful design.
D: Without giving away too many secrets can you give us an idea of how you make the “Sea Fever” style images? What kit do you use? Shutter speed etc?
DB: I experiment with a variety of shutter speeds and focal lengths whilst trying to look for relationships between the waves and ideally clouds. I aim to have at least a line of foreground or central wave across the frame. I try to take a painterly approach if that makes sense as I want the images to say this is how it feels to be at the shoreline with the battering wind full of salt, the spray, the thump of the waves, the sense of vulnerability. How can an hour at the shore be captured in an image?

D: How long have you been working on the “Sea Fever” project? How long did it take to perfect the style of the images?
DB: I was in the Outer Hebrides in March 2012. During my previous trip in February 2008, I had taken mostly long exposure shots (as during this time the B+W 10 stop filter featured in many a photoblogger’s work) but during March not one long exposure shot was made. Feeling a little ‘unsettled’ I started taking shots during the closing days of the trip to capture the sea’s power in a way I had not undertaken before.
The first image, Hebridean Sea III, was uploaded to my photoblog in late April 2012 and that was that. Nothing happened in terms of development of the project until August of that year when another image was processed. I hadn’t realised I had a potential project but something must have been percolating away as in March 2013 onwards I started experimenting in acquiring images to compliment Hebridean Sea III.
D: Do you like working on projects? Or do you prefer more random ways of working? If you prefer project working, what benefits do you see working that way?
DB: It’s only during the past couple of years that a project based approach has been developed. I worked up one called Ridge Trees which concentrated on the New Forest and was defined by three attributes – dawn, mist and geography. Whilst the structure of a project is appreciated, I’m not restricted to just that type of work.
D: Why the sea? What draws you to photographing it so intensely?
DB: Good question! I usually mumble something about energy, and change. It’s not something that I’ve nailed down yet, and I’m not sure I want to. I’m not a great deconstructor (in an image sense) although I written a little about this aspect in the book.
D: Have you always been interested in photography? What is your photographic ‘history’?
DB: At 15 I wanted to be an architect. My dad had introduced me to an architect client and despite the then (1978) 33% unemployment in the industry, I was keen on pursuing architecture as a career. Despite good grades, events didn’t entirely pan out as planned, and after dithering about a course at Salisbury Art College and flirting with a technical drawing apprenticeship, I joined the Civil Service. It’s fair to say that there’s been little creativity work-wise since. I’ve always had a great love of art (especially sculpture) so I guess the creative ‘urge’ has always been there albeit mostly dormant.
I started using a small compact digital camera in about 2003/04 documenting visits to stone circles, dolmens and standing stones. A friend subsequently talked about his new digital SLR and suggested that I also buy one, so in January 2005, trying to engage a creative aspect of myself, I also bought a 300D.
From a technical aspect, almost immediately I wondered what I had let myself in for. I started reading magazines, books (fortunately Southampton has an excellent library) and looking at other images in various exhibitions and photoblogs. In the spring of 2005, I began posting images on a web forum and as a consequence a photoblog was started in late 2005.
Why photography? It was accessible and there was an immense amount of support and inspiration from the photoblog community.

D: Who would you say was your first inspiration in photography? And who do you find inspirational now?
DB: Just after I started using a SLR, I saw a photograph in Outdoor Photography of a Hampshire beach at sunset by Guy Edwardes and the sea looked fantastic drawn over the shingle beach. The wave trails looked ethereal and a week or so later I attempted the same and that was that, I was caught and I’ve been a seascaper ever since. Current inspiration is from a wide variety of sources.
D: What does photography do for you? What do you get out of it that drives you to pursue it as a passion?
DB: I guess it’s the conduit for a creative aspect that must be present in myself.
D: Have you ever hit a creative block? If so, how do you get over it?
DB: I get very keen on my work and then very disappointed by it very rapidly. I then go off to make more images. And then the process starts again.
D: What camera equipment do you currently use?
DB: 5D2, 24-70 and 70-300 lenses, Lee filters, Gitzo tripod and a RRS ballhead. The camera, lenses and filters all fit in a Billingham bag. There’s no need to march huge distances for my work, and I’m (hopefully) finished with the days of rucksack wrestling against a rapidly incoming tide.
D: Is there a piece of kit you really couldn’t live without? A favourite piece of equipment?
DB: For years I used the Canon 17-40. Everything was at 17mm and hang the consequences. That used to be nailed to my 300D and then to the 5D. Now, I think the 70-300 zoom is used significantly more than ever. Almost everything is on the tripod too.
D: Is there any piece of equipment you lust after and would love to own?
DB: I was considering the Gitzo Ocean tripod.
D: I know you are a keen and active photoblogger and Twitter user. Why do you love photoblogging? What do you enjoy about Twitter and the photographic community on there?
DB: The immense amount of support and inspiration from the community plus the free exchange of ideas, links to work, exhibitions, and the occasional meet-up.
D: Would you describe yourself as a “Landscape/seascape Photographer” or do you enjoy other genres of photography?
DB: I’m a seascape/forest photographer really. I really like looking at the landscape big views plus the more intimate landscape compositions and also the very experimental ones. I also really like looking at street work (especially if there’s humour present).
D: What advice would you give to young or new photographers to help them make progress with their passion?
DB: Believe in the value of your talent and your images. Experiment, and have fun. If considering a project, make sure it’s personal to you, and choose a subject which will allow access to create the images you want. Think about the story and how the work will be shown – book, exhibition or blog.
D: What software do you use to process your images? Does much work go into processing the “Sea Fever” images?
DB: For ages (and ages…), I used RawShooter Essentials (which became Lightroom I think) as I loved the ease of use, and the mono images it could produce. During the last year I’ve used Canon DPP for the Raw files. I make no corrections in DPP aside from using the lens profiles and the auto-dust correction (the principal reason for moving from RSE). Everything else in undertaken in PS, and I use Bridge as a catalogue.
D: What is the URL of your website so readers can have a look at your work?
DB: milouvision.com (although some project highlights are also at dbphotographic.com).
D: So, finally David, what next? More “Sea Fever” images or is the project complete? Do you have other projects on the go? Any other plans?
DB: I’m not sure at present. It took a few Ridge Trees and Sea Fever images to realise I had the makings of a project so I’m sure something will present itself soon.

The soft back book itself is outsized at 410mm x 305mm and is being printed in Malta by the same high quality printers who printed Dav Thomas’s acclaimed “With Trees” book. The paper used for this book is 170 gsm Valletta Silk and it is being printed using the same Sublima 240 lps screen process as with Dav’s book which yielded spectacular print quality.
There will be two versions. For the serious collector there is a very limited edition of 50 which will be individually signed and numbered by David and comes complete with limited edition A3 print for £85. The standard edition is £25. The price excludes P&P of £8.50 (UK) or £23.50 (International). You can pre-order your copy HERE.

The attention to detail and print quality achieved for Dav’s book by Triplekite must inspire confidence that “Sea Fever” will look stunning when it arrives. (this review is based on seeing an advanced pdf copy, not a full print copy). David Breen and Dav Thomas seem to have started the company as they mean to continue. The fact they are both keen photographers first and have a passion for photography is reflected in the way they are putting the images ahead of profit. So many photography books are churned out by large publishing houses and treated much the same as cookery books and other books with pictures in. Often the paper and print quality is disappointing and doesn’t reflect well on the photographer whose work is often outstanding when seen in the flesh. With Triplekite the quality of the images comes first above everything, so the paper and print process choice has to be able to display the images at their very best. Attention to detail is seen at every step of the process, from the selection of the photographer and the images, to Dav’s design and layout right through printing and even into the packaging. It is a refreshing change to see a publisher who seems to care more about the photography than the bottom line.
I have a feeling many photographers around the world are going to beating down Triplekites door asking to be considered for their next book. But I also know Triplekite are putting their customers first by being very selective in those photographers work they choose to publish. Triplekite seem to have a tight focus on exactly where they are going with future publications to hold true to their vision for the company. This can be seen in the latest announcements that the next two “Portfolio” books will be by the wonderful Paul Kenny and Marc Wilson respectively. They have also announced a third series of books entitles “Land|Sea”, each of which will feature a small portfolio of work by five photographers carefully selected and which will build into a collectible library of great landscape work. 2014 Looks to be an exciting year for lovers of fine photography.

“Sea Fever” is the first in Triplekites new innovative “Portfolio” series, designed to be project based. Being focused on such a tight project with all of the images shot in a very similar style and with a common technique some may find they desire a greater variety of images, but that is not the purpose of this type of book. Its focus is its asset and it is a great example of how, as photographers, our work can get so much stronger if we focus on a tight themed project. While smaller and lower in cost, it will still adhere to Triplekites philosophy of making the images shine through large page sizes and superb print quality. These books are an ideal way to showcase the talent and work of some of the Worlds finest photographers. I can see the series becoming very collectable.
I, for one, pre-ordered the book as soon as I heard it was to feature Davids “Sea Fever” series and look forward to getting my signed copy and print. Having now seen the pdf proof I am even more excited. A firm delivery date is yet to be announced but is expected to be around mid to late November.
For lovers of fine land and seascape photography and especially if you love really fine photography books this is another ‘must-have’ (and what a great gift, even for non-photographers) from Triplekite. Order your copy HERE