Tag: lessons

New Exhibition of My Work

Dark Light

New Exhibition - "Dark Light"


I have been to Gainsborough today to hang my new solo exhibition entitled, “Dark Light”

It is being hosted at the Trinity Arts Centre in Gainsborough and is an exhibition of monochrome photographs. The Arts Centre is a council run location dedicated to the promotion of the arts in North Lincolnshire. The gallery space doubles as a mingling and bar area outside the main theatre and so is ideally placed for people visiting for performances to browse the images. If you happen to live in or near Gainsborough I would love you to pop in and take a look, but please don’t make a special journey.

The exhibition consists of 16 images (it was planned for 22, but the gallery didn’t have enough hanging clips to put all of the images up, requiring an on the spot rejigging of my hanging plan – the joys of exhibiting!). Here are a few iPhone images from the venue to give you a feel for what it is like.

Trinity Arts Centre Gallery

Main Wall

Side Wall

The Curved Wall

Here is a quick montage of some of the images on display

Montage 1

Montage 2


If you would like to go and see the exhibition, the gallery is free of charge. Opening times are;

Monday – Closed

Tuesday – Closed

Wednesday – 10.30 – 3.30

Thursday – 10.30 – 3.30

Friday 10.30 – 3.30

Saturday – 9.30 – 2.30

Sunday – Closed

The gallery is also open for performances – see the Trinity Arts Centre web site or Facebook page for details.

The address is

Trinity Arts Centre

Trinity Street

Gainsborough

DN21 2AL

(There is a car park (free) at the back of the centre but its a bit tricky to find. Drive past the centre on your right and go a few more yards to the roundabout where the big Tescos is and turn right. The road bends around to the right as you go around the corner you will see a row of terraced houses ahead on your right. Immediately after them is the entrance to the car park).

If you ever get the chance to hold your own exhibition, what do you need to know?

The first thing is, don’t expect to make a lot of money from sales. Its a sad fact in the UK that most people don’t value photography as art and as a result are very reluctant to put their hands in their pockets to buy images. If you have tried selling prints from your website you have perhaps realised this. True, some do make a good amount of money from print sales but this is usually because they are a big name and their images are of the very finest available or their name alone makes the images collectable. In fact, expect to make a loss if you hold an exhibition. The costs to hold one are high. For a start, many galleries charge you a fee to exhibit, whether you sell or not. They also take a commission on any sales and this can be from 25% to 60% of the sale price. Now factor in your printing costs (whether home printed or outsourced), framing costs and your time getting it all printed and framed. You also have to make labels for each image (mounted on foamex board) as well as writing an artists statement, designing a poster and producing a price list. You have to drive to the venue and spend a few hours hanging the exhibition on your own, the gallery rarely help in this. Then drive home, perhaps drive back for an open evening (for which you provide drinks and nibbles) and drive home again. Then at the end of the exhibition drive back and take it all down and drive home again! You can see why it is difficult to make a true profit if you factor in all of the costs.

Before you exhibit you need to be clear about what the gallery provides and what they expect you to provide. Some of the better ones will provide the drinks and nibbles, for example. Most won’t. Many expect you to provide all of the packaging for any items sold. if people buy prints or framed prints you will probably be responsible for posting them to the buyers unless the buyer is willing to return to collect them.

You need to be clear on insurance. Some galleries provide a certain amount of insurance cover if works are stolen or damaged. Will this cover your work. If they don’t provide cover, you lose if anything happens to a picture or pictures.

Be clear with the gallery too, on what advertising they do for you. Do they have a website and will they use it to promote your exhibition? Do they use Twitter, Facebook etc. Do they have an emailing list and will they use it to mail their clientele? In reality, many galleries are poor at advertising on your behalf. They leave it all to you, so what is your ‘reach’ as regards advertising? Are you on social networking sites and if so are you suing them to promote the exhibition? Do you blog, use Twitter and have a mailing list? If not, who is going to know about the exhibition apart from your close friends? Do you have the gumption to ring the local newspaper and see if they will run a piece for you? Are you up for contacting the photography magazines to see if they will list your exhibition? This is all additional time you need to spend to make the exhibition a success while remembering you are still unlikely to sell any or many prints!

In smaller local exhibitions you are more likely to make sales if your images are of local scenes. Also seasonal scenes sell better, so if the bluebells are out bluebell images sell better, for example. More ‘arty’ and creative work has a lower chance of selling because it will appeal to a smaller audience, however will, perhaps, command a higher price.

This leads us to the age old question of what to charge. You can approach this one of two ways. Most people add up the cost of the paper, ink, frame and so on and then add a bit on top. This is called ‘cost plus’ pricing. If your frame, print etc costs you £25 and you charge £50 it sounds like a good 100% profit. But remember, the gallery will take a huge slice and you are unlikely to have factored in the true costs I have listed above. In reality, if you are charging any less than £100 or more you are making a crushing loss IN REALITY, whatever you are fooling yourself into thinking. The second method of pricing, is to view your work as art. This takes courage and also lessens your chances of selling anything! Here, you think less of the costs involved and place a figure on your work based on the fact you feel it has, and will increase in, value. You are thinking more like a painter or sculptor. So you may value prints at £250 or whatever. This is a brave photographer who takes this approach as sales become even further apart. Ask yourself, would you spend £100, £200 or more on a framed print from a photographer you have never heard of who is relatively low profile? No? Neither will they. Why? Because they think they can go to Ikea and get a very nice framed print for £20 and then when they redecorate they take it to a charity shop or car boot sale and buy another that fits with the new decor. The English do not value photographs as art in the way the Americans do.

So this all sounds very pessimistic. Why on earth exhibit? Good question. If you are in it just to make money, don’t. However, if you want to invest in your profile or want the world to see what you create and are prepared to take criticism as well as plaudits, it is a lovely thing to do. It does bring kudos and respect from fellow photographers. It is also a starting point. I am sure Charlie Waite, Joe Cornish & Michael Kenna went through these early loss making exhibitions. But because they were prepared to put themselves out there and make the investment in time and money gradually, and because they have real talent, they became more successful. Now Joe has his own, amazing, gallery (one of the few UK photographers who make a success of this) and images by photographers such as Charlie and Joe command good prices and have become collectable in their own right – they have broken the glass ceiling so it can be done. One day someone who runs a ‘better’ gallery may walk in and be impressed with your work and offer to represent you long term (this is the route Michael Kenna has taken – working with galleries for years who display and sell his images all year around as well as holding solo exhibitions on top of these). A publisher may see your work and ask you to do a book. A print manufacturer might be scouting for talent. If we don’t promote ourselves, even at a loss, we will never know. If we really want to make something of our images then we should view an exhibition as an investment in ourselves and go in with our eyes open. This saves us from disappointment.

I hope this helps you if you are considering exhibiting. I am not trying to dissuade you at all. I just want you to know what it is really like. If you accept this it can be a very fulfilling and positive experience and if we make some money too, so much the better.

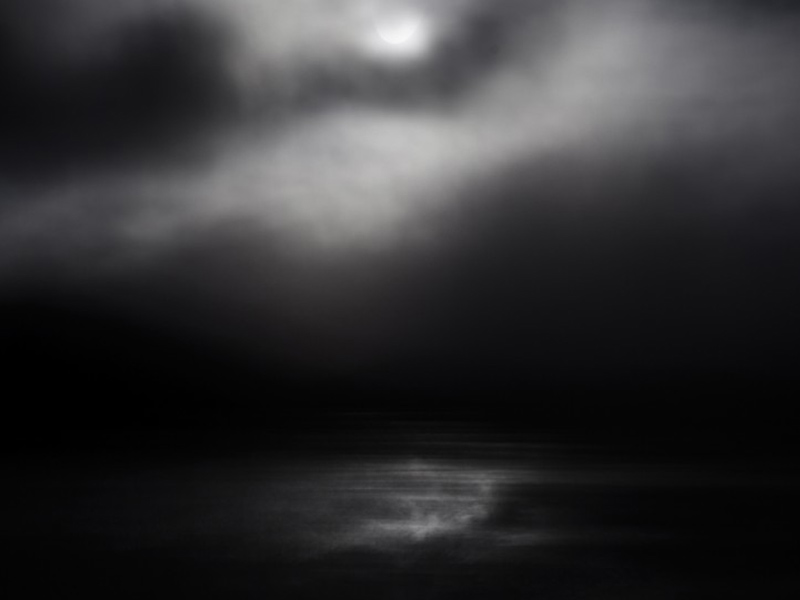
And to finish, heres another image you can see at the exhibition.

Thinking of Winter


New Farm Harvest Workshop

Those who subscribe to my newsletter know that I have been trying to organise an unusual workshop on a farm, of the potato harvest. Well, I am pleased to announce it is now on.

The farmer and his wife have been really helpful and we have been able to put a plan together for a small group to photograph the potato harvest – hopefully with stunning evening light. Apparently gulls follow the tractor as the potatoes are lifted and so the whole scene should be very photogenic. There may also be opportunities for unusual incidental images of things like potato boxes in the barns and farm buildings and so on. It sounds like there will be two tractors working, one is driven by the farmer actually lifting the crop, the other driven by his wife will be transporting the potatoes from the fields to the farm buildings. I have all sorts of images in mind we can try and get.
They are kindly arranging parking as close to the harvest fields as possible to reduce walking but please note the ground will be muddy and uneven so wellies or boots are required and anyone with mobility issues needs to take this into consideration when booking.
It is vital we do not encroach on the harvest, get in the way of farm machinery or impede the work in any way. I imagine we will be working from the field margins most of the time. I will give advice later on lens choice and more information on how things will work to those who book. You are, as with all of my workshops, responsible to organise your own insurance if you feel it is necessary. Our individual health and safety is our own responsibility and booking is an acceptance of this fact.
I have offered to pay a fee to contribute to the farm for each person joining us on this unique workshop and this is included in your fee. No meals or refreshments are included in this workshop but apparently there is a pub just a mile away which does serve food and snacks so it may be feasible to adjourn at some point to go and refresh ourselves -or to enjoy something there before or after the workshop.
The date will be Monday 19th September. We will meet at the farm to start at 2.30pm. Sunset is at 19:09 so I assume we will be finished by 19:30. This should give plenty of time and the best light on the day to get some memorable and unusual images. The farm is located near Lincoln. I can’t guarantee the weather, of course, but September is often lovely for landscapes.
I haven’t visited the farm myself and don’t know how ‘photogenic’ it is so will be approaching this as I do a commercial shoot where I often have to arrive without seeing the location advance and work ‘on the hoof’. It might be useful for you to see how I approach working out the best shooting positions and so on without prior knowledge of the place – a skill all commercial photographers need. There are pylons on the farm (as there is in much of Nottinghamshire and Lincolnshires farmland) so some work in PS might be needed, unless you like pylons – I will be showing how to frame images and use lenses to reduce their inclusion in shots.
Please also note I will be using my camera on this workshop to make my own images so I will not be quite as focused as I am on most of my other workshops on giving instruction. I will, of course, be happy to help you with your image making and will give as much time as I can to helping you, especially early on in the session so that yo are ready for later on, but as the light gets to its best or if the photo opportunities are good I will be shooting myself too and I just want you to be aware of this. Those who are closest to me in the fields will have the best chance of getting lots of help. I am reflecting this in the price of the workshop which is lower than my usual fee.
Oh, and one other thing. The farm is just half a mile from where the Red Arrows are based and they do practise over the farm. So, while they probably won’t put in an appearance, there is always a chance the will – so you never know the photographic opportunites might be amazing!
This is a rare chance to shoot a harvest at close range and get some great images of real farm life. I am really looking forward to it. Places are limited to 10 and I was deluged with interest so it may be wise to book early to avoid disappointment. Half the places have now gone. The fee, including a contribution to the farm will be £39 per person. This will be payable in full on booking.
I would like to thank in advance Mr & Mrs Marris for their kindness, cooperation and help in making this workshop possible.
if you would like to book please use the ‘CONTACT ME’ form on the right and I will organise it for you and remember your booking will not be secured until your fee is received.

Top ten tips for photographing seascapes

Landscape photographers love the chance to photograph the sea. We love the wide horizons, big skies and the magnification of the glorious light at dawn and dusk reflected in the water. To make the most of your trips to the coast here are some tips for making great seascape images.

1. Go prepared. Welly boots, while not glamorous, are the best footwear on the shore. They allow you to work in soft mud, lapping waves and rock pools without worrying about getting wet, cold feet. Neoprene lined wellies are more expensive but much more comfortable and warmer than cheaper brands. I have also found seawater rots the adhesives and stitching in modern walking boots. I had a pair of new boots fall apart after a trip to Skye due to me wading about in seawater for two weeks.

2. Check the tides in advance. Often the best time to make seascapes is with a falling tide at sunrise or sunset. The exposed rocks and sand will be wet from the receding tide which reflects the light in the sky and adds much more interest than a drier foreshore with an advancing high tide. To find the tide time for your location enter the name of the nearest harbour or port into Google along with the words ‘tide table BBC’. this will bring up a link for the generally reliable tide tables on the BBC website. If you don’t live in the UK just enter the nearest harbour name and the words’ tide table’ and you should get a link for your country. Being aware of the tide times also helps you be aware of not being cut off from the mainland by a fast rising high tide. Very easy, believe me, when you are engrossed in making images.

3. Check where and when in relation to the location the sun will rise and set to find the best time to visit that location. The best way to do this is to download ‘The Photographers Ephemeris’. This free software uses Google Earth and shows on the map exactly where the sun and moon rise and set in any location on the planet on any day. One of the best bits of software a landscape photographer can have on the computer. You will find it here. There is even a version for the iPhone.

4. Take a towel, lens cloth and lens cleaning fluid. You will find, even in quite calm conditions that your lens and filters start to get coated in salt while making images at the sea. This soon ruins images. Keep an eye on this and clean your glass regularly. I also have a golf towel clipped to my tripod for quickly drying off salt spray from the camera and for draping over the camera if the waves start to get high.

5. Wash you tripod legs in fresh water after a seascapes session. Tripods often get stood in seawater to get the perfect shot, and get coated in abrasive sand from beaches. To preserve your kit, wash it off well with fresh water after the shoot.

6. Get there early. I usually get my best seascapes 30, 45 minutes or more before the sun is due to rise. Trust me, that extra 20 minutes in bed is not worth missing the best light for.

7. Stay late. As with the preceding point, at the end of the day i often get my best images up to an hour after the sun has set. Don’t pack up and go home when the sun dips below the horizon – keep shooting.

8. Get the tripod down low. So often photographers fully extend the tripod legs so the camera is at head height for comfort or out of habit. Get down low for more interesting images with a different perspective.

9. Use ND filters. ND filters from 2 to 10 stops help lengthen exposures and create wonderful effects on moving water and clouds. The 10 stop filters, such as the Lee Filters ‘Big Stopper’ enable me to shoot great seascapes long after the best light has gone thus lengthening the shooting time on location. they also enable great images to be had in poor light and cloudy conditions.

10. Shoot details. it is easy to just shoot the wide seascape before you and to miss some of the beautiful ‘intimate landscapes’ of the shore. Rock patterns, seaweeds, shells and pebbles, patterns in the sand, beach furniture and buildings and so on.

I hope you have found these tips helpful. I would be interested in hearing from you if you have tips to add.

If you would like more help with improving your seascape photography, please use the form on the right to add your email address to my mailing list. You will get advanced notice of all of my future seascape and other workshops before they are announced elsewhere.